

Spring in Spain brings a vibrant burst of flavors and colors to the table. I’ve rounded up 12 fresh Spanish spring recipes that are perfect for the season. From a refreshing Andalusian gazpacho to a lively vegetable paella, each dish offers a light and clean taste that’s sure to delight. Explore zesty ensalada de bacalao and sweet fig and Manchego salad to add a touch of Spanish flair to your meals. There’s a whole array of delightful recipes waiting for you.
Classic Andalusian Gazpacho
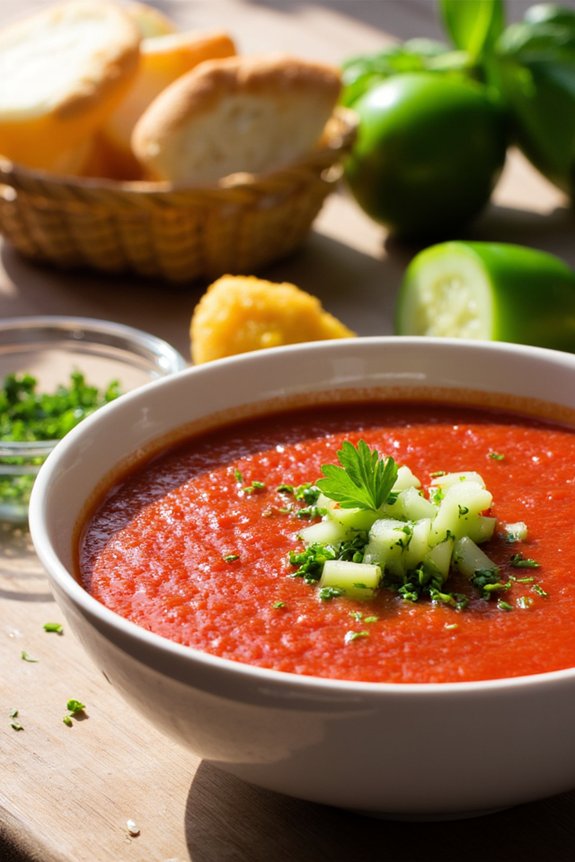
Gazpacho is a revitalizing cold soup originating from the Andalusian region of Spain. Perfect for hot spring and summer days, this dish combines ripe tomatoes, cucumbers, peppers, and garlic to create a vibrant and flavorful soup.
With a blend of fresh vegetables, olive oil, vinegar, and spices, Classic Andalusian Gazpacho is a healthy and delicious option for those looking to enjoy a taste of Spain.
This dish is incredibly simple to prepare and requires no cooking, making it a great choice for a quick and easy meal. Traditionally, gazpacho is served chilled, allowing the flavors to meld together for a satisfying and invigorating experience.
Whether served as an appetizer or a light main course, this gazpacho is sure to delight your taste buds.
Ingredients for 4-6 Servings:
- 2 pounds ripe tomatoes, cored and roughly chopped
- 1 cucumber, peeled and chopped
- 1 green bell pepper, seeded and chopped
- 1 small red onion, chopped
- 2 cloves garlic, peeled
- 3 tablespoons extra virgin olive oil
- 2 tablespoons red wine vinegar
- 1 teaspoon salt
- 1/2 teaspoon freshly ground black pepper
- 1 cup cold water
- Optional garnishes: diced cucumber, diced bell pepper, chopped fresh parsley, croutons
Cooking Instructions:
- Prepare the Vegetables: Begin by washing and preparing all your vegetables. Core the tomatoes, peel the cucumber, and seed the bell pepper. Chop the tomatoes, cucumber, bell pepper, and red onion into medium-sized pieces for easy blending.
- Blend the Ingredients: In a blender or food processor, combine the chopped tomatoes, cucumber, green bell pepper, red onion, and garlic cloves. Blend until smooth. If needed, do this in batches to avoid overfilling the blender.
- Add the Seasonings: Pour the blended mixture into a large mixing bowl. Stir in the olive oil, red wine vinegar, salt, and black pepper. Mix well until all ingredients are evenly distributed.
- Adjust the Consistency: Add cold water to the mixture to reach your desired soup consistency. Stir the soup well to guarantee the water is fully incorporated.
- Chill the Soup: Transfer the gazpacho to the refrigerator and let it chill for at least 2 hours. This allows the flavors to blend and the soup to reach the right invigorating temperature.
- Serve: Once chilled, taste the gazpacho and adjust seasoning if necessary. Serve in bowls, garnished with optional toppings like diced cucumber, bell pepper, fresh parsley, or croutons for added texture and flavor.
Extra Tips:
For the best flavor, use the ripest tomatoes you can find, as they’re the star of the dish.
It’s important to chill the gazpacho for a couple of hours before serving to allow the flavors to meld. If you prefer a smoother texture, strain the soup through a fine-mesh sieve to remove any remaining solids.
Additionally, gazpacho can be made a day ahead, which will enhance its flavor even more. Enjoy this dish as a revitalizing snack, appetizer, or light meal on warm days!
Refreshing Salmorejo Cordobés

Salmorejo Cordobés is a classic Spanish dish originating from the region of Córdoba. This chilled tomato and bread soup is the perfect invigorating meal to enjoy during the warmer months of spring. Its creamy texture is achieved by blending ripe tomatoes with stale bread, olive oil, garlic, and vinegar, creating a smooth and flavorful dish that’s both satisfying and light.
Traditionally, it’s garnished with hard-boiled eggs and jamón serrano, adding a delightful contrast in texture and taste.
The beauty of Salmorejo Cordobés lies in its simplicity and the quality of its ingredients. This dish highlights the fresh, robust flavors of the tomatoes and the richness of the olive oil, making it a staple in Spanish cuisine. It’s an excellent choice for a light lunch or as a starter for a more elaborate meal. Easy to prepare and bursting with flavor, Salmorejo Cordobés brings a taste of Spain to your table.
Ingredients (Serves 4-6):
- 1 kg ripe tomatoes
- 200 g stale bread (preferably white)
- 1 clove garlic
- 100 ml extra virgin olive oil
- 1-2 tablespoons sherry vinegar
- Salt to taste
- 3 hard-boiled eggs
- 100 g jamón serrano (cured Spanish ham)
Cooking Instructions:
1. Prepare the Ingredients:
Begin by washing the tomatoes thoroughly. Remove the cores and cut them into quarters. Peel the garlic clove and set it aside.
2. Soak the Bread:
Cut the stale bread into small pieces and place them in a bowl. Moisten the bread with a little water to soften it, but verify it doesn’t become too soggy.
3. Blend the Tomatoes:
In a blender, add the cut tomatoes and the peeled garlic clove. Blend on high speed until you achieve a smooth puree.
4. Combine with Bread:
Add the softened bread pieces to the tomato puree in the blender. Blend again until the mixture is well combined and smooth.
5. Incorporate Olive Oil and Vinegar:
With the blender running on low speed, slowly drizzle in the extra virgin olive oil to emulsify the mixture. Add the sherry vinegar and blend until fully incorporated. Season with salt to taste.
6. Chill the Soup:
Pour the salmorejo into a large bowl or container, cover, and refrigerate for at least 2 hours to allow the flavors to meld and the soup to chill thoroughly.
7. Prepare the Garnishes:
While the soup is chilling, peel the hard-boiled eggs and chop them into small pieces. Thinly slice or dice the jamón serrano.
8. Serve:
Once chilled, serve the salmorejo in bowls. Garnish each serving with a generous sprinkling of chopped hard-boiled eggs and jamón serrano.
Extra Tips:
For the best flavor and texture, use the ripest tomatoes you can find as they’ll enhance the sweetness and natural acidity of the salmorejo. If you prefer a smoother texture, strain the blended tomato mixture before adding the bread.
Additionally, adjust the amount of vinegar to suit your taste preference, as some may prefer a more pronounced tang. Finally, if jamón serrano isn’t available, you can substitute it with prosciutto or another type of cured ham.
Spring Vegetable Paella
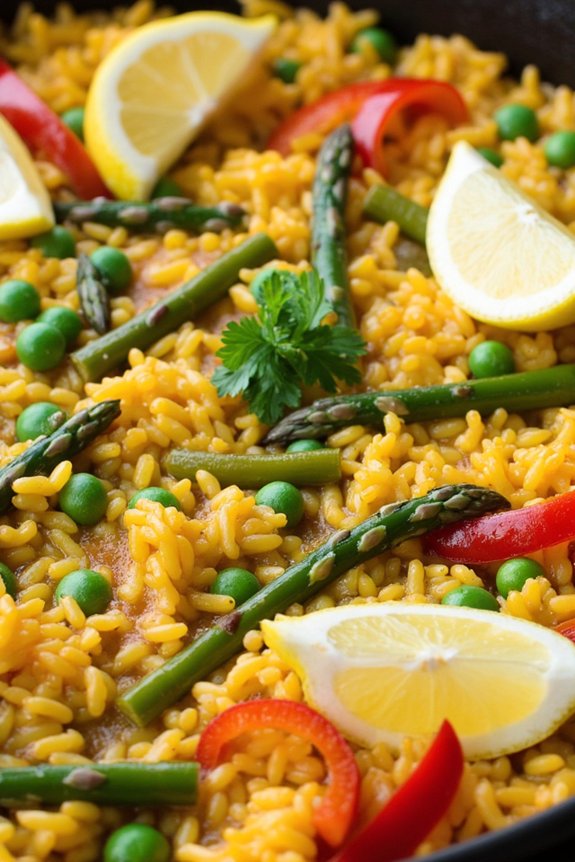
Spring Vegetable Paella is a delightful and vibrant dish that captures the essence of the season. With a medley of fresh vegetables and aromatic spices, this paella offers a lighter, vegetarian twist on the classic Spanish dish, perfect for springtime gatherings or family meals. The combination of colorful vegetables such as bell peppers, peas, and asparagus, with saffron-infused rice, delivers a mouthwatering experience that balances flavors and textures beautifully.
Cooking a Spring Vegetable Paella not only provides a nutritious and tasty meal but also offers an opportunity to celebrate the bounty of spring produce. This recipe is designed to serve 4-6 people, making it an ideal choice for a family dinner or a festive occasion. The preparation is straightforward, allowing even novice cooks to enjoy the process and create a dish that’s as pleasing to the eye as it’s to the palate.
Ingredients for 4-6 servings:
- 2 tablespoons olive oil
- 1 onion, finely chopped
- 2 cloves garlic, minced
- 1 red bell pepper, sliced
- 1 yellow bell pepper, sliced
- 1 cup peas (fresh or frozen)
- 1 cup asparagus, cut into 1-inch pieces
- 2 cups Arborio or Bomba rice
- 4 cups vegetable broth
- 1/2 teaspoon saffron threads
- 1 teaspoon smoked paprika
- Salt and pepper to taste
- 1 lemon, cut into wedges
- Fresh parsley, chopped for garnish
Cooking Instructions:
- Prepare the Saffron Infusion: Begin by heating the vegetable broth in a saucepan over low heat. Add the saffron threads and let them steep while you prepare the other ingredients. This will infuse the broth with a beautiful color and aroma.
- Sauté the Aromatics: In a large paella pan or wide skillet, heat the olive oil over medium heat. Add the chopped onion and garlic, and sauté until the onion becomes translucent, about 3-4 minutes.
- Add the Vegetables: Stir in the sliced bell peppers, asparagus, and peas. Cook for another 5-7 minutes, stirring occasionally, until the vegetables begin to soften.
- Toast the Rice: Add the Arborio or Bomba rice to the pan, stirring well to coat the grains with the oil and vegetable mixture. Cook for 2-3 minutes, allowing the rice to toast slightly.
- Incorporate the Broth and Seasonings: Pour the saffron-infused vegetable broth into the pan, ensuring the rice is evenly distributed. Sprinkle the smoked paprika, salt, and pepper over the mixture. Stir gently to combine.
- Simmer and Cook: Increase the heat to bring the mixture to a gentle boil, then reduce to a simmer. Allow the paella to cook uncovered for about 20-25 minutes, or until the rice is tender and has absorbed most of the liquid.
- Rest and Garnish: Once cooked, remove the pan from the heat and let the paella rest for 5 minutes. This helps the flavors meld together. Garnish with fresh parsley and lemon wedges before serving.
Extra Tips:
When making paella, it’s important not to stir the rice once the broth has been added, as this helps form the coveted “socarrat” – the crispy, caramelized layer at the bottom of the pan.
If you don’t have a paella pan, a wide, shallow skillet works well as a substitute. Feel free to experiment with other seasonal vegetables or add your favorite ones to customize the dish further.
Always taste and adjust the seasoning to your preference, and remember, the quality of the saffron can greatly influence the dish’s overall flavor and aroma.
Spanish Tortilla With Asparagus

Spanish Tortilla With Asparagus is a delightful springtime dish that celebrates the vibrant flavors of fresh asparagus paired with the classic Spanish tortilla. This dish is perfect for brunch, lunch, or even a light dinner, offering a satisfying blend of creamy eggs, tender potatoes, and crisp asparagus. The combination of these ingredients creates a dish that’s both hearty and invigorating, capturing the essence of spring with every bite.
The Spanish Tortilla With Asparagus is a versatile dish that can be served warm or at room temperature, making it an excellent choice for picnics or gatherings. The key to a successful tortilla is achieving the right balance between the eggs, potatoes, and asparagus, guaranteeing that each ingredient complements the others. With a few simple steps, you can create this delicious and visually appealing dish that will impress your family and friends with its authentic Spanish flavors.
Ingredients (serves 4-6):
- 6 large eggs
- 2 medium-sized potatoes
- 1 bunch of asparagus (around 1 lb)
- 1 medium onion
- 3 tablespoons olive oil
- Salt and pepper to taste
Cooking Instructions:
- Prepare the Ingredients: Begin by peeling and thinly slicing the potatoes. Trim the woody ends of the asparagus and cut them into 1-inch pieces. Finely chop the onion.
- Cook the Potatoes and Onion: Heat 2 tablespoons of olive oil in a non-stick skillet over medium heat. Add the sliced potatoes and chopped onion, and cook them for about 10-12 minutes, stirring occasionally, until the potatoes are tender but not browned.
- Blanch the Asparagus: While the potatoes and onion are cooking, bring a pot of salted water to a boil. Add the asparagus pieces and blanch them for 2-3 minutes until they’re bright green and tender-crisp. Drain and set aside.
- Combine Ingredients: In a large bowl, beat the eggs and season with salt and pepper. Gently fold in the cooked potatoes, onion, and blanched asparagus, ensuring everything is evenly coated with the egg mixture.
- Cook the Tortilla: Wipe the skillet clean and add the remaining tablespoon of olive oil. Pour the egg mixture into the skillet and cook over medium-low heat. As the mixture begins to set, gently lift the edges with a spatula to allow uncooked egg to flow underneath. Cook for about 10-12 minutes until the bottom is set and lightly golden.
- Flip the Tortilla: To flip the tortilla, place a large plate over the skillet and carefully invert the skillet so the tortilla transfers onto the plate. Slide the tortilla back into the skillet to cook the other side for an additional 5-6 minutes until fully set and cooked through.
- Serve: Once cooked, slide the tortilla onto a serving platter, let it cool slightly, and then slice it into wedges. Serve warm or at room temperature.
Extra Tips:
For a more flavorful tortilla, consider adding a pinch of smoked paprika to the egg mixture or garnishing the finished dish with fresh herbs such as parsley or chives.
If you prefer a slightly thicker tortilla, use a smaller skillet to achieve more height. Be patient when cooking the tortilla on low heat to guarantee it cooks evenly without burning.
If you’re feeling adventurous, try adding other seasonal vegetables like peas or bell peppers to enhance the springtime essence of this classic dish.
Light and Zesty Ensalada De Bacalao
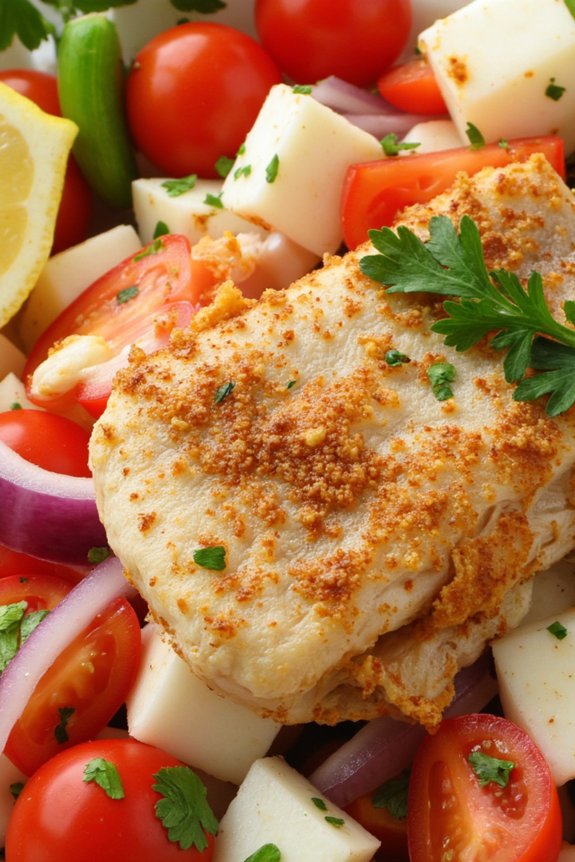
Light and Zesty Ensalada De Bacalao is a revitalizing Spanish dish that perfectly captures the essence of spring. This vibrant salad highlights the delicate flavors of bacalao, or salted cod, with an array of fresh, zesty ingredients. Traditionally enjoyed as a tapas or a light meal, Ensalada De Bacalao is a celebration of textures and tastes, combining the savory, umami-rich fish with the crispness of fresh vegetables and a tangy dressing.
This dish is perfect for those who seek a light yet satisfying meal that doesn’t compromise on flavor.
The preparation of Ensalada De Bacalao is straightforward, allowing the quality of each ingredient to shine through. The key to success with this dish is in the preparation of the bacalao itself, which needs to be desalinated before use. This process, combined with the freshness of tomatoes, peppers, and herbs, makes for a delightful plate that’s both nourishing and invigorating.
Whether you’re planning a spring picnic or a casual dinner at home, this salad is sure to impress with its simplicity and bold flavors.
Ingredients for 4-6 servings:
- 1 pound salted cod (bacalao)
- 1/4 cup extra virgin olive oil
- 2 tablespoons red wine vinegar
- 1 clove garlic, minced
- 1 teaspoon paprika
- 1 small red onion, thinly sliced
- 2 ripe tomatoes, diced
- 1 green bell pepper, diced
- 1 red bell pepper, diced
- 1/4 cup chopped fresh parsley
- Salt and pepper to taste
- Lemon wedges for serving
Instructions:
- Desalinate the Bacalao: Begin by soaking the salted cod in cold water for 24 to 48 hours, changing the water every 8 hours to remove excess salt. This step is essential to achieve the right balance of flavors in your salad.
- Prepare the Bacalao: Once desalinated, drain the cod and pat it dry with paper towels. Remove any skin or bones and shred the fish into bite-sized pieces.
- Make the Dressing: In a small bowl, whisk together the olive oil, red wine vinegar, minced garlic, and paprika until well combined. Set aside to allow the flavors to meld.
- Assemble the Salad: In a large bowl, combine the shredded bacalao, red onion, tomatoes, green and red bell peppers, and parsley. Pour the dressing over the mixture and toss gently to guarantee everything is well coated.
- Season and Serve: Taste the salad and add salt and pepper as needed. Be cautious with the salt, as the bacalao may still have some residual saltiness. Serve the salad chilled or at room temperature, accompanied by lemon wedges for an extra burst of revitalization.
Extra Tips:
When preparing Ensalada De Bacalao, verify that your bacalao is properly desalinated to avoid an overly salty dish. Freshness is key, so use the ripest tomatoes and crispest peppers you can find.
If you prefer a bit of heat, consider adding a pinch of crushed red pepper flakes to the dressing. This dish can be made a few hours in advance and stored in the refrigerator, allowing the flavors to develop further. Just be sure to bring it to room temperature before serving for the best taste experience.
Sautéed Garlic Shrimp With Lemon
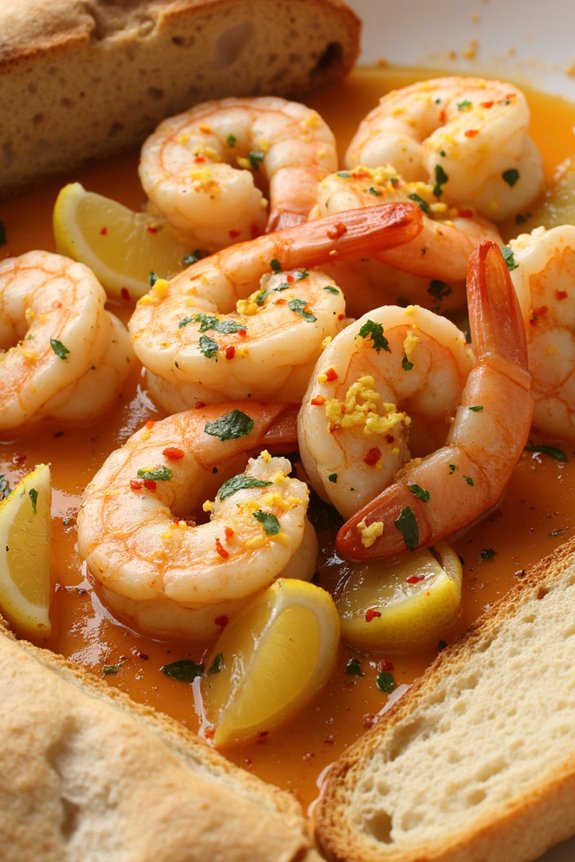
Sautéed Garlic Shrimp With Lemon is a delicious and vibrant Spanish dish that perfectly captures the essence of springtime dining. With its fresh and zesty flavors, this dish is ideal for a light lunch or as an appetizer to impress guests. The combination of garlic and lemon adds a burst of flavor to the tender shrimp, while a touch of chili provides a subtle kick.
This dish is quick to prepare, making it a wonderful option for those looking to enjoy a taste of Spain without spending hours in the kitchen. This recipe is simple yet elegant, allowing the quality of the ingredients to shine through. The key to achieving the best flavor is using fresh shrimp and high-quality olive oil.
The dish is typically served with crusty bread to soak up the delicious garlic-lemon sauce. Perfect for a spring gathering, this recipe serves 4-6 people, making it a great option for sharing with family and friends.
Ingredients:
- 1 kg (2.2 lbs) large shrimp, peeled and deveined
- 4 tablespoons olive oil
- 6 cloves garlic, thinly sliced
- 1 teaspoon red pepper flakes (optional)
- Juice of 2 lemons
- Zest of 1 lemon
- Salt and pepper to taste
- 2 tablespoons fresh parsley, chopped
- Crusty bread, for serving
Instructions:
- Prepare the Shrimp: Rinse the shrimp under cold running water and pat them dry with paper towels. Make sure they’re completely dry to guarantee even cooking.
- Heat the Oil: In a large skillet, heat the olive oil over medium heat. Once the oil is shimmering, add the sliced garlic and sauté until it becomes golden and fragrant, about 1-2 minutes. Be careful not to burn the garlic.
- Cook the Shrimp: Add the shrimp to the skillet in a single layer. Sprinkle the red pepper flakes, if using, over the shrimp. Cook for about 2-3 minutes on each side until the shrimp turn pink and opaque.
- Add Lemon and Seasonings: Squeeze the juice of the lemons over the shrimp and add the lemon zest. Season with salt and pepper to taste. Stir everything together, making sure the shrimp are well-coated with the garlic-lemon mixture.
- Finish and Serve: Remove the skillet from the heat and sprinkle the chopped parsley over the shrimp. Give it a final stir and transfer to a serving dish. Serve immediately with crusty bread to soak up the sauce.
Extra Tips:
For the best results, use fresh, high-quality shrimp and avoid overcooking them to maintain their tender texture. If fresh shrimp aren’t available, frozen shrimp can be used, but make sure they’re fully thawed and dried before cooking.
Adjust the amount of red pepper flakes according to your preference for spice. Additionally, you can garnish with extra lemon wedges for a fresh citrus burst. This dish pairs beautifully with a chilled glass of white wine, enhancing the flavors even more.
Roasted Red Pepper Tapenade
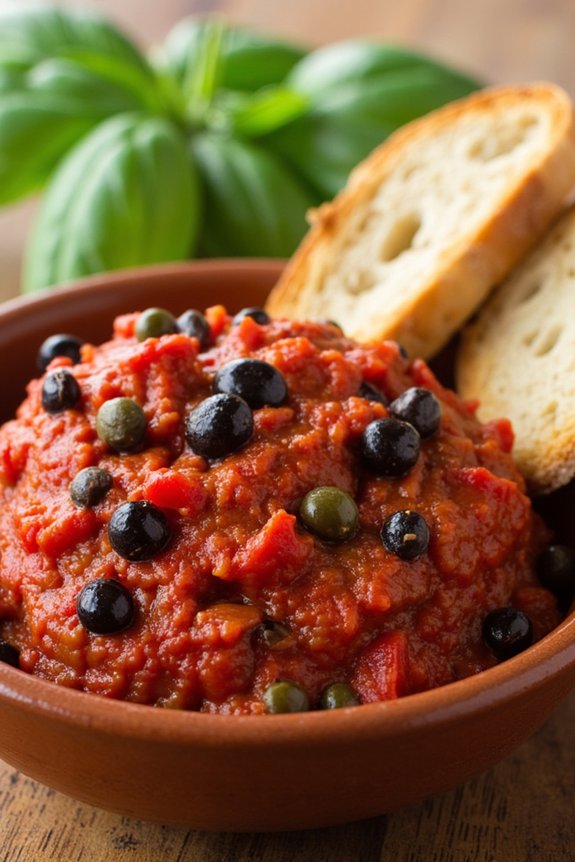
Roasted Red Pepper Tapenade is a vibrant and tasty Spanish dish perfect for welcoming the spring season. It’s made using roasted red peppers, olives, capers, and a few other flavorful ingredients, blended together to create a rich, savory spread.
This tapenade is a versatile appetizer that pairs beautifully with crusty bread, crackers, or as a complement to grilled meats and vegetables. Its bright color and bold flavors make it a delightful addition to any springtime gathering.
This recipe serves 4-6 people, making it ideal for a small gathering or family meal. The preparation of Roasted Red Pepper Tapenade is straightforward and doesn’t require much time, allowing you to enjoy more time with your guests. With the right balance of ingredients, this dish will bring a taste of Spain to your table, leaving your guests impressed and satisfied.
Ingredients:
- 4 large red bell peppers
- 1 cup pitted Kalamata olives
- 2 tablespoons capers, drained
- 2 cloves garlic, minced
- 3 tablespoons extra virgin olive oil
- 1 tablespoon lemon juice
- 1 teaspoon red wine vinegar
- 1/2 teaspoon smoked paprika
- Salt and pepper to taste
- Fresh basil leaves for garnish (optional)
Cooking Instructions:
- Roast the Peppers: Preheat your oven to 450°F (230°C). Place the red bell peppers on a baking sheet lined with aluminum foil. Roast in the oven for about 25-30 minutes, turning occasionally, until the skins are charred and blistered.
- Cool and Peel: Remove the peppers from the oven and place them in a bowl. Cover the bowl with a plate or plastic wrap to trap the steam. Let them cool for about 15 minutes. Once cooled, peel off the skins, remove the seeds, and chop the peppers into smaller pieces.
- Prepare the Tapenade: In a food processor, combine the roasted red peppers, Kalamata olives, capers, and minced garlic. Pulse until the mixture is roughly chopped.
- Add Seasonings: Add the olive oil, lemon juice, red wine vinegar, smoked paprika, salt, and pepper to the processor. Blend until the mixture reaches your desired consistency. You can leave it a bit chunky or blend it smooth, depending on your preference.
- Adjust and Serve: Taste the tapenade and adjust the seasoning if necessary. Transfer the tapenade to a serving bowl and garnish with fresh basil leaves if desired. Serve with slices of crusty bread or crackers.
Extra Tips:
For an enhanced smoky flavor, you can grill the peppers instead of roasting them in the oven. If you’re short on time, jarred roasted red peppers can be used as a substitute, though fresh roasting is recommended for the best taste.
Additionally, if you prefer a bit of heat, feel free to add a pinch of cayenne pepper or a dash of hot sauce to the mixture. This tapenade can be made a day ahead and stored in the refrigerator, allowing the flavors to meld together beautifully.
Grilled Artichokes With Romesco Sauce
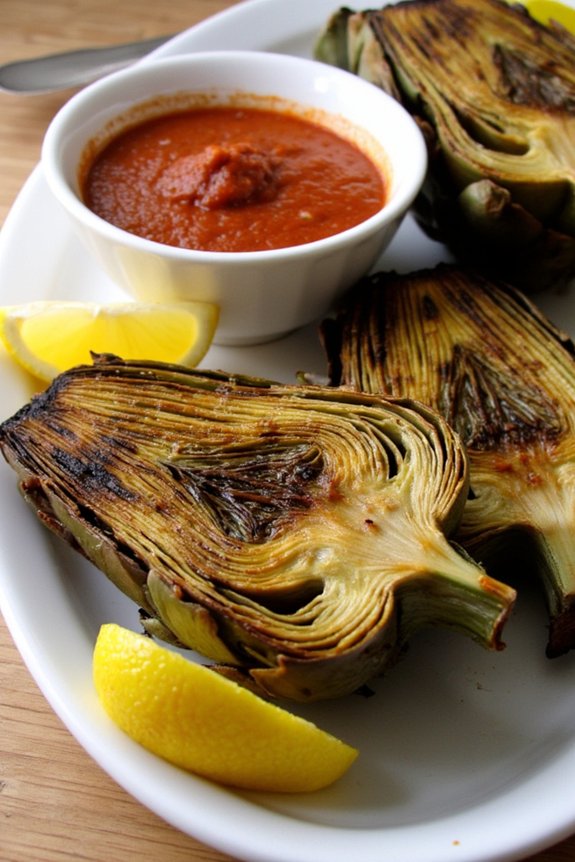
As the sun begins to shine a little brighter and the days grow longer, it’s the perfect time to enjoy fresh, seasonal produce. One standout ingredient that epitomizes Spanish spring cuisine is the artichoke.
Grilled Artichokes with Romesco Sauce is a delightful dish that captures the essence of spring with its vibrant flavors and textures. The smoky, charred exterior of the artichokes pairs beautifully with the rich, nutty Romesco sauce, creating a harmonious balance that’s sure to please any palate.
Romesco sauce, a staple of Catalan cuisine, is made from roasted red peppers, nuts, and a blend of spices, offering a depth of flavor that complements the earthy artichokes. This dish isn’t only a feast for the taste buds but also a feast for the eyes with its colorful presentation.
Whether you’re hosting a springtime gathering or simply enjoying a meal al fresco, Grilled Artichokes with Romesco Sauce is a dish that brings the taste of Spain to your table.
Ingredients (Serves 4-6):
- 4 large artichokes
- 2 lemons, halved
- 2 tablespoons olive oil
- Salt and pepper to taste
- 2 roasted red peppers
- 1/2 cup blanched almonds
- 2 cloves garlic
- 1 tablespoon red wine vinegar
- 1 teaspoon smoked paprika
- 1/4 teaspoon cayenne pepper
- 1/3 cup olive oil
- Salt to taste
Cooking Instructions:
- Prepare the Artichokes: Fill a large bowl with cold water and squeeze in the juice of one lemon. Remove the tough outer leaves of the artichokes and trim the stems. Cut the top third off each artichoke and snip off any remaining sharp leaf tips. Halve the artichokes and remove the choke with a spoon.
- Boil the Artichokes: Bring a large pot of salted water to a boil. Add the artichokes and one lemon half to the pot. Boil for about 10-15 minutes until the artichokes are tender. Drain and pat dry with a kitchen towel.
- Prepare the Romesco Sauce: In a food processor, combine roasted red peppers, almonds, garlic, red wine vinegar, smoked paprika, and cayenne pepper. Blend until smooth. With the processor running, slowly drizzle in the olive oil until the sauce is well combined and emulsified. Season with salt to taste.
- Grill the Artichokes: Preheat your grill to medium-high heat. Brush the cut sides of the artichokes with olive oil and season with salt and pepper. Place the artichokes cut side down on the grill. Grill for about 5-7 minutes until they’ve nice grill marks and are slightly charred.
- Serve: Arrange the grilled artichokes on a serving platter and serve with a generous dollop of Romesco sauce. Garnish with lemon wedges from the remaining lemon.
Extra Tips:
When selecting artichokes, choose ones that feel heavy for their size and have tightly packed leaves for the best quality.
Be careful not to overcook the artichokes during boiling as they can become mushy and difficult to grill. If you have any leftover Romesco sauce, it can be stored in the refrigerator for up to a week and pairs wonderfully with grilled meats or as a spread on sandwiches.
Enjoy your meal with a glass of crisp white wine to complement the flavors of the dish.
Seared Tuna With Olive and Caper Salsa
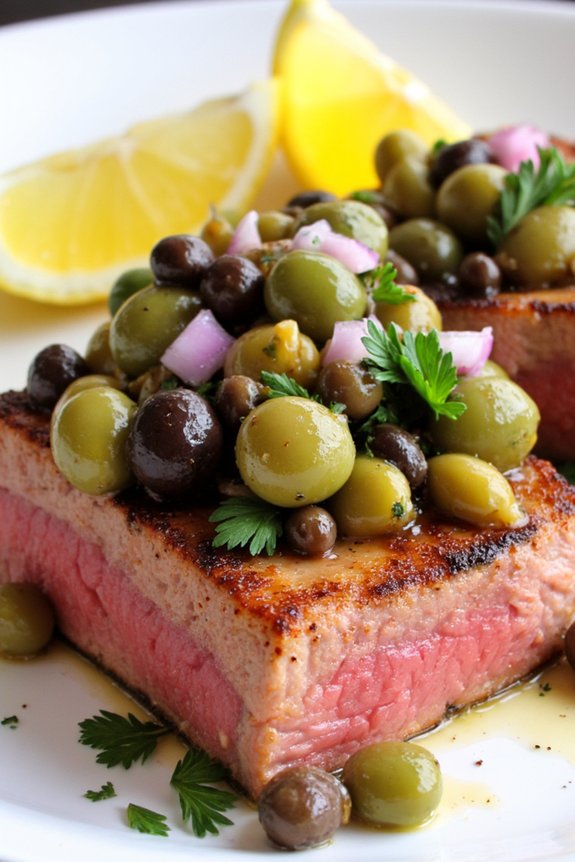
Seared Tuna With Olive and Caper Salsa is a delightful and invigorating dish perfect for a Spanish spring meal. This recipe combines the rich flavors of fresh tuna steaks with a zesty salsa made from olives and capers, bringing a burst of Mediterranean taste to your table. The tuna is seared to perfection, guaranteeing a juicy and tender bite, while the salsa adds a tangy and savory complement that elevates the overall flavor profile of the dish.
This dish isn’t only delicious but also quick and easy to prepare, making it ideal for both a casual family dinner or an elegant dinner party. The combination of high-quality ingredients and simple cooking techniques allows the natural flavors to shine. Pair it with a light salad or roasted vegetables for a complete meal that will impress your guests. This recipe serves 4-6 people.
Ingredients:
- 4-6 tuna steaks (about 6-7 ounces each)
- 2 tablespoons olive oil
- Salt and pepper to taste
- 1 cup green olives, pitted and roughly chopped
- 2 tablespoons capers, drained and rinsed
- 1/4 cup red onion, finely chopped
- 1-2 cloves garlic, minced
- 1 tablespoon lemon juice
- 1 tablespoon fresh parsley, chopped
- Lemon wedges for serving
Cooking Instructions:
- Prepare the Tuna: Pat the tuna steaks dry with paper towels. Season both sides generously with salt and pepper. This will guarantee a good crust when searing.
- Make the Salsa: In a medium bowl, combine the chopped olives, capers, red onion, garlic, lemon juice, and fresh parsley. Mix well to combine all the ingredients. Set aside to allow the flavors to meld together.
- Heat the Pan: In a large skillet, heat the olive oil over medium-high heat until it shimmers. This should take about 1-2 minutes. The pan should be hot enough to sear the tuna but not smoke.
- Sear the Tuna: Carefully place the tuna steaks in the hot pan. Sear for about 2-3 minutes on each side, depending on the thickness of the steaks, for medium-rare. Adjust the cooking time if you prefer your tuna more or less cooked.
- Rest the Tuna: Once cooked to your liking, remove the tuna from the pan and let it rest for a few minutes. This allows the juices to redistribute, keeping the tuna moist and flavorful.
- Serve: Arrange the tuna steaks on a serving platter. Spoon the olive and caper salsa over the top. Serve immediately with lemon wedges on the side.
Extra Tips: When choosing tuna for this dish, opt for sushi-grade or high-quality fresh tuna for the best flavor and texture. Be sure not to overcook the tuna; it should remain slightly pink in the center for the best taste and tenderness.
If you prefer a milder flavor, you can reduce the amount of capers or rinse them thoroughly to remove extra salt. The salsa can also be prepared in advance and kept in the refrigerator for up to a day, allowing the flavors to develop even further.
Chilled Almond and Garlic Soup
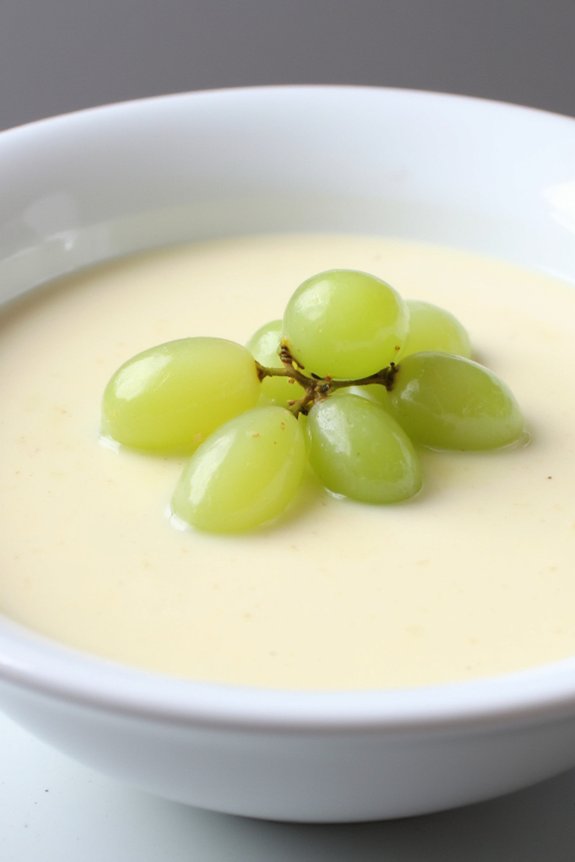
Chilled Almond and Garlic Soup, known as Ajo Blanco, is a revitalizing and traditional Spanish dish that’s perfect for springtime. This cold soup originates from Andalusia in southern Spain and is a great way to enjoy the season’s fresh ingredients. It combines the nutty flavor of almonds with the pungency of garlic, creating a creamy, smooth, and satisfying dish.
Ajo Blanco isn’t only delicious but also simple to prepare, making it an ideal choice for a light lunch or an appetizer during a spring gathering.
The key to this soup’s delightful flavor and texture lies in the quality of the ingredients. Fresh garlic and high-quality almonds form the base, while olive oil adds a rich, silky texture. A hint of vinegar provides the necessary acidity to balance the richness, and a garnish of grapes or melon adds a sweet contrast.
This recipe serves 4-6 people and can be easily adjusted to cater to a larger group if needed.
Ingredients:
- 200g blanched almonds
- 3 garlic cloves
- 150g day-old bread, crusts removed
- 100ml extra virgin olive oil
- 2 tablespoons sherry vinegar
- 750ml cold water
- Salt to taste
- Garnishes: green grapes or melon balls
Cooking Instructions:
- Prepare the Bread: Start by soaking the day-old bread in a bowl of water until it’s completely softened, about 10 minutes. Once soft, squeeze out the excess water and set the bread aside.
- Blend the Ingredients: In a blender, combine the blanched almonds, garlic cloves, and soaked bread. Blend until the mixture becomes a smooth paste.
- Add Liquid Ingredients: Gradually add the olive oil and sherry vinegar to the almond paste while blending on a low speed. This will help emulsify the mixture and create a creamy texture.
- Incorporate Cold Water: Slowly pour in the cold water while continuing to blend. Adjust the consistency according to your preference, adding more water if you desire a thinner soup.
- Season the Soup: Taste the soup and add salt to your liking. Blend for another minute to guarantee all ingredients are well incorporated.
- Chill the Soup: Transfer the soup to a large bowl or pitcher, cover, and refrigerate for at least 2 hours. Chilling the soup enhances the flavors and gives it the revitalizing quality that’s characteristic of Ajo Blanco.
- Serve and Garnish: Before serving, stir the soup to guarantee an even consistency. Ladle into bowls and garnish with halved green grapes or melon balls for a touch of sweetness and color.
Extra Tips:
When making Chilled Almond and Garlic Soup, it’s important to use blanched almonds to achieve the soup’s characteristic white color and smooth texture.
If you can’t find blanched almonds, you can blanch them yourself by briefly boiling them and then removing their skins. Additionally, adjusting the amount of garlic and vinegar to your taste can personalize the soup to your preference.
For a more traditional experience, serve the soup with a drizzle of extra virgin olive oil on top.
Citrus and Olive Oil Cake

As the days grow longer and the temperatures begin to rise, there’s something truly delightful about indulging in a light and flavorful dessert that embodies the freshness of spring. The Citrus and Olive Oil Cake is a perfect choice, combining the zesty brightness of citrus fruits with the rich, fruity notes of high-quality olive oil.
This cake is a staple in Spanish cuisine, where olive oil is often used in lieu of butter to create moist and fragrant baked goods. Its simplicity and elegance make it an ideal dessert to enjoy with friends and family during a leisurely afternoon or to serve as a sophisticated ending to a springtime dinner.
This cake not only highlights the natural sweetness of citrus but also embraces the rustic charm of olive oil, resulting in a harmonious blend of flavors that will captivate your taste buds. The recipe is designed to serve 4-6 people, making it perfect for small gatherings or as a special treat for your loved ones.
With a tender crumb and a vibrant aroma, this Citrus and Olive Oil Cake is sure to become a favorite in your springtime repertoire.
Ingredients (Serves 4-6):
- 1 1/2 cups all-purpose flour
- 1 cup granulated sugar
- 1/2 teaspoon baking powder
- 1/4 teaspoon baking soda
- 1/4 teaspoon salt
- 1/2 cup extra virgin olive oil
- 2 large eggs
- 1/2 cup fresh orange juice
- Zest of 1 orange
- Zest of 1 lemon
- 1 teaspoon vanilla extract
- Powdered sugar for dusting (optional)
Instructions:
- Preheat the Oven: Begin by preheating your oven to 350°F (175°C). Grease a 9-inch round cake pan with olive oil or line it with parchment paper to guarantee easy removal of the cake after baking.
- Mix Dry Ingredients: In a medium-sized bowl, whisk together the all-purpose flour, granulated sugar, baking powder, baking soda, and salt until well combined. This will help distribute the leavening agents evenly throughout the batter.
- Combine Wet Ingredients: In a separate large bowl, beat the eggs until lightly frothy. Gradually whisk in the olive oil, orange juice, orange zest, lemon zest, and vanilla extract until the mixture is smooth and well incorporated.
- Combine Wet and Dry Mixtures: Slowly add the dry ingredients to the wet ingredients, stirring gently with a spatula or wooden spoon until just combined. Be careful not to overmix, as this can make the cake dense.
- Bake the Cake: Pour the batter into the prepared cake pan, smoothing the top with a spatula. Place the pan in the preheated oven and bake for 30-35 minutes, or until a toothpick inserted into the center of the cake comes out clean.
- Cool and Serve: Once baked, allow the cake to cool in the pan for about 10 minutes. Then, gently remove it from the pan and transfer it to a wire rack to cool completely. Before serving, dust with powdered sugar if desired.
Extra Tips:
For a more intense citrus flavor, consider adding additional zest or a splash of lemon juice to the batter. Ascertain all your ingredients are at room temperature before mixing, as this helps the batter come together more smoothly.
The choice of olive oil is essential; opt for a fruity, high-quality extra virgin olive oil for the best flavor profile. This cake pairs wonderfully with a dollop of whipped cream or a scoop of vanilla ice cream, and it can be stored in an airtight container for up to three days, maintaining its moisture and flavor.
Enjoy the vibrant flavors of spring in every bite!
Honeyed Fig and Manchego Salad
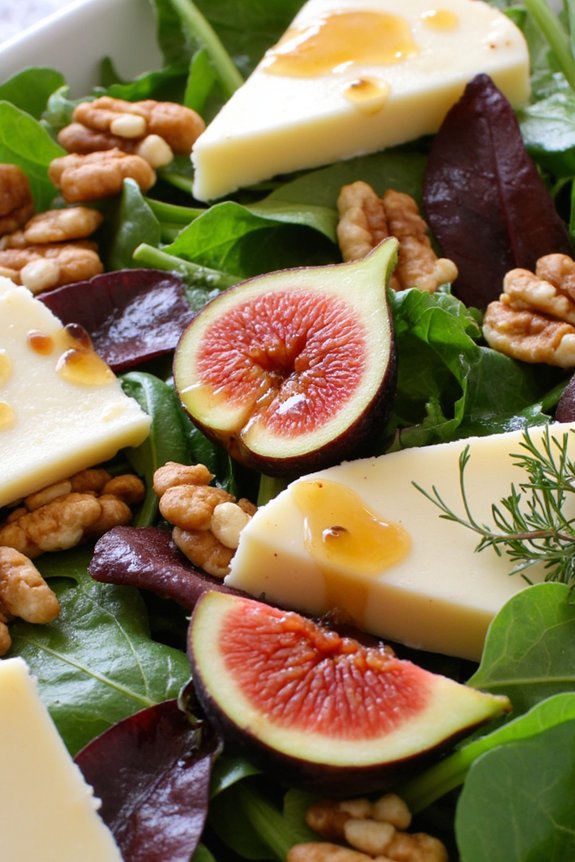
Honeyed Fig and Manchego Salad is a delightful combination of sweet and savory flavors that perfectly encapsulates the essence of Spanish spring cuisine. This salad features ripe figs drizzled with honey, paired with the nutty and buttery taste of Manchego cheese.
It’s a light yet satisfying dish, ideal for a revitalizing lunch or as a starter for a dinner party. The balance of textures and flavors makes it a crowd-pleaser, celebrating the season’s bounty with its colorful and nutritious ingredients.
Preparing this salad is simple and quick, allowing you to spend more time enjoying the company of your guests. Its vibrant presentation makes it not only a treat for the palate but also a feast for the eyes.
With its combination of fresh greens, juicy figs, crunchy walnuts, and creamy cheese, this dish is sure to become a favorite in your spring recipe repertoire. The drizzle of honey adds a touch of sweetness that complements the earthy flavors, making it a harmonious blend of ingredients that highlight the versatility of Spanish cuisine.
Ingredients for 4-6 servings:
- 8 fresh figs
- 200g Manchego cheese
- 100g mixed salad greens (such as arugula, spinach, and watercress)
- 50g walnuts
- 3 tablespoons honey
- 2 tablespoons olive oil
- 1 tablespoon balsamic vinegar
- Salt and pepper to taste
Cooking Instructions:
- Prepare the Figs: Begin by washing the figs thoroughly under cold running water. Pat them dry with a kitchen towel. Cut each fig into quarters and set aside.
- Prepare the Cheese: Slice the Manchego cheese into thin wedges or cubes, depending on your preference. Set aside.
- Toast the Walnuts: In a dry skillet over medium heat, toast the walnuts until they’re golden brown and fragrant, about 3-4 minutes. Be sure to stir frequently to avoid burning. Once toasted, remove from heat and let them cool.
- Prepare the Dressing: In a small bowl, whisk together the olive oil, balsamic vinegar, and honey until well combined. Season with salt and pepper to taste.
- Assemble the Salad: In a large salad bowl, combine the mixed salad greens, figs, cheese, and toasted walnuts. Drizzle the honey-balsamic dressing over the top.
- Toss and Serve: Gently toss the salad to guarantee all ingredients are evenly coated with the dressing. Serve immediately for the best flavor and texture.
Extra Tips:
For an extra layer of flavor, consider adding a sprig of fresh thyme or mint leaves to the salad. This will enhance the freshness and complement the honey and cheese beautifully.
If fresh figs aren’t available, dried figs can be used as a substitute, though they’ll impart a slightly different texture. Adjust the sweetness of the dressing by varying the amount of honey to suit your taste preferences.
Finally, if you prefer a bit more crunch, add croutons or thinly sliced red onions for additional texture.