

Have you ever wanted to bring the vibrant flavors of Spain right into your kitchen? Picture indulging in the crispy delight of Patatas Bravas or savoring the creamy satisfaction of Croquetas De Jamón. These tantalizing Spanish snacks aren’t just for special occasions. They’re a delightful way to spice up any family gathering. And that’s just the beginning of our culinary adventure!
Patatas Bravas
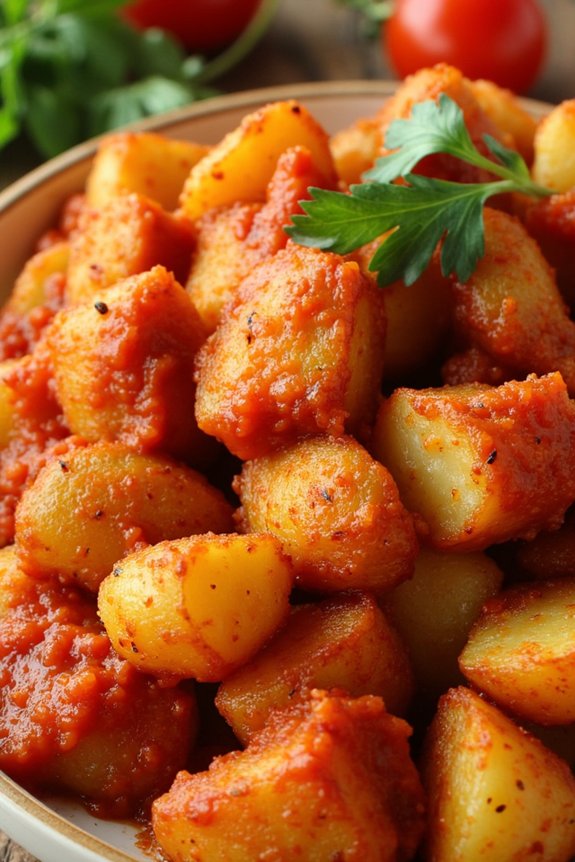
Patatas Bravas is a quintessential Spanish tapas dish that delivers a spicy kick alongside its comforting texture. This dish, popular in many Spanish bars and restaurants, features crispy, golden-brown potatoes drizzled with a vibrant, spicy tomato sauce. The combination of the crispy, hot potatoes and the zesty, tangy sauce makes Patatas Bravas an irresistible snack that perfectly captures the flavors of Spain.
While it looks simple, achieving the perfect balance of crispy potatoes and a rich, spicy sauce necessitates attention to detail and quality ingredients. Traditionally, Patatas Bravas are served as an appetizer, often enjoyed with a cold beer or a glass of Spanish wine. The name “bravas” refers to the bold and fiery nature of the sauce, which is a fundamental aspect of the dish.
Whether you’re hosting a tapas night or simply looking to expand your culinary repertoire, mastering Patatas Bravas will bring a little slice of Spain into your home. With the following recipe, you can recreate this beloved dish for a serving size of 4-6 people, guaranteeing everyone gets to enjoy a taste of this classic Spanish snack.
Ingredients for Patatas Bravas (serves 4-6):
- 4 large potatoes
- 1 cup olive oil
- Salt, to taste
- 1 onion, finely chopped
- 2 cloves garlic, minced
- 1 teaspoon smoked paprika
- 1 teaspoon hot paprika
- 1/4 teaspoon cayenne pepper
- 1 tablespoon tomato paste
- 1 cup canned crushed tomatoes
- 1 tablespoon red wine vinegar
- Fresh parsley, chopped (for garnish)
Cooking Instructions:
- Prepare the Potatoes: Peel the potatoes and cut them into 1-inch cubes. Rinse the cubes under cold water to remove excess starch, then pat them dry with a kitchen towel to guarantee they’ll become crispy when fried.
- Fry the Potatoes: In a large skillet, heat the olive oil over medium-high heat. Once the oil is hot, add the potato cubes in batches to avoid overcrowding. Fry them for about 10-12 minutes or until they’re golden brown and crispy on the outside. Use a slotted spoon to transfer the fried potatoes to a plate lined with paper towels to drain excess oil. Sprinkle with salt while they’re still hot.
- Make the Bravas Sauce: In a separate pan, heat 2 tablespoons of olive oil over medium heat. Add the chopped onion and sauté for about 5 minutes until it’s soft and translucent. Add the minced garlic and cook for another minute.
- Spice Up the Sauce: Stir in the smoked paprika, hot paprika, and cayenne pepper. Cook for about 30 seconds until the spices are fragrant. Add the tomato paste and crushed tomatoes, stirring to combine. Let the mixture simmer gently for 10 minutes, allowing the flavors to meld together.
- Finalize the Sauce: Stir in the red wine vinegar and season the sauce with salt to taste. Remove it from the heat and let it cool slightly before blending it into a smooth sauce using an immersion blender or a regular blender.
- Serve the Patatas Bravas: Arrange the fried potatoes on a serving platter and generously drizzle the spicy tomato sauce over them. Garnish with freshly chopped parsley for a burst of color and freshness.
Extra Tips:
To guarantee your Patatas Bravas are authentically crispy, make sure the potatoes are completely dry before frying, as moisture can lead to sogginess. Additionally, adjust the heat level of the sauce according to your preference by varying the amount of hot paprika and cayenne pepper.
For an extra layer of flavor, consider adding a splash of sherry or a pinch of sugar to balance out the acidity of the tomatoes. Enjoy your Patatas Bravas fresh and hot for the best experience!
Croquetas De Jamón

Croquetas De Jamón, a beloved Spanish snack, are crispy on the outside and creamy on the inside, offering a delightful bite of ham-filled goodness. Originating from Spain, these savory croquettes are often enjoyed as tapas or appetizers, perfect for sharing with friends and family. The key to a delicious Croquetas De Jamón lies in the béchamel sauce that encases the ham, guaranteeing every bite is rich and flavorful. This recipe will guide you through making these delectable treats, confirming you achieve the perfect balance of taste and texture.
Preparing Croquetas De Jamón requires a bit of patience and precision, but the end result is well worth the effort. The process involves creating a smooth béchamel sauce, incorporating finely chopped ham, and allowing the mixture to cool before shaping it into croquettes. Once formed, the croquettes are coated in breadcrumbs and fried to golden perfection. Whether you’re looking to impress guests at a dinner party or simply indulge in a tasty snack, these croquettes are sure to be a hit.
Ingredients for 4-6 servings:
- 1 cup diced serrano ham or cooked ham
- 4 tablespoons unsalted butter
- 1/2 cup all-purpose flour
- 2 cups whole milk
- 1/4 teaspoon nutmeg
- Salt and pepper, to taste
- 2 eggs
- 1 cup breadcrumbs
- Vegetable oil, for frying
Cooking Instructions:
- Prepare the Béchamel Sauce: In a medium saucepan over medium heat, melt the butter. Once melted, add the flour and stir continuously for about 2-3 minutes until the mixture is smooth and turns a light golden color.
- Incorporate the Milk: Gradually add the milk to the flour mixture, whisking constantly to prevent lumps. Continue to cook and stir until the sauce thickens and becomes smooth, about 5-7 minutes.
- Season the Sauce: Stir in the nutmeg, salt, and pepper. Adjust the seasoning according to your taste.
- Add the Ham: Once the béchamel sauce is ready, remove it from heat and fold in the diced ham. Mix thoroughly to confirm the ham is evenly distributed.
- Chill the Mixture: Transfer the mixture to a shallow dish, cover with plastic wrap (pressing it directly onto the surface to prevent a skin from forming), and refrigerate for at least 2 hours or until firm.
- Shape the Croquettes: Once the mixture is firm, shape it into small logs or balls (about 2 inches long).
- Prepare the Coating: Beat the eggs in a shallow bowl. Place the breadcrumbs in another bowl. Dip each croquette first into the beaten eggs, then roll it in the breadcrumbs until fully coated.
- Fry the Croquettes: Heat vegetable oil in a deep frying pan or deep fryer to 350°F (175°C). Fry the croquettes in batches, ensuring not to overcrowd the pan, until they’re golden brown and crispy, about 3-4 minutes.
- Drain and Serve: Remove the croquettes from the oil and drain on paper towels. Serve warm.
Extra Tips:
For a perfect Croquetas De Jamón, confirm your béchamel sauce is smooth and lump-free, which is vital for achieving the desired creamy texture. If you find the mixture too sticky to handle when shaping, lightly oil your hands or use damp hands to form the croquettes.
It’s also important to control the oil temperature while frying; too hot and the croquettes will brown too quickly outside without heating through, too cool and they may become greasy. Finally, you can prepare the croquettes in advance and freeze them; simply fry them straight from the freezer for a convenient and tasty snack.
Tortilla Española Bites

Tortilla Española Bites are a delightful twist on the classic Spanish omelet, making them perfect for a party appetizer or a satisfying snack. These bite-sized treats capture the essence of a traditional Tortilla Española, which typically consists of eggs, potatoes, and onions, delivering a burst of authentic Spanish flavors in every mouthful.
They’re perfect for gatherings or as a quick snack, presenting a delicious and creative way to enjoy a beloved Spanish dish in smaller portions.
These Tortilla Española Bites aren’t only easy to prepare but also versatile, allowing you to add your favorite ingredients like chorizo or bell peppers for an extra kick. Whether you’re hosting a tapas night or simply looking for a new way to enjoy your eggs and potatoes, these bites are sure to impress.
Serve them warm or at room temperature, and watch as they quickly become a favorite among family and friends.
Ingredients (serving size: 4-6 people):
- 6 large eggs
- 2 medium potatoes, peeled and thinly sliced
- 1 medium onion, finely chopped
- 1/4 cup olive oil
- Salt and pepper to taste
- Optional: 1/4 cup diced chorizo
- Optional: 1/4 cup diced red bell pepper
- Fresh parsley for garnish
Cooking Instructions:
- Prepare the Ingredients: Begin by peeling and thinly slicing the potatoes. Chop the onion finely, and if adding optional ingredients, dice the chorizo and red bell pepper. Preheat your oven to 350°F (175°C).
- Cook the Potatoes and Onions: Heat the olive oil in a large non-stick frying pan over medium heat. Add the sliced potatoes and chopped onions, cooking for about 10-12 minutes until the potatoes are tender and the onions are translucent. Stir occasionally to prevent sticking and guarantee even cooking.
- Mix the Batter: In a large bowl, crack the eggs and beat them lightly. Season with salt and pepper. Add the cooked potatoes and onions to the eggs, stirring to combine. If using chorizo and bell pepper, add them to the mixture at this stage.
- Bake the Bites: Grease a mini muffin tin or a small baking dish with olive oil. Pour the egg and potato mixture into the muffin cups, filling each about 3/4 full. If using a baking dish, pour the mixture evenly. Bake in the preheated oven for 15-20 minutes, or until the eggs are set and the tops are golden.
- Serve: Remove the bites from the oven and allow them to cool slightly before removing from the muffin tin. Garnish with fresh parsley before serving. These bites can be enjoyed warm or at room temperature.
Extra Tips:
To guarantee even cooking, make sure the potato slices are thin and uniform in size. If you’re short on time, you can pre-cook the potatoes in the microwave before frying them with the onions.
When adding ingredients like chorizo or peppers, consider lightly sautéing them beforehand for enhanced flavors. Remember, the key to a good Tortilla Española is the balance between the eggs and the filling, so adjust the proportions according to your preference.
Churros With Chocolate Sauce

Churros with Chocolate Sauce is a delightful Spanish snack that has gained popularity worldwide. These golden, crispy pastries are perfect for an indulgent treat, especially when paired with a rich and velvety chocolate sauce. Originating from Spain, churros are often enjoyed during breakfast or as a snack throughout the day. The sweet aroma of freshly fried dough coated in sugar and cinnamon is sure to entice anyone nearby.
Making churros at home is simpler than it seems, and the result is a warm, comforting snack that’s perfect for sharing with friends and family. The key to perfect churros lies in the dough consistency and frying them to a perfect golden brown. The accompanying chocolate sauce is a luxurious addition that elevates the experience, making each bite a delectable delight. Here’s how you can create this beloved Spanish snack for 4-6 people.
Ingredients for Churros:
- 1 cup water
- 2 1/2 tablespoons sugar
- 1/2 teaspoon salt
- 2 tablespoons vegetable oil
- 1 cup all-purpose flour
- Vegetable oil for frying
- 1/2 cup sugar
- 1 teaspoon ground cinnamon
Ingredients for Chocolate Sauce:
- 1/2 cup heavy cream
- 1 cup semi-sweet chocolate chips
- 1 teaspoon vanilla extract
Cooking Instructions:
- Prepare the Dough: In a medium saucepan, combine water, sugar, salt, and vegetable oil. Bring the mixture to a boil over medium heat. Remove from heat and immediately stir in the flour until the mixture forms a ball.
- Heat the Oil: Heat vegetable oil in a deep frying pan or pot over medium-high heat. The oil should reach about 375°F (190°C), which is ideal for frying churros.
- Pipe the Churros: Transfer the dough into a piping bag fitted with a large star tip. Carefully pipe strips of dough into the hot oil, cutting them with scissors to your desired length.
- Fry the Churros: Fry the churros in batches, turning them occasionally, until golden brown and crisp on all sides, about 5-7 minutes per batch. Remove them with a slotted spoon and drain on paper towels.
- Coat the Churros: Mix 1/2 cup sugar and the ground cinnamon in a shallow dish. Roll the warm churros in the cinnamon-sugar mixture until evenly coated.
- Make the Chocolate Sauce: While the churros are frying, heat the heavy cream in a small saucepan over medium heat until it begins to simmer. Remove from heat and stir in the chocolate chips until smooth and melted. Add the vanilla extract and mix well.
- Serve: Serve the churros warm with the chocolate sauce on the side for dipping.
Extra Tips: When making churros, it’s important to monitor the oil temperature to guarantee even cooking. If the oil is too hot, the churros will brown too quickly on the outside and remain raw inside. Conversely, if the oil is too cool, they’ll absorb too much oil and become greasy.
For a twist, you can add a pinch of nutmeg or cardamom to the cinnamon-sugar mixture for an extra layer of flavor. Enjoy your churros fresh for the best texture and taste.
Empanadillas De Atún

Empanadillas de Atún, or tuna empanadillas, are a delightful Spanish snack that brings a taste of the Mediterranean to your table. These small pastries are traditionally filled with a savory mix of tuna, tomato, and bell peppers, creating a harmonious blend of flavors. Empanadillas are perfect for serving as an appetizer or as part of a tapas spread, and they can be enjoyed warm or at room temperature.
The flaky pastry encasing the tuna mixture offers a satisfying contrast in texture, making it a crowd-pleaser for any gathering. Originating from the Spanish region of Galicia, empanadillas have become a staple across Spain and are beloved for their versatility and ease of preparation.
This recipe for Empanadillas de Atún is designed to serve 4-6 people, making it ideal for small parties or family dinners. The preparation involves creating a rich and flavorful filling that’s encased in a crispy, golden pastry shell. Whether you’re a seasoned cook or a beginner in the kitchen, this recipe offers a straightforward approach to creating these delicious bites.
Ingredients (Serves 4-6)
- 2 sheets of puff pastry or empanadilla dough
- 2 cans (about 200g each) of tuna in olive oil, drained
- 1 medium onion, finely chopped
- 1 red bell pepper, finely chopped
- 2 cloves of garlic, minced
- 2 tablespoons of tomato paste
- 1 teaspoon of smoked paprika
- Salt and pepper to taste
- 1 egg, beaten (for egg wash)
- Olive oil (for sautéing)
Cooking Instructions
- Prepare the Filling: Heat a drizzle of olive oil in a large skillet over medium heat. Add the chopped onion and bell pepper, sautéing until they’re soft and the onion is translucent, about 5-7 minutes.
- Add Garlic and Tuna: Stir in the minced garlic and cook for another 1-2 minutes until fragrant. Add the drained tuna to the skillet, breaking it up with a spatula.
- Incorporate Tomato Paste and Seasonings: Mix in the tomato paste and smoked paprika, stirring well to combine. Season with salt and pepper to taste. Cook the mixture for another 3-4 minutes until everything is well combined and slightly thickened. Remove from heat and let it cool.
- Prepare the Pastry: Preheat your oven to 200°C (390°F). Roll out the puff pastry sheets on a floured surface. Use a round cutter or a glass to cut out circles of about 10 cm (4 inches) in diameter.
- Assemble the Empanadillas: Place a spoonful of the tuna filling in the center of each pastry circle. Fold the pastry over to form a half-moon shape and seal the edges by pressing them with a fork.
- Apply Egg Wash: Arrange the empanadillas on a baking sheet lined with parchment paper. Brush the tops with the beaten egg to facilitate a golden finish.
- Bake: Bake in the preheated oven for 15-20 minutes or until the empanadillas are golden brown and the pastry is cooked through.
- Serve: Allow them to cool for a few minutes before serving. They can be enjoyed warm or at room temperature.
Extra Tips
When preparing empanadillas, verify that the filling isn’t too wet, as excess moisture can prevent the pastry from becoming crisp. If you find the filling mixture too moist, try draining the tuna well and cooking the filling a bit longer to evaporate any excess liquid.
Additionally, experimenting with other fillings like minced meat, cheese, or vegetables can offer variations to this classic recipe. For a bit of heat, consider adding a pinch of cayenne pepper or a few chili flakes to the filling.
Gazpacho Shooters
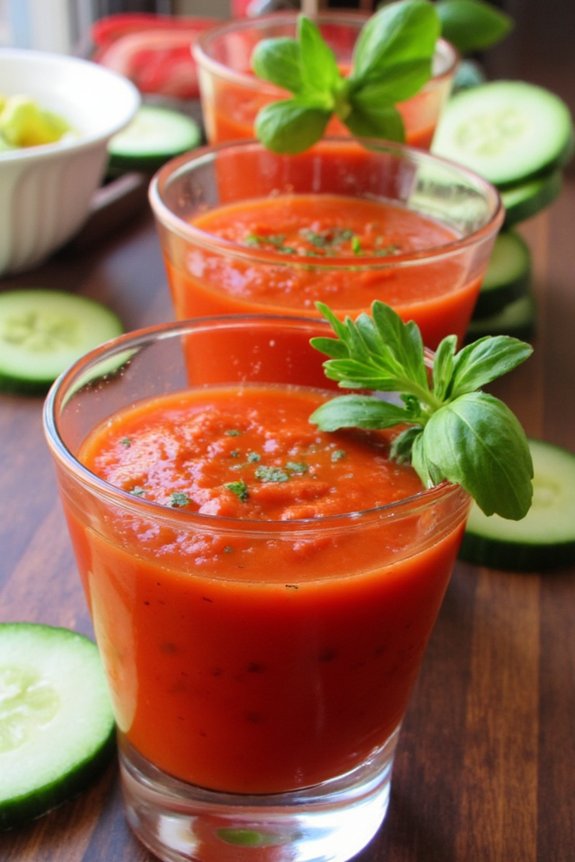
Gazpacho Shooters are a delightful and invigorating Spanish snack, perfect for summer gatherings or as an elegant appetizer. Originating from Andalusia, gazpacho is a cold soup made mainly from raw vegetables and served chilled. This dish captures the essence of traditional Spanish cuisine with its vibrant colors and fresh, bold flavors. When served in shooter glasses, it becomes a fun and sophisticated way to enjoy this classic dish.
To prepare Gazpacho Shooters, you’ll need a mix of ripe tomatoes, cucumbers, bell peppers, onions, and a touch of garlic. These ingredients are blended together with olive oil and vinegar to create a smooth, flavorful concoction that’s both cooling and nutritious. The shooters are perfect for serving at parties or as a light starter, providing an explosion of taste in every sip.
Ingredients for 4-6 people:
- 6 ripe tomatoes
- 1 cucumber
- 1 red bell pepper
- 1 green bell pepper
- 1 small red onion
- 2 cloves of garlic
- 1/4 cup of olive oil
- 2 tablespoons of red wine vinegar
- Salt, to taste
- Black pepper, to taste
- 1 cup of cold water
- Fresh basil or parsley for garnish
Instructions:
- Prepare the Vegetables: Begin by washing all the vegetables thoroughly. Core the tomatoes and cut them into quarters. Peel the cucumber and chop it into chunks. Core and deseed the bell peppers, then cut them into pieces. Peel the onion and garlic.
- Blend the Ingredients: In a blender or food processor, combine the tomatoes, cucumber, bell peppers, onion, and garlic. Blend until you achieve a smooth consistency. You may need to do this in batches depending on the size of your blender.
- Add Liquids and Seasoning: Once blended, add the olive oil, red wine vinegar, and cold water to the mixture. Blend again until all the ingredients are well combined. Season with salt and black pepper to taste.
- Chill the Gazpacho: Transfer the gazpacho to a large bowl or pitcher. Cover and refrigerate for at least 2 hours, allowing the flavors to meld together and the soup to chill thoroughly.
- Serve the Shooters: Before serving, stir the gazpacho well. Pour the chilled soup into shooter glasses. Garnish each shooter with a small sprig of fresh basil or parsley for a pop of color and added aroma.
Extra Tips:
For the best flavor, use the ripest tomatoes you can find, as they contribute greatly to the soup’s taste. Adjust the seasoning according to your preference, and feel free to add a dash of hot sauce if you enjoy a bit of heat.
If the gazpacho is too thick, you can thin it out with more cold water or a few ice cubes. Preparing the gazpacho a day ahead and allowing it to sit overnight in the fridge will intensify its flavors, making it even more delicious when served.
Pan Con Tomate
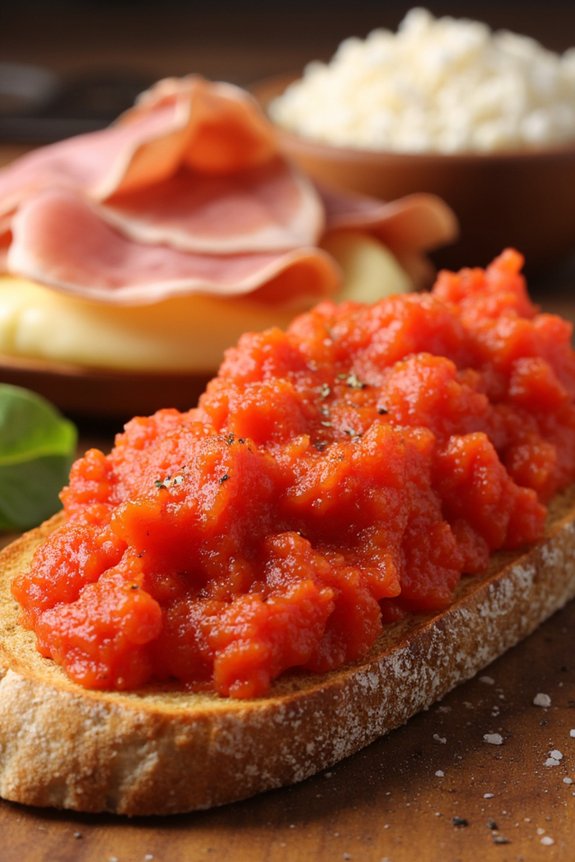
Pan Con Tomate, or “bread with tomato,” is a simple yet delicious Spanish snack that has won the hearts of many around the world. This classic Catalonian dish combines the rustic charm of crusty bread with the fresh, vibrant flavors of ripe tomatoes, fragrant garlic, and high-quality olive oil. Traditionally served as a tapa or light breakfast, Pan Con Tomate is celebrated for its simplicity and the way it lets the quality of its ingredients shine.
Whether you’re hosting a Spanish-themed dinner party or simply craving a taste of the Mediterranean, this dish is a must-try for any food enthusiast.
The beauty of Pan Con Tomate lies in its versatility and the ease of its preparation. At its core, it’s a humble dish that requires only a handful of ingredients, yet it offers a burst of flavor that’s both satisfying and invigorating. It can be customized with additional toppings such as jamón serrano or manchego cheese, making it a perfect base for culinary creativity.
With just a few steps, you can create a delightful snack that captures the essence of Spanish cuisine and transports you to the sun-drenched terraces of Barcelona.
Ingredients (Serves 4-6):
- 1 large rustic baguette or ciabatta bread
- 4 ripe tomatoes
- 2 cloves of garlic
- 1/4 cup extra virgin olive oil
- Salt to taste
- Optional: Freshly ground black pepper, jamón serrano, or manchego cheese
Cooking Instructions:
- Prepare the Bread: Begin by slicing the baguette or ciabatta into 1-inch thick slices. Aim for enough slices to accommodate your serving size of 4-6 people. Place the slices on a baking sheet.
- Toast the Bread: Preheat your oven to 375°F (190°C). Place the baking sheet with the bread slices in the oven and toast them for about 5-7 minutes, or until they’re golden brown and crispy. Remove from the oven and let them cool slightly.
- Prepare the Tomatoes: While the bread is toasting, wash the tomatoes thoroughly. Cut them in half and then grate them using the coarse side of a box grater. Discard the skins and set the grated tomato pulp aside in a bowl.
- Infuse the Bread with Garlic: Peel the garlic cloves, then cut them in half. Once the bread slices are cool enough to handle, rub the cut side of the garlic over the top of each slice. This will infuse the bread with a subtle garlic flavor.
- Assemble the Pan Con Tomate: Spoon the grated tomato pulp generously over each slice of garlic-rubbed bread. Drizzle each slice with a good amount of extra virgin olive oil, making sure each one is well-coated.
- Season and Serve: Sprinkle a pinch of salt over each slice to enhance the flavors. If desired, add freshly ground black pepper. Serve immediately while the bread is still slightly warm, optionally garnished with slices of jamón serrano or grated manchego cheese.
Extra Tips:
For the best results, use the freshest and ripest tomatoes you can find, as they’re the stars of this dish. The quality of the olive oil is equally important, so opt for a high-quality extra virgin variety for a richer flavor.
If you prefer a bit of heat, consider adding a dash of red pepper flakes. Additionally, Pan Con Tomate is best enjoyed immediately after preparation to guarantee the bread maintains its crispy texture while the tomato mixture is fresh and juicy.
Albondigas
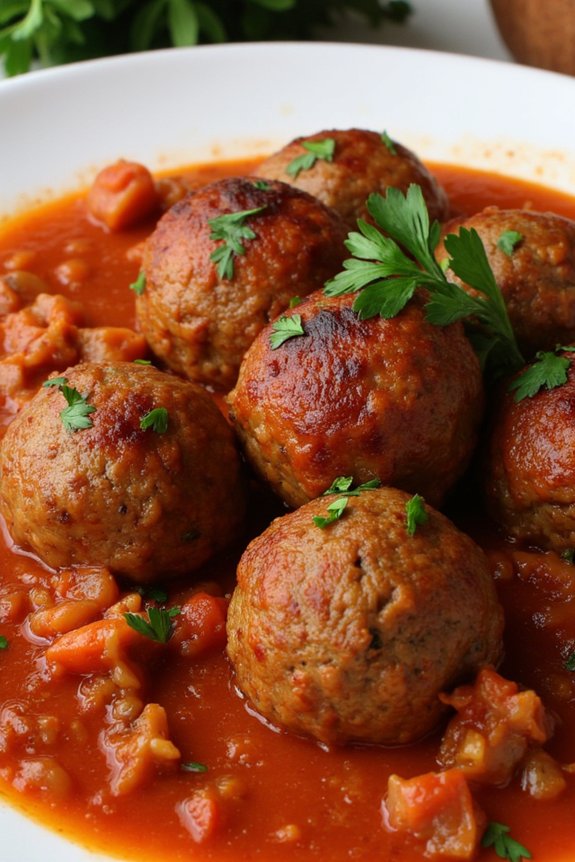
Albondigas, or Spanish meatballs, are a delicious and savory snack that bring together the rich flavors of Spain in every bite. Traditionally, albondigas are made with a mixture of ground beef and pork, seasoned with aromatic spices and herbs. The meatballs are usually simmered in a luscious tomato-based sauce, allowing them to absorb the flavors and achieve a melt-in-your-mouth texture.
Perfect as a snack, appetizer, or part of a tapas spread, albondigas are a versatile dish that can be enjoyed in many ways. The key to making perfect albondigas is in the seasoning and the sauce. A well-seasoned meatball should be tender and flavorful, with hints of garlic, parsley, and a touch of smoked paprika for that authentic Spanish flair.
The sauce, on the other hand, should be rich and slightly tangy, complementing the meatballs perfectly. Whether you’re hosting a dinner party, looking for a snack to enjoy with friends, or simply wanting to explore Spanish cuisine, these albondigas are sure to captivate.
Ingredients for 4-6 Servings:
- 1 pound ground beef
- 1/2 pound ground pork
- 1/2 cup breadcrumbs
- 1/4 cup milk
- 1 large egg
- 3 cloves garlic, minced
- 1/4 cup fresh parsley, chopped
- 1 teaspoon smoked paprika
- Salt and pepper to taste
- 2 tablespoons olive oil
- 1 onion, finely chopped
- 1 can (14 ounces) crushed tomatoes
- 1/2 cup beef broth
- 1 teaspoon sugar
- 1 bay leaf
Cooking Instructions:
- Prepare the Meatball Mixture: In a large bowl, combine ground beef, ground pork, breadcrumbs, milk, egg, minced garlic, chopped parsley, smoked paprika, salt, and pepper. Mix well until all ingredients are evenly combined. Cover and let the mixture rest in the refrigerator for about 15 minutes to allow the flavors to meld.
- Shape the Meatballs: Once the meat mixture has rested, take it out of the refrigerator. Wet your hands slightly to prevent sticking and shape the mixture into small meatballs, about the size of a golf ball. Place them on a tray and set aside.
- Cook the Meatballs: Heat olive oil in a large skillet over medium heat. Add the meatballs in batches, being careful not to overcrowd the pan. Cook until browned on all sides, about 8-10 minutes. Remove the meatballs and set them aside on a plate lined with paper towels to drain excess oil.
- Prepare the Sauce: In the same skillet, add chopped onion and sauté until translucent. Add crushed tomatoes, beef broth, sugar, and bay leaf. Stir well and let the sauce simmer for about 10 minutes, allowing the flavors to develop.
- Simmer the Meatballs in Sauce: Return the meatballs to the skillet, gently nestling them into the sauce. Cover and let the meatballs simmer in the sauce for about 20 minutes, stirring occasionally to guarantee even cooking.
- Serve: Remove the bay leaf before serving. Transfer the albondigas to a serving dish, garnish with extra chopped parsley if desired, and serve with crusty bread or over rice.
Extra Tips:
For even more flavor, consider adding a pinch of cayenne pepper to the meatball mixture for a bit of heat. If you prefer a smoother sauce, use an immersion blender to puree the sauce before adding the meatballs back in.
Additionally, if you have time, let the meatball mixture chill longer in the fridge, as this helps the flavors intensify. Albondigas can also be made ahead of time and frozen for up to three months, making them a convenient snack option.
Pimientos De Padrón
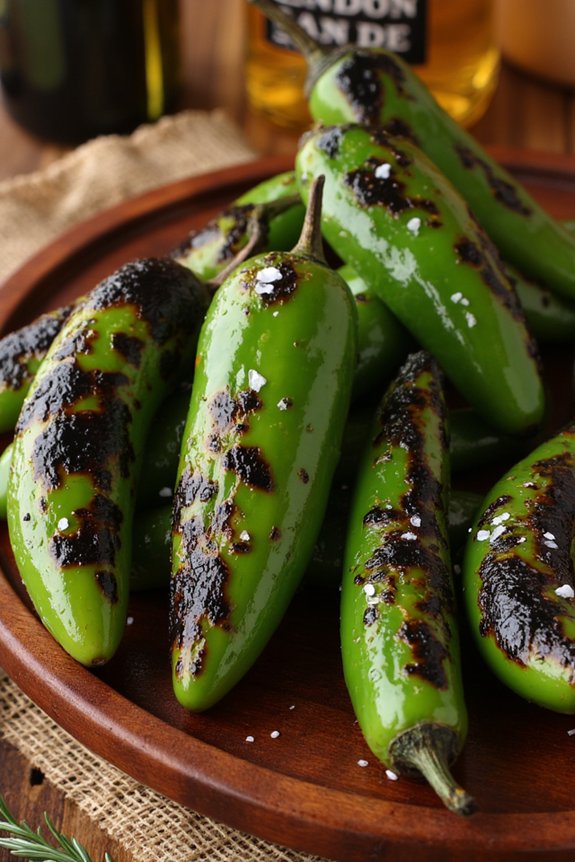
Pimientos De Padrón are a classic Spanish snack that brings a burst of flavor with minimal effort. These small green peppers are typically mild, though occasionally you might encounter a spicy one, adding an element of surprise to your snack experience.
Originating from the town of Padrón in Galicia, Spain, these peppers have become a staple in Spanish cuisine, often served as tapas or alongside a variety of dishes. They’re quick to prepare, making them an excellent choice for a spontaneous snack or a delightful appetizer at your next dinner party.
The beauty of Pimientos De Padrón lies in their simplicity. A quick sauté in olive oil and a sprinkle of sea salt are all that’s needed to bring out their distinctive flavor. These peppers are best served hot, with the skin blistered and slightly charred, enhancing their natural taste.
This recipe will guide you through the process of preparing Pimientos De Padrón for a serving size of 4-6 people, guaranteeing that your guests will enjoy an authentic taste of Spain.
Ingredients (Serves 4-6):
- 500 grams (1.1 lbs) Pimientos de Padrón
- 2 tablespoons olive oil
- Sea salt, to taste
Cooking Instructions:
- Prepare the Peppers: Begin by washing the Pimientos de Padrón thoroughly under cold running water. Pat them dry with a clean kitchen towel or paper towel to make certain they’re completely dry before cooking.
- Heat the Oil: Place a large skillet or frying pan over medium-high heat. Add the olive oil and let it heat until it shimmers, indicating it’s hot enough to fry the peppers.
- Cook the Peppers: Add the Padrón peppers to the pan in a single layer, making sure not to overcrowd them. Sauté the peppers for about 3-4 minutes, turning them occasionally with tongs, until their skin is blistered and slightly charred.
- Season the Peppers: Once the peppers are cooked, transfer them to a serving plate. Sprinkle generously with sea salt while they’re still hot, allowing the salt to adhere to the blistered skin.
- Serve Immediately: Serve the Pimientos de Padrón hot, as they’re best enjoyed fresh out of the pan. Offer them as a standalone snack or as part of a tapas spread with other Spanish delicacies.
Extra Tips:
For the best results, use a good quality olive oil to enhance the flavor of the peppers. Keep in mind that while most Padrón peppers are mild, some can be unexpectedly spicy, so be prepared for a surprise!
If you prefer a milder taste, you can opt to remove the seeds after cooking, although traditionally they’re eaten whole. Additionally, if you find fresh Padrón peppers aren’t readily available, you can usually find them in the frozen section of specialty stores, which will work just as well for this recipe.
Manchego Cheese and Quince Paste Bites

Manchego Cheese and Quince Paste Bites are a delightful Spanish snack that combines the rich, nutty flavor of Manchego cheese with the sweet, fruity taste of quince paste. This classic combination is often enjoyed as an appetizer or a part of tapas in Spain.
The contrasting flavors and textures make these bites a perfect addition to any party spread or a sophisticated snack for a cozy evening at home. The simplicity of this dish allows the quality of the ingredients to shine, making it vital to choose a good aged Manchego and a high-quality quince paste.
Traditionally, this dish is served cold, highlighting the natural flavors of the cheese and quince. However, if you prefer a warm snack, you can lightly toast the assembled bites for a minute or two.
These bites aren’t only delicious but also visually appealing with their contrasting colors, making them a feast for both the eyes and the palate. Whether you’re hosting a gathering or simply indulging in a treat, Manchego Cheese and Quince Paste Bites are sure to impress.
Ingredients (Serves 4-6):
- 200 grams of aged Manchego cheese
- 100 grams of quince paste
- Fresh rosemary sprigs (optional, for garnish)
- Crackers or thinly sliced baguette (optional, for serving)
Cooking Instructions:
- Prepare the Ingredients: Begin by cutting the Manchego cheese into uniform bite-sized cubes, approximately 1-inch each. Similarly, cut the quince paste into squares or rectangles that match the size of the cheese cubes.
- Assemble the Bites: Place a piece of quince paste on top of each cheese cube. You can use a toothpick to secure them together if desired, or simply place them neatly on a serving platter.
- Garnish and Serve: For a decorative touch, add a small sprig of fresh rosemary on top of each bite. This not only enhances the presentation but also adds a subtle aromatic element. Arrange the bites on a platter and serve them as is or alongside crackers or slices of baguette.
- Optional Toasting: If you prefer a warm version, preheat your oven to 180°C (350°F). Arrange the assembled bites on a baking tray and toast them for about 2 minutes, just until the cheese starts to soften slightly. Remove from the oven and garnish with rosemary before serving.
Extra Tips:
When selecting Manchego cheese, look for one that’s aged for at least 6 months, as this will provide a more intense flavor and firmer texture which pairs beautifully with the sweet quince paste.
If you can’t find quince paste, fig jam can be a tasty substitute, though it will slightly alter the traditional flavor profile. Additionally, if serving with crackers or baguette, opt for a neutral flavor to make certain the cheese and quince combination remains the star of the dish.
Gambas Al Ajillo

Gambas Al Ajillo, or garlic shrimp, is a classic Spanish tapas dish that’s both simple and packed with flavor. Traditionally cooked in a cazuela, a Spanish clay dish, this recipe highlights the natural sweetness of the shrimp enhanced by the robust flavors of garlic and chili.
It’s a perfect appetizer or snack, often served with crusty bread to soak up the delicious garlicky oil. This dish can be prepared quickly and is best enjoyed fresh and warm. The key to a great Gambas Al Ajillo is using fresh shrimp, preferably with the shell on, as this adds depth to the flavor.
The combination of garlic, olive oil, and a hint of chili creates a fragrant and savory dish that’s sure to captivate your guests.
Ingredients (for 4-6 servings):
- 1.5 pounds of medium-sized shrimp, peeled and deveined
- 8 cloves of garlic, thinly sliced
- 1/2 cup of extra virgin olive oil
- 1 teaspoon of red pepper flakes or 1-2 dried red chilies, crushed
- 1/4 cup of fresh parsley, finely chopped
- Salt to taste
- Freshly ground black pepper to taste
- Lemon wedges for serving
- Crusty bread for serving
Cooking Instructions:
- Prepare the Shrimp: Begin by rinsing the shrimp under cold water and patting them dry with paper towels. This guarantees they’ll cook evenly and absorb the flavors better.
- Heat the Oil: In a large skillet or cazuela, heat the olive oil over medium heat. Add the sliced garlic and red pepper flakes. Cook gently until the garlic becomes golden and aromatic, being careful not to burn it, about 2-3 minutes.
- Cook the Shrimp: Increase the heat to medium-high and add the shrimp to the skillet in a single layer. Season with salt and black pepper. Cook the shrimp for 2-3 minutes on each side or until they turn pink and opaque.
- Add Parsley: Once the shrimp are cooked, remove the skillet from the heat and stir in the chopped parsley. This will add freshness and color to the dish.
- Serve: Transfer the shrimp with the garlic oil to a serving dish. Garnish with additional parsley if desired and serve immediately with lemon wedges and crusty bread on the side.
Extra Tips:
To enhance the flavor, you can marinate the shrimp for about 30 minutes before cooking with a little olive oil, garlic, and a pinch of salt.
If you prefer a milder dish, reduce the amount of chili or red pepper flakes. For an extra touch, consider adding a splash of dry white wine to the skillet after cooking the garlic, letting it reduce slightly before adding the shrimp. This can add a subtle depth of flavor to the Gambas Al Ajillo.
Chorizo and Cheese Pinchos

Chorizo and Cheese Pinchos are a delightful Spanish snack that combines bold flavors and textures, perfect for any gathering or casual meal. “Pinchos” refers to the small skewers used to hold the ingredients together, making them easy to serve and enjoy. The savory taste of chorizo pairs beautifully with the creamy, tangy cheese, creating a mouthwatering bite-sized treat that’s sure to impress your guests.
Whether you’re hosting a tapas night or simply want to try something new, these pinchos offer a delicious and authentic taste of Spain. This recipe for Chorizo and Cheese Pinchos serves 4-6 people, making it ideal for small parties or family get-togethers. The preparation is simple and quick, allowing you to spend more time enjoying your company and less time in the kitchen.
With just a few high-quality ingredients and minimal cooking, you can create a dish that looks as good as it tastes. Let’s plunge into the ingredients you’ll need and the steps to bring this tasty appetizer to life.
Ingredients:
- 12 slices of chorizo sausage
- 12 cubes of Manchego cheese
- 12 small pieces of crusty bread or baguette slices
- 2 tablespoons olive oil
- 1 teaspoon smoked paprika
- Salt and pepper to taste
- Fresh parsley for garnish
- 12 wooden skewers or toothpicks
Instructions:
- Prepare the Ingredients: Begin by slicing the chorizo into 12 even pieces if not pre-sliced, and cut the Manchego cheese into cubes approximately the same size as the chorizo slices. Cut the bread into small pieces or slices that can be easily skewered.
- Season the Bread: In a small bowl, combine the olive oil, smoked paprika, salt, and pepper. Brush this mixture onto the pieces of bread to add flavor and a slight crispness when toasted.
- Assemble the Pinchos: Take a skewer and start by threading a piece of bread followed by a slice of chorizo, then a cube of cheese. Repeat this process for all the skewers until you have 12 pinchos assembled.
- Cook the Pinchos: Heat a grill pan over medium heat. Place the pinchos on the pan and cook for about 2-3 minutes on each side, or until the cheese starts to melt slightly and the bread is toasted.
- Garnish and Serve: Once cooked, remove the pinchos from the heat and place them on a serving platter. Garnish with freshly chopped parsley for a pop of color and added freshness. Serve immediately while warm.
Extra Tips:
For a variation, consider adding roasted red peppers or olives to the pinchos for extra flavor and color. If Manchego cheese is unavailable, a sharp cheddar or another semi-hard cheese can be a good substitute.
Be sure not to overcook the pinchos, as the cheese should be just starting to melt without losing its shape. Additionally, if you’re using thicker slices of chorizo, you might want to warm them in the pan slightly before assembling to ascertain they’re heated through. Enjoy experimenting with different combinations to suit your taste preferences!
Spanish Olive Tapenade
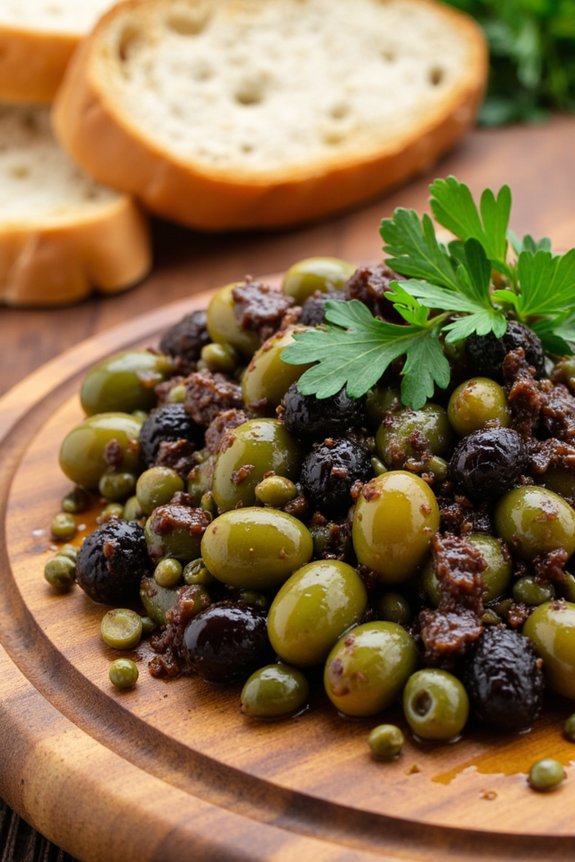
Spanish Olive Tapenade is a delightful and flavorful spread that captures the essence of Spanish cuisine in every bite. Made with a blend of olives, capers, anchovies, and garlic, this tapenade is perfect for snacking or serving as an appetizer. With its bold flavors and smooth texture, it pairs well with crusty bread, crackers, or fresh vegetables, making it an exquisite addition to any gathering or casual meal.
This Spanish-inspired tapenade isn’t only delicious but also incredibly simple to make. The key is using high-quality ingredients, especially the olives, which form the base of the dish. The preparation is straightforward, allowing you to whip up a batch in no time. Whether you’re hosting a party or just looking for a savory treat, this Spanish Olive Tapenade will surely impress your guests and tantalize your taste buds.
Ingredients for 4-6 servings:
- 2 cups of Spanish green olives, pitted
- 1 cup of black olives, pitted
- 2 tablespoons of capers, rinsed
- 4 anchovy fillets
- 2 cloves of garlic, minced
- 1 tablespoon of lemon juice
- 1/4 cup of extra-virgin olive oil
- 1/2 teaspoon of black pepper
- 1 tablespoon of fresh parsley, chopped
Cooking Instructions:
- Prepare the Ingredients: Start by pitting the olives if they aren’t already. Rinse the capers under cold water to remove excess salt. Peel and mince the garlic cloves.
- Blend the Base: In a food processor, combine the green and black olives, capers, anchovy fillets, and minced garlic. Pulse the mixture until it becomes a coarse paste. Be sure not to over-process; you want the texture to remain somewhat chunky.
- Add Flavor: Add the lemon juice and black pepper to the olive mixture. Pulse a few more times to incorporate these ingredients.
- Incorporate the Olive Oil: With the processor running, slowly drizzle in the extra-virgin olive oil until the tapenade reaches your desired consistency. It should be thick and spreadable.
- Final Touches: Transfer the tapenade to a serving bowl and stir in the chopped fresh parsley. Taste and adjust the seasoning if necessary.
- Serve: Serve the tapenade at room temperature with slices of crusty bread, crackers, or fresh vegetable sticks.
Extra Tips:
When making Spanish Olive Tapenade, it’s important to taste the mixture as you go, especially after adding the anchovies and capers since they can be quite salty. Adjust the seasoning according to your preference.
For a more robust flavor, allow the tapenade to sit for at least an hour before serving, which allows the flavors to meld beautifully. If you prefer a spicy kick, consider adding a pinch of red pepper flakes to the mix.
Additionally, this tapenade can be made ahead of time and stored in the refrigerator for up to a week, making it a convenient option for pre-planned gatherings.
Turrón De Chocolate Bars

Turrón De Chocolate Bars are a delightful Spanish treat that combines the rich flavors of chocolate with the crunchy texture of nuts. This traditional dessert is especially popular during the holiday season in Spain, but it’s a wonderful snack to enjoy any time of the year.
The bars are made by melting chocolate and mixing it with a combination of nuts and crispy rice cereal, resulting in a sweet and crunchy snack that’s hard to resist. Whether you’re serving them at a party or enjoying them as a dessert, Turrón De Chocolate Bars are bound to be a hit with both kids and adults.
Making Turrón De Chocolate Bars at home is simple and requires only a few ingredients. The process involves melting chocolate, combining it with nuts and cereal, and then allowing it to set. This recipe yields enough for 4-6 people, making it perfect for a small gathering or family snack time.
The bars can be customized to your liking by choosing your favorite type of chocolate and nuts, allowing you to create a personalized version of this classic treat.
Ingredients (Serves 4-6):
- 200g dark chocolate (at least 70% cocoa)
- 100g milk chocolate
- 100g hazelnuts, toasted and roughly chopped
- 50g almonds, toasted and roughly chopped
- 50g crispy rice cereal
- 1 tablespoon unsalted butter
- A pinch of sea salt
Instructions:
- Prepare the baking dish: Line a rectangular baking dish (approximately 9×13 inches) with parchment paper, allowing some paper to hang over the edges for easy removal later.
- Melt the chocolate: In a heatproof bowl set over a pot of simmering water (double boiler), melt the dark chocolate, milk chocolate, and butter together. Stir occasionally until smooth and fully melted. Remove from heat.
- Mix in the dry ingredients: Stir in the toasted hazelnuts, almonds, and crispy rice cereal into the melted chocolate mixture. Confirm that all the ingredients are well-coated with chocolate.
- Spread the mixture: Pour the chocolate and nut mixture into the prepared baking dish, spreading it evenly with a spatula. Press down gently to compact the mixture and confirm an even surface.
- Set the turrón: Sprinkle a pinch of sea salt over the top of the mixture for added flavor. Place the dish in the refrigerator and allow it to set for at least 2 hours, or until the chocolate has hardened.
- Cut and serve: Once the turrón has set, lift it out of the dish using the parchment paper overhang. Place on a cutting board and cut into bars of your desired size. Serve immediately or store in an airtight container for later.
Extra Tips:
For an extra layer of flavor, consider adding a teaspoon of vanilla extract or a sprinkle of cinnamon to the chocolate mixture. If you prefer a sweeter bar, you can adjust the ratio of dark to milk chocolate to your liking.
Remember to toast the nuts before adding them to the mixture, as this will enhance their flavor and crunchiness. Ultimately, be sure to let the turrón set completely in the refrigerator to confirm it holds its shape when cut into bars.