

As the crisp air of autumn settles in, Spanish cuisine brings warmth and comfort to our tables. The rich aroma of chorizo and lentil stew simmering or the delightful crunch of cinnamon-spiced churros are perfect for this season. Each dish is a celebration of autumn’s bounty, offering cozy flavors with every bite. Excited to explore these flavorful fall treasures? Let’s embark on this culinary journey together.
Chorizo and Lentil Stew
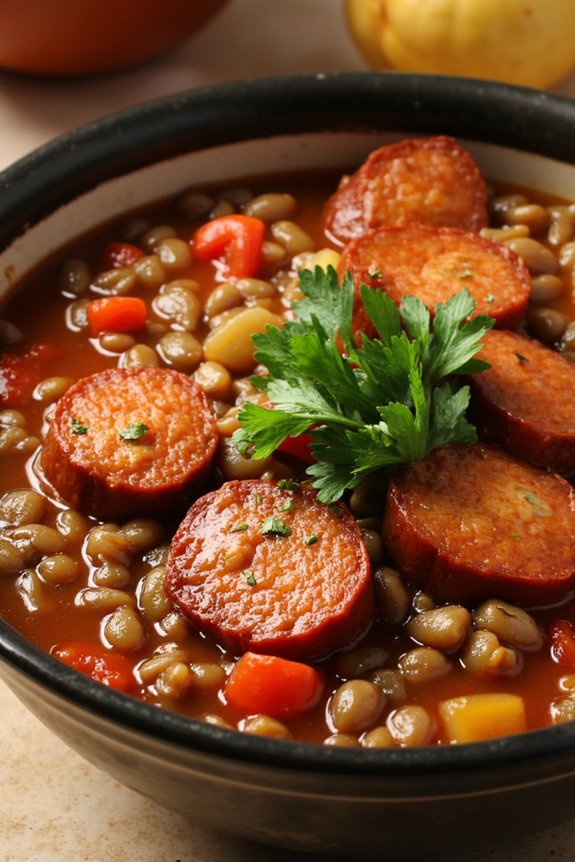
As the leaves turn and the air grows crisp, there’s nothing like a hearty stew to warm you from the inside out. Chorizo and Lentil Stew, a classic Spanish dish, combines the smoky, spicy flavors of chorizo with the earthy, comforting warmth of lentils. This dish is perfect for a cozy fall evening, providing both flavor and nourishment in every bite. The rich, aromatic broth infuses the lentils and vegetables, creating a delightful melding of textures and tastes that’s sure to satisfy the whole family.
In Spain, such stews are a staple, often enjoyed with crusty bread and a glass of robust red wine. The beauty of this dish lies not only in its flavors but also in its simplicity; it’s a one-pot wonder that requires minimal effort but delivers maximum satisfaction. With just a few ingredients and straightforward steps, you can bring a taste of Spain to your table, offering a comforting and delicious meal that will warm your home and heart.
Ingredients (Serves 4-6):
- 1 tablespoon olive oil
- 1 large onion, chopped
- 2 cloves garlic, minced
- 1 red bell pepper, diced
- 1 pound (450g) chorizo sausage, sliced
- 2 cups (400g) dried lentils, rinsed
- 1 teaspoon smoked paprika
- 1/2 teaspoon ground cumin
- 1/2 teaspoon dried oregano
- 1 can (14 oz/400g) diced tomatoes
- 4 cups (1 liter) chicken or vegetable broth
- Salt and pepper to taste
- Fresh parsley, chopped (for garnish)
Cooking Instructions:
- Prepare the Base: Heat the olive oil in a large pot over medium heat. Add the chopped onion and cook for about 5 minutes until it becomes translucent. Stir in the minced garlic and cook for an additional minute until fragrant.
- Add the Chorizo and Veggies: Add the sliced chorizo to the pot and cook for about 5-7 minutes, allowing it to release its oils and begin to brown. Then, add the diced red bell pepper and continue to cook for another 3 minutes, stirring occasionally.
- Mix in the Spices: Stir in the smoked paprika, ground cumin, and dried oregano, mixing well to coat the vegetables and chorizo with the spices. This step will enhance the flavors as the spices toast slightly in the oil.
- Incorporate Lentils and Tomatoes: Add the rinsed lentils to the pot, followed by the diced tomatoes. Stir everything together, ensuring the lentils are well covered in the flavorful mixture.
- Simmer the Stew: Pour in the chicken or vegetable broth. Bring the mixture to a boil, then reduce the heat to low. Cover the pot and let it simmer for about 30-40 minutes, or until the lentils are tender and the flavors have melded together.
- Season and Garnish: Taste the stew and season with salt and pepper as desired. If the stew is too thick, you can add a bit more broth or water to reach your preferred consistency. Just before serving, sprinkle with freshly chopped parsley for added freshness and color.
Extra Tips:
When cooking Chorizo and Lentil Stew, it’s important to use good-quality chorizo as it greatly impacts the flavor of the dish. If you prefer a milder stew, opt for a less spicy chorizo or adjust the amount used.
Remember that lentils can vary in cooking time, so check them for doneness towards the end of cooking; they should be tender but not mushy. This stew can also be made a day ahead, as the flavors develop even further after resting overnight. Serve with hearty, crusty bread to soak up the delicious broth. Enjoy!
Spanish Pumpkin Soup
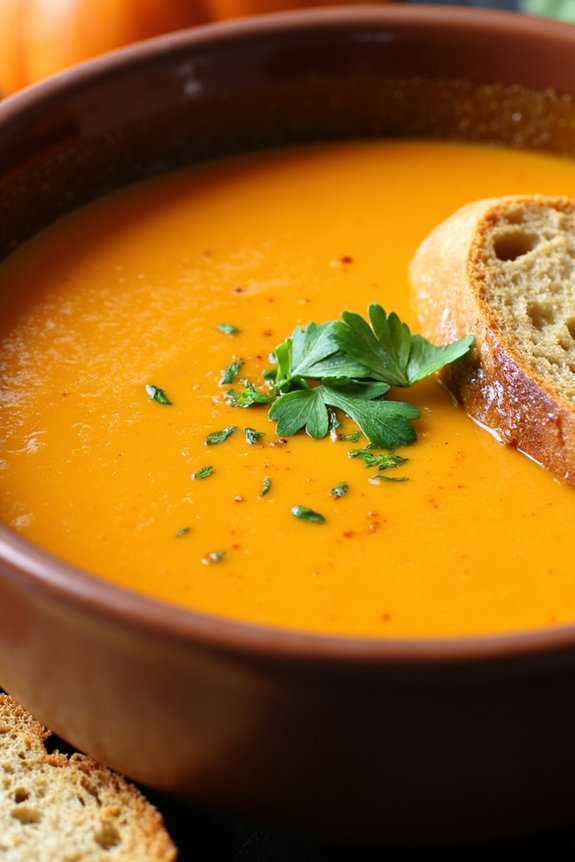
As the crisp fall air settles in, there’s nothing quite like indulging in a bowl of hearty Spanish Pumpkin Soup to warm your soul. This delightful dish captures the essence of autumn with its velvety texture and rich flavors. The combination of sweet pumpkin, aromatic spices, and savory ingredients makes it a perfect comfort food for chilly evenings.
Spanish Pumpkin Soup isn’t only a delicious treat but also a hallmark of the simplicity and elegance of Spanish cuisine. Whether you’re hosting a dinner party or enjoying a quiet night at home, this soup is sure to impress with its vibrant color and enticing aroma.
Spanish cuisine is renowned for its ability to transform humble ingredients into extraordinary dishes, and this pumpkin soup is no exception. The recipe calls for fresh pumpkin, which is roasted to enhance its natural sweetness and depth of flavor. A medley of Spanish spices, including smoked paprika and cumin, adds a warm and slightly smoky undertone that beautifully complements the pumpkin’s earthiness.
Garnished with a drizzle of olive oil and a sprinkle of fresh herbs, this soup is both visually appealing and satisfyingly delicious. Serve it with crusty bread for a complete meal that celebrates the bountiful flavors of the fall season.
Ingredients (Serves 4-6):
- 1 medium pumpkin (about 2 pounds), peeled and cubed
- 2 tablespoons olive oil
- 1 large onion, chopped
- 4 cloves garlic, minced
- 1 teaspoon smoked paprika
- 1/2 teaspoon ground cumin
- 1/4 teaspoon cayenne pepper
- 4 cups vegetable broth
- Salt and pepper to taste
- 1/2 cup heavy cream (optional)
- Fresh parsley or cilantro, chopped, for garnish
- Crusty bread, for serving
Cooking Instructions:
- Preheat and Prepare Pumpkin: Preheat your oven to 400°F (200°C). Spread the cubed pumpkin on a baking sheet, drizzle with 1 tablespoon of olive oil, and season with salt and pepper. Roast in the preheated oven for about 25-30 minutes, or until the pumpkin is tender and lightly caramelized.
- Sauté Aromatics: While the pumpkin is roasting, heat the remaining tablespoon of olive oil in a large pot over medium heat. Add the chopped onion and sauté until soft and translucent, about 5 minutes. Stir in the minced garlic, smoked paprika, cumin, and cayenne pepper, and cook for another 2 minutes until fragrant.
- Combine Ingredients: Add the roasted pumpkin to the pot, followed by the vegetable broth. Bring the mixture to a boil, then reduce the heat and let it simmer for about 15 minutes to allow the flavors to meld.
- Blend the Soup: Using an immersion blender, blend the soup until smooth and creamy. If you prefer a smoother texture, you can transfer the soup to a blender in batches. If desired, stir in the heavy cream for added richness.
- Season and Serve: Taste and adjust the seasoning with salt and pepper as needed. Ladle the soup into bowls and garnish with chopped parsley or cilantro. Serve hot with crusty bread on the side.
Extra Tips:
For the best results, choose a pumpkin variety that’s ideal for cooking, such as the sugar pumpkin or butternut squash. These types have a sweeter taste and smoother texture, perfect for soup.
If you want to add a touch of sweetness, consider adding a small, peeled and diced apple to the soup as it simmers. For a vegan version, simply omit the heavy cream or replace it with coconut milk for a different flavor profile.
Additionally, roasted pumpkin seeds can be sprinkled on top for added crunch and visual appeal. Enjoy your Spanish Pumpkin Soup as a comforting, seasonal delight!
Cinnamon-Spiced Churros
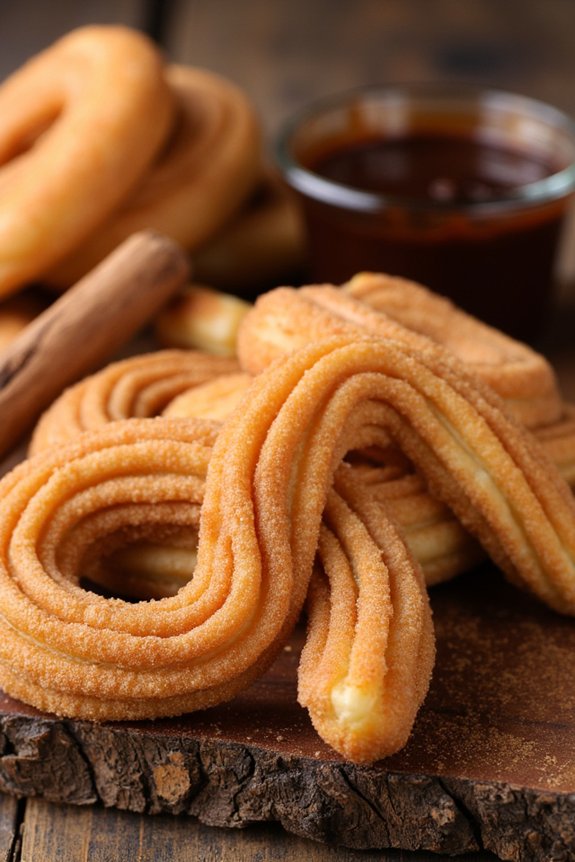
Churros, a beloved Spanish treat, are perfect for indulging during the crisp fall season. These delightful fried pastries, with their crispy exterior and soft, doughy interior, are traditionally enjoyed with a dusting of sugar and a hint of cinnamon. When paired with a rich chocolate dipping sauce, cinnamon-spiced churros become a warm, comforting dessert that’s perfect for gatherings with family and friends.
Originating from Spain, churros have become a popular dessert worldwide, often enjoyed at fairs, markets, and festivals.
Making cinnamon-spiced churros at home is a rewarding experience that fills your kitchen with the comforting aroma of cinnamon and sugar. This recipe serves 4-6 people, making it an ideal choice for a cozy get-together. The key to perfect churros is creating a dough that’s firm enough to hold its shape but soft enough to yield a tender interior. By following this recipe, you’ll be able to recreate the magic of authentic Spanish churros right in your own home.
Ingredients:
- 1 cup all-purpose flour
- 1 cup water
- 2 tablespoons unsalted butter
- 2 tablespoons granulated sugar
- 1/4 teaspoon salt
- 1 teaspoon vanilla extract
- 1 teaspoon ground cinnamon
- 2 large eggs
- Vegetable oil, for frying
- 1/2 cup granulated sugar (for coating)
- 1 teaspoon ground cinnamon (for coating)
Instructions:
- Prepare the Dough: In a medium saucepan, combine the water, unsalted butter, granulated sugar, and salt. Bring the mixture to a boil over medium heat. Once boiling, remove from heat and immediately stir in the flour, mixing vigorously until a smooth dough forms and pulls away from the sides of the pan.
- Incorporate Flavors: Allow the dough to cool slightly before adding the vanilla extract and 1 teaspoon of ground cinnamon. Mix well to incorporate the flavors evenly throughout the dough.
- Add the Eggs: Gradually add the eggs one at a time, mixing well after each addition until the dough is smooth and glossy. The dough should be thick but pipeable.
- Prepare for Frying: Heat vegetable oil in a deep pan or fryer to 350°F (175°C). While the oil is heating, combine the 1/2 cup of granulated sugar and 1 teaspoon of ground cinnamon in a shallow dish for coating the churros after frying.
- Pipe the Churros: Transfer the dough to a piping bag fitted with a large star tip. Carefully pipe 4-6 inch strips of dough directly into the hot oil, using a pair of scissors to cut the dough from the piping bag. Fry in batches to avoid overcrowding the pan.
- Fry Until Golden: Fry the churros for about 2-3 minutes on each side or until they’re golden brown and crispy. Use a slotted spoon to remove the churros from the oil and drain them on paper towels.
- Coat with Cinnamon Sugar: While the churros are still warm, roll them in the cinnamon-sugar mixture until completely coated. Serve immediately with your favorite chocolate dipping sauce.
Extra Tips:
To guarantee your churros are light and airy, make sure not to skip the step of vigorously mixing the flour into the boiling water. This helps the dough achieve the right consistency.
Additionally, maintaining the oil temperature is vital for even cooking and preventing the churros from becoming greasy. If you don’t have a deep fryer, a heavy-bottomed pot works well for frying.
Finally, for a fun twist, try adding a pinch of nutmeg or a dash of cayenne pepper to the cinnamon-sugar coating for an extra layer of flavor.
Roasted Sweet Potatoes With Paprika
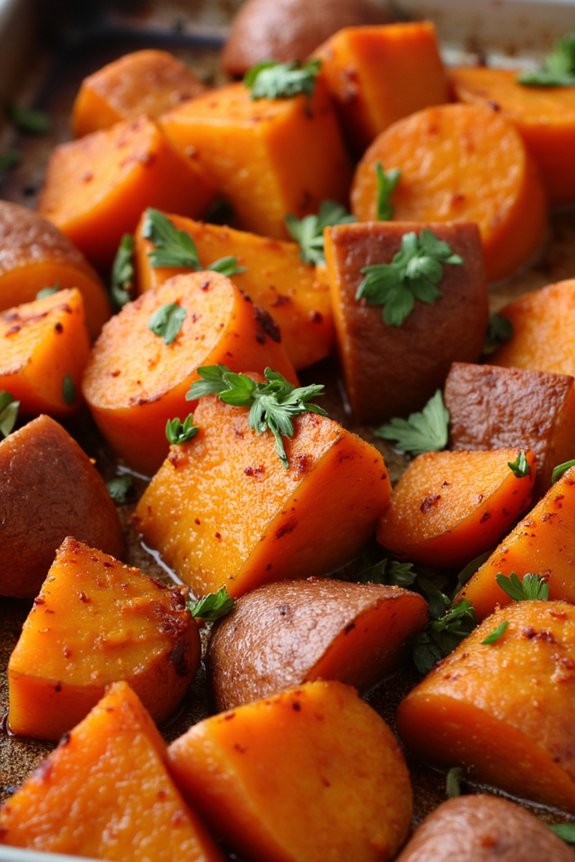
Roasted Sweet Potatoes With Paprika is a delightful dish that perfectly captures the essence of Spanish fall flavors. This recipe brings out the natural sweetness of sweet potatoes, enhanced by the smoky, earthy notes of paprika—a staple spice in Spanish cuisine. The dish is simple yet satisfying, making it an ideal side for any fall meal or a hearty vegetarian option on its own.
The beauty of this recipe lies in its simplicity and the way it enhances the natural flavors of the ingredients. The sweet potatoes are roasted until they’re tender and caramelized, while the paprika adds a distinct warmth and depth. The result is a dish that not only warms the body but also delights the senses with its vibrant colors and aromas.
Suitable for serving 4-6 people, this recipe is perfect for family gatherings or cozy dinners.
Ingredients:
- 4 large sweet potatoes
- 2 tablespoons olive oil
- 2 teaspoons smoked paprika
- 1 teaspoon salt
- 1/2 teaspoon black pepper
- 2 cloves garlic, minced
- Fresh parsley, chopped (for garnish)
Cooking Instructions:
- Preheat the Oven: Start by preheating your oven to 425°F (220°C). This will guarantee that the sweet potatoes cook evenly and achieve the desired caramelization.
- Prepare the Sweet Potatoes: Wash the sweet potatoes thoroughly and peel them if desired. Cut them into 1-inch cubes to guarantee they cook evenly.
- Season the Sweet Potatoes: In a large mixing bowl, combine the sweet potato cubes, olive oil, smoked paprika, salt, black pepper, and minced garlic. Toss the mixture well to guarantee each piece is coated evenly with the seasoning.
- Arrange on a Baking Sheet: Spread the seasoned sweet potatoes in a single layer on a baking sheet. This allows for even roasting and prevents the potatoes from steaming.
- Roast in the Oven: Place the baking sheet in the preheated oven and roast for 25-30 minutes, or until the sweet potatoes are tender and have a golden-brown crust. Flip the potatoes halfway through the cooking time to guarantee even roasting.
- Garnish and Serve: Once done, remove the sweet potatoes from the oven and transfer them to a serving dish. Garnish with freshly chopped parsley for a burst of color and freshness before serving.
Extra Tips:
For an added twist, consider adding a dash of cayenne pepper for a spicy kick, or a sprinkle of brown sugar to enhance the natural sweetness of the potatoes.
You can also experiment with different varieties of paprika, such as hot or sweet, to suit your taste preferences. Always guarantee the sweet potatoes are cut into uniform pieces for even cooking.
If you find the sweet potatoes aren’t caramelizing as desired, increase the oven temperature slightly or extend the cooking time, but keep a close eye to avoid burning.
Saffron and Seafood Paella
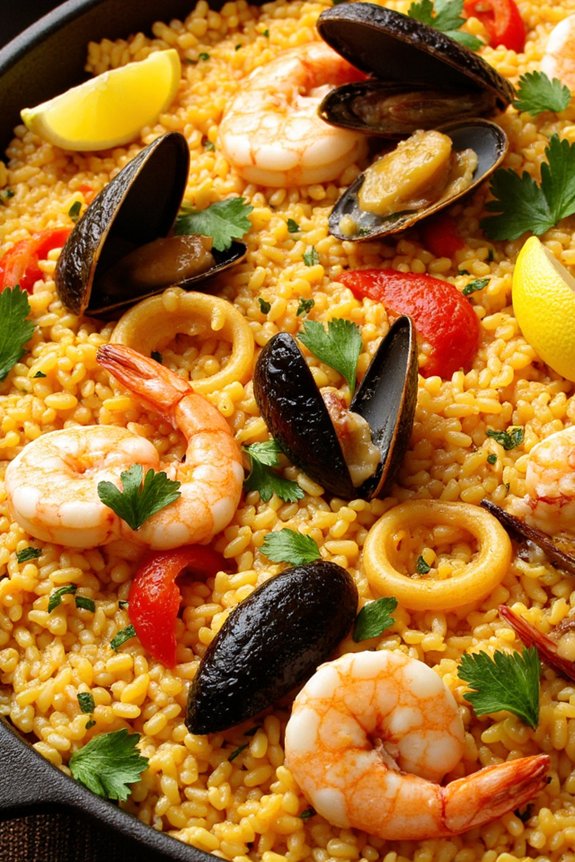
Saffron and Seafood Paella is a quintessential Spanish dish that brings the vibrant flavors of the Mediterranean to your table. Traditionally hailing from the Valencia region, this seafood version of paella is a delightful medley of fresh seafood, aromatic saffron, and perfectly cooked rice. It’s a hearty and communal dish often enjoyed with family and friends, making it perfect for fall gatherings.
The golden hue of saffron combined with the briny taste of seafood creates a dish that’s both visually stunning and tantalizing to the taste buds. This recipe for Saffron and Seafood Paella serves 4-6 people, making it ideal for a cozy dinner party. The key to a great paella is using the right type of rice, such as Bomba or Calasparra, which absorbs the flavors without becoming mushy.
The gentle infusion of saffron gives the rice its characteristic color and a subtle floral aroma. With the addition of fresh mussels, clams, shrimp, and calamari, this dish is a seafood lover’s dream. The preparation is straightforward but requires attention to detail to guarantee everything is cooked to perfection.
Ingredients:
- 2 cups Bomba or Calasparra rice
- 1/2 teaspoon saffron threads
- 4 cups seafood stock
- 1/4 cup olive oil
- 1 medium onion, finely chopped
- 1 red bell pepper, diced
- 3 cloves garlic, minced
- 1 teaspoon smoked paprika
- 1/2 teaspoon crushed red pepper flakes (optional)
- 1 cup diced tomatoes
- 1/2 pound mussels, cleaned and debearded
- 1/2 pound clams, cleaned
- 1/2 pound shrimp, peeled and deveined
- 1/2 pound calamari, cleaned and sliced into rings
- Salt and black pepper to taste
- 1/4 cup chopped fresh parsley
- Lemon wedges for serving
Instructions:
- Prepare the Saffron Infusion: In a small bowl, combine the saffron threads with a few tablespoons of warm seafood stock. Allow it to steep for at least 10 minutes to release its color and aroma.
- Cook the Aromatics: In a large paella pan or wide skillet, heat olive oil over medium heat. Add the chopped onion and red bell pepper, sautéing until they’re soft and translucent, about 5 minutes. Stir in the minced garlic, smoked paprika, and crushed red pepper flakes, cooking for another minute until fragrant.
- Add Tomatoes and Rice: Stir in the diced tomatoes, cooking until they begin to break down and release their juices, approximately 3 minutes. Add the rice, stirring well to coat the grains in the aromatic mixture.
- Incorporate the Stock and Saffron: Pour in the seafood stock and the saffron infusion, stirring to combine. Season with salt and black pepper. Bring the mixture to a gentle boil, then reduce the heat to low. Don’t stir the rice from this point on to allow a crust, or socarrat, to form on the bottom.
- Cook the Seafood: After about 15 minutes, arrange the mussels, clams, shrimp, and calamari on top of the rice, nestling them into the mixture. Cover the pan with foil or a lid and cook for an additional 10-15 minutes, or until the seafood is cooked through and the rice has absorbed the liquid.
- Finish and Serve: Remove the pan from the heat and let it rest, covered, for about 5 minutes. Sprinkle with chopped parsley and serve with lemon wedges.
Extra Tips:
When cooking Saffron and Seafood Paella, it’s important to use a wide, shallow pan to allow the rice to cook evenly and form a desirable crust on the bottom. Avoid stirring the rice once the stock has been added, as this helps develop the authentic socarrat.
Guarantee all seafood is fresh and properly cleaned to enhance the flavor of the dish. If you can’t find Bomba or Calasparra rice, Arborio can be a suitable substitute, but remember that it may absorb liquid differently, so adjust the cooking liquid as necessary.
Apple and Almond Empanadas
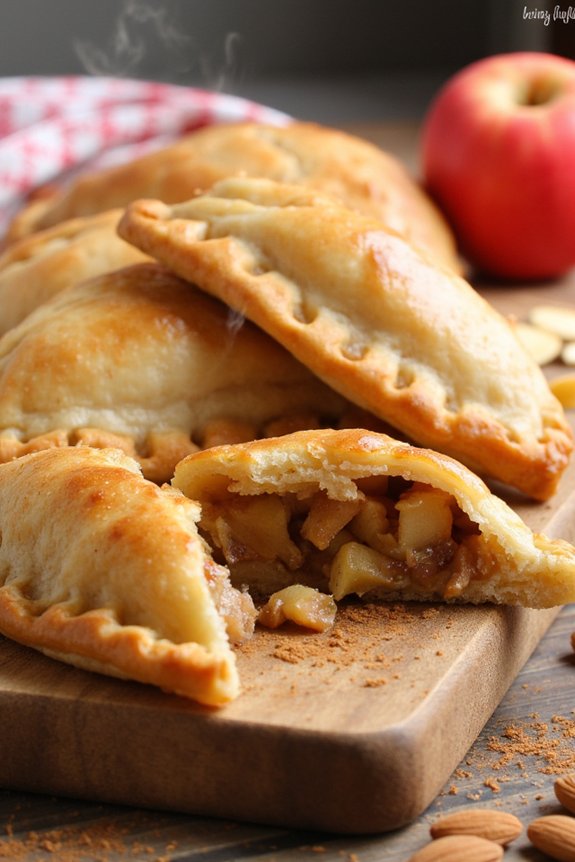
Apple and Almond Empanadas are a delightful and seasonal treat perfect for the fall. These empanadas combine the natural sweetness of apples with the rich, nutty flavor of almonds, creating a warm and comforting pastry that’s ideal for cooler weather. The flaky pastry crust wraps around a luscious filling made from fresh apples, finely chopped almonds, and a hint of cinnamon and nutmeg, providing a perfect balance of flavors and textures that will transport you to a cozy autumn in Spain.
These empanadas aren’t only delicious but also versatile. They can be served as a dessert, a snack, or even a special breakfast treat. Perfect for family gatherings, these empanadas can be made ahead of time and enjoyed warm from the oven or at room temperature.
Whether you’re an experienced baker or a novice in the kitchen, this recipe is straightforward and rewarding, promising a delightful homemade pastry that will become a favorite in your fall recipe repertoire.
Ingredients for 4-6 servings:
- 2 cups all-purpose flour
- 1/2 teaspoon salt
- 1/2 cup unsalted butter, cold and cubed
- 1/4 cup ice water
- 3 medium apples, peeled, cored, and diced
- 1/2 cup sugar
- 1 teaspoon ground cinnamon
- 1/4 teaspoon ground nutmeg
- 1/3 cup finely chopped almonds
- 1 teaspoon lemon juice
- 1 egg, beaten (for egg wash)
Cooking Instructions:
- Prepare the Dough: In a large bowl, combine the flour and salt. Add the cold, cubed butter and use a pastry cutter or your fingers to blend until the mixture resembles coarse crumbs. Gradually add ice water, stirring until the dough begins to come together. Form the dough into a ball, wrap it in plastic wrap, and refrigerate for at least 30 minutes.
- Make the Filling: In a medium saucepan over medium heat, combine the diced apples, sugar, cinnamon, nutmeg, and lemon juice. Cook for about 10 minutes, or until the apples are tender and the mixture is slightly thickened. Stir in the chopped almonds and remove from heat. Allow the filling to cool to room temperature.
- Roll Out the Dough: Preheat your oven to 375°F (190°C). On a lightly floured surface, roll out the dough to about 1/8-inch thickness. Use a round cutter or a small bowl to cut out circles about 5 inches in diameter.
- Fill and Seal Empanadas: Place a tablespoon of the apple-almond filling in the center of each dough circle. Fold the dough over to form a half-moon shape and press the edges together to seal. Crimp the edges with a fork for a decorative finish.
- Apply Egg Wash: Place the empanadas on a baking sheet lined with parchment paper. Brush the tops with the beaten egg to give them a golden color when baking.
- Bake: Bake the empanadas in the preheated oven for 20-25 minutes or until golden brown. Remove from the oven and allow them to cool slightly before serving.
Extra Tips: For a twist, consider adding a handful of raisins or dried cranberries to the apple filling for a burst of flavor. If you prefer a sweeter pastry, sprinkle a little sugar on top of the egg wash before baking.
Store any leftover empanadas in an airtight container at room temperature for up to two days, or freeze them for longer storage. Enjoy these empanadas warm with a scoop of vanilla ice cream or a dollop of whipped cream for an extra indulgent treat.
Spanish Hot Chocolate

Spanish Hot Chocolate, or “Chocolate a la Taza,” is a rich and thick beverage that’s a perfect treat during the fall months. Unlike the watery hot chocolate often found elsewhere, this Spanish version is thick enough to coat the back of a spoon. It’s typically enjoyed with churros for breakfast or as an afternoon snack, making it a comforting and indulgent delight for chocolate lovers.
The key to achieving its characteristic thickness is the use of cornstarch, which gives it a luscious, velvety texture that sets it apart from other hot chocolates. This recipe is designed to serve 4-6 people, making it ideal for a cozy family gathering or a small get-together with friends. The deep chocolatey flavor is perfectly balanced with a hint of sweetness and a touch of spice, creating a harmonious blend that warms you from the inside out.
With just a few ingredients and simple steps, you can create this exquisite Spanish treat right in your own kitchen.
Ingredients (Serves 4-6):
- 4 cups whole milk
- 8 oz dark chocolate (70% cocoa), finely chopped
- 1/4 cup granulated sugar
- 2 tablespoons cornstarch
- 1 teaspoon vanilla extract
- 1/2 teaspoon ground cinnamon
- Pinch of salt
Cooking Instructions:
1. Combine Dry Ingredients:
In a small bowl, mix the cornstarch with 1/4 cup of the milk to create a smooth slurry. This will prevent lumps when thickening the hot chocolate.
2. Heat the Milk:
In a medium saucepan, heat the remaining milk over medium heat until it begins to steam. Don’t let it boil, as this may scald the milk.
3. Melt the Chocolate:
Add the finely chopped dark chocolate to the warm milk, stirring continuously until it’s fully melted and the mixture is smooth.
4. Add Sweetness and Spice:
Stir in the sugar, vanilla extract, ground cinnamon, and a pinch of salt. Continue to stir until the sugar is completely dissolved.
5. Thicken the Hot Chocolate:
Slowly pour the cornstarch slurry into the chocolate mixture, stirring constantly. Continue to heat the mixture over medium-low heat until it thickens to your desired consistency. It should be thick enough to coat the back of a spoon.
6. Serve and Enjoy:
Remove the saucepan from heat and pour the hot chocolate into mugs. Serve immediately while hot, ideally with a side of churros for dipping.
Extra Tips:
For an ultra-smooth texture, consider straining the hot chocolate through a fine-mesh sieve before serving. This can help remove any potential lumps from the cornstarch.
If you prefer a sweeter hot chocolate, adjust the sugar to taste. Additionally, experimenting with different types of chocolate can alter the flavor profile; you might try a mix of milk and dark chocolates for a creamier drink.
Finally, if you want an extra kick, a pinch of cayenne pepper can add a subtle heat that complements the richness of the chocolate.
Rioja Braised Short Ribs

As the crisp autumn air begins to settle in, there’s nothing quite as comforting as a richly flavored, slow-cooked meal that fills your home with warmth and irresistible aromas. Rioja Braised Short Ribs is a quintessential Spanish fall dish that combines the deep, fruity notes of Rioja wine with the savory richness of tender beef short ribs. This dish is perfect for a cozy family dinner or a special gathering with friends, where the succulent meat falls off the bone and the sauce is perfect for mopping up with crusty bread.
This recipe brings together a blend of traditional Spanish flavors, with ingredients like smoked paprika and fresh herbs that enhance the natural taste of the beef. The slow-braising process allows the short ribs to absorb all the wonderful flavors of the wine and aromatics, making every bite a delightful experience. Served with a side of creamy mashed potatoes or polenta, this dish is sure to become a favorite in your fall cooking repertoire.
Ingredients (serves 4-6):
- 4 pounds beef short ribs
- Salt and freshly ground black pepper
- 2 tablespoons olive oil
- 1 large onion, chopped
- 3 cloves garlic, minced
- 2 carrots, chopped
- 2 celery stalks, chopped
- 2 tablespoons tomato paste
- 1 tablespoon smoked paprika
- 1 teaspoon dried thyme
- 2 cups Rioja wine
- 2 cups beef stock
- 2 bay leaves
- Fresh parsley, chopped (for garnish)
Cooking Instructions:
- Prepare the Short Ribs: Begin by seasoning the short ribs generously with salt and freshly ground black pepper. This will enhance the flavor of the meat as it cooks.
- Sear the Meat: Heat the olive oil in a large, heavy-duty pot or Dutch oven over medium-high heat. Add the short ribs in batches and sear them on all sides until they’re deeply browned, about 4-5 minutes per side. Remove the ribs from the pot and set them aside.
- Cook the Vegetables: In the same pot, add the chopped onion, garlic, carrots, and celery. Cook for 5-7 minutes, stirring occasionally, until the vegetables are softened and starting to caramelize.
- Add Tomato Paste and Spices: Stir in the tomato paste, smoked paprika, and dried thyme. Cook for another 2 minutes to allow the tomato paste to caramelize slightly and the spices to release their flavors.
- Deglaze with Wine: Pour in the Rioja wine, scraping up any browned bits from the bottom of the pot. Let the wine simmer for about 5 minutes to reduce slightly and intensify the flavor.
- Return the Ribs and Add Stock: Return the short ribs to the pot, nestling them among the vegetables. Pour in the beef stock and add the bay leaves. Bring the mixture to a gentle simmer.
- Braise the Ribs: Cover the pot with a lid and transfer it to a preheated oven at 325°F (160°C). Braise the short ribs for 2.5 to 3 hours, or until the meat is tender and easily pulls away from the bone.
- Finish and Serve: Once done, remove the pot from the oven and let it cool slightly. Skim off any excess fat from the surface. Serve the short ribs with the sauce and vegetables, garnished with chopped fresh parsley.
Extra Tips:
To guarantee the best flavor, it’s important to choose a good quality Rioja wine for braising. The wine you select will directly impact the depth and richness of the sauce.
Additionally, when browning the short ribs, be patient and avoid overcrowding the pan. A proper sear will create a flavorful crust that adds to the overall taste of the dish.
If you find the sauce too thin after braising, you can remove the short ribs and reduce the sauce on the stovetop until it reaches your desired consistency. Enjoy the dish with a side of mashed potatoes or crusty bread to soak up the delicious sauce.
Valencia Orange and Olive Oil Cake
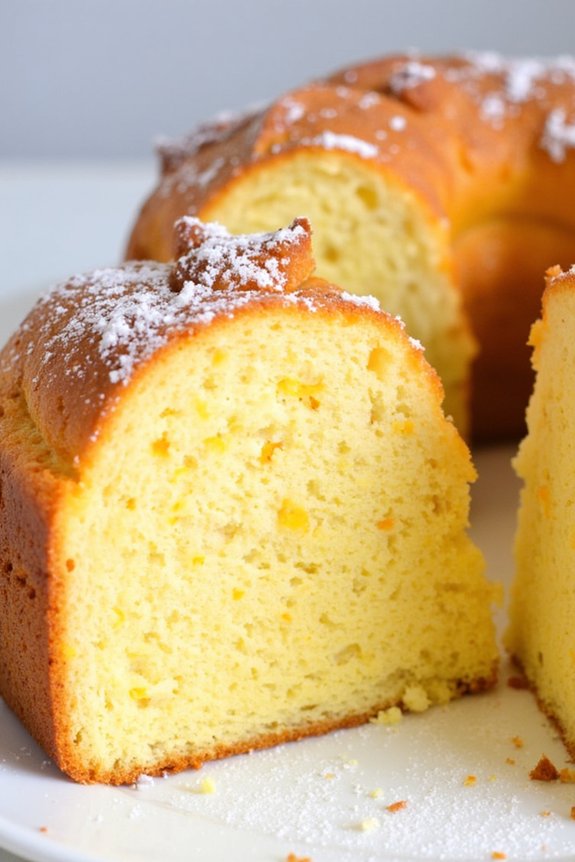
Valencia Orange and Olive Oil Cake is a delightful Spanish dessert that embodies the zest of fall. This cake is perfect for bringing a touch of Mediterranean sunshine into your kitchen during the cooler months. The combination of fresh Valencia oranges and high-quality olive oil creates a moist and flavorful cake that’s both simple and sophisticated. The citrusy notes from the oranges complement the richness of the olive oil, resulting in a cake that’s fragrant and not overly sweet. It’s an excellent choice for a cozy gathering or as a special treat to enjoy with a warm cup of tea or coffee.
This recipe is designed to serve 4-6 people, making it ideal for small parties or family dinners. The cake’s preparation is straightforward, requiring just a few basic ingredients and some patience to allow the flavors to meld together. The result is a tender, aromatic cake that will transport your senses to the sun-drenched groves of Valencia. Whether you’re a seasoned baker or a novice in the kitchen, this cake promises to be a rewarding and delicious endeavor.
Ingredients (for 4-6 servings):
- 1 cup granulated sugar
- 2 large Valencia oranges
- 1/2 cup extra virgin olive oil
- 3 large eggs
- 1 teaspoon vanilla extract
- 1 1/2 cups all-purpose flour
- 1 1/2 teaspoons baking powder
- 1/4 teaspoon salt
- Confectioners’ sugar for dusting (optional)
Cooking Instructions:
- Preheat the Oven: Start by preheating your oven to 350°F (175°C). Grease a 9-inch round cake pan with olive oil or line it with parchment paper to prevent sticking.
- Prepare the Oranges: Grate the zest of the two Valencia oranges and set it aside. Then, juice the oranges to yield approximately 1/2 cup of fresh juice.
- Mix Wet Ingredients: In a large mixing bowl, whisk together the sugar and olive oil until well combined. Add the eggs, one at a time, beating well after each addition. Stir in the vanilla extract, orange juice, and orange zest.
- Combine Dry Ingredients: In a separate bowl, sift together the flour, baking powder, and salt.
- Combine Wet and Dry Mixtures: Gradually add the dry ingredients to the wet mixture, stirring gently until the batter is smooth and no lumps remain. Be careful not to overmix, as this can lead to a dense cake.
- Bake the Cake: Pour the batter into the prepared cake pan, smoothing the top with a spatula. Bake in the preheated oven for 30-35 minutes, or until a toothpick inserted into the center of the cake comes out clean.
- Cool and Serve: Allow the cake to cool in the pan for about 10 minutes, then transfer it to a wire rack to cool completely. Once cooled, dust with confectioners’ sugar if desired before serving.
Extra Tips:
For an added depth of flavor, consider using a high-quality extra virgin olive oil that has fruity undertones. This will enhance the citrus notes of the oranges. Ascertain the oranges are at room temperature before juicing to extract more juice.
If you prefer a more pronounced orange flavor, you can increase the amount of zest used in the recipe. This cake keeps well at room temperature for a couple of days, making it a convenient make-ahead dessert. Enjoy your Valencia Orange and Olive Oil Cake with a dollop of whipped cream or a scoop of vanilla ice cream for an indulgent treat.
Spiced Chickpea and Spinach Stew
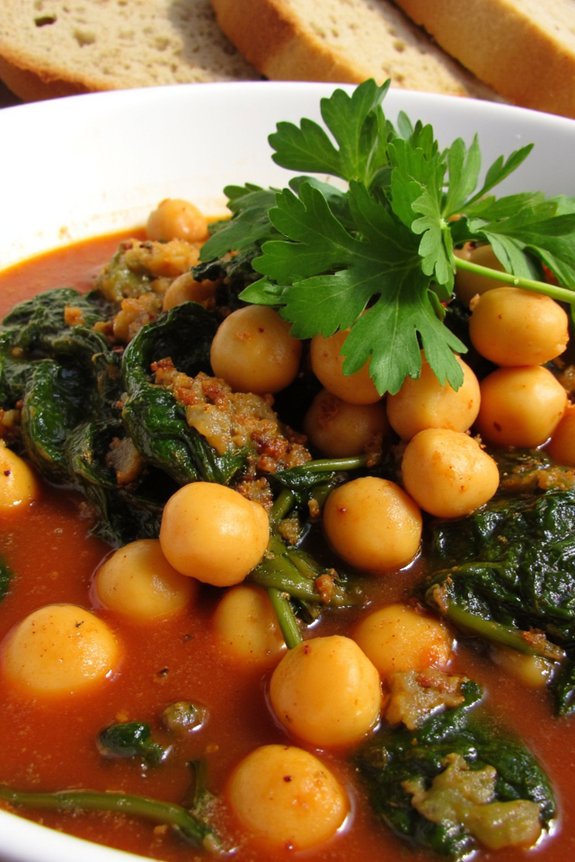
As the crisp fall air begins to settle in, there’s nothing more comforting than a warm, hearty stew simmering on the stove. The Spiced Chickpea and Spinach Stew is a delightful Spanish-inspired dish that combines the earthiness of chickpeas with the fresh, vibrant notes of spinach, all enveloped in a rich, spiced tomato broth.
This vegetarian stew isn’t only delicious but also packed with nutrients, making it a perfect choice for a cozy dinner that will please both vegetarians and meat-lovers alike.
This recipe serves 4-6 people, making it ideal for a family meal or a small gathering with friends. The combination of spices such as smoked paprika and cumin gives the stew its distinctive Spanish flair, while the addition of lemon juice at the end brightens up the flavors, guaranteeing each bite is as satisfying as the last.
Pair it with some crusty bread for an ultimate fall feast that will warm you up from the inside out.
Ingredients:
- 2 tablespoons olive oil
- 1 large onion, finely chopped
- 3 garlic cloves, minced
- 1 teaspoon smoked paprika
- 1 teaspoon ground cumin
- 1/2 teaspoon cayenne pepper (optional)
- 2 cans (15 oz each) chickpeas, drained and rinsed
- 1 can (14 oz) diced tomatoes
- 4 cups vegetable broth
- 5 ounces fresh spinach
- Salt and pepper, to taste
- 1 tablespoon lemon juice
- Fresh parsley, chopped (for garnish)
Instructions:
- Prepare the Base: Heat the olive oil in a large pot over medium heat. Add the chopped onion and garlic, sautéing until the onion becomes translucent and fragrant, about 5 minutes.
- Add the Spices: Stir in the smoked paprika, ground cumin, and cayenne pepper if using. Cook for an additional 2 minutes, allowing the spices to release their aroma and flavor into the oil.
- Incorporate the Chickpeas and Tomatoes: Add the drained chickpeas and canned tomatoes into the pot. Stir well to combine and coat the chickpeas with the spices.
- Simmer the Stew: Pour in the vegetable broth, bringing the mixture to a gentle boil. Reduce the heat to low, cover, and let the stew simmer for about 20-25 minutes. This will allow the flavors to meld together and the chickpeas to soften slightly.
- Add Spinach and Season: Stir in the fresh spinach, allowing it to wilt in the heat of the stew. Season with salt and pepper to your taste.
- Finish with Lemon: Remove the pot from the heat and stir in the lemon juice. This will add a bright, tangy finish to the stew.
- Serve: Ladle the stew into bowls, garnishing with freshly chopped parsley. Serve hot with crusty bread on the side.
Extra Tips:
For an extra depth of flavor, consider adding a pinch of saffron or a small piece of cinnamon stick to the stew while it simmers.
If you prefer a thicker stew, you can mash some of the chickpeas with a fork before adding the spinach. This not only thickens the stew but also creates a creamier texture.
Always taste and adjust the seasoning before serving to guarantee the flavors are balanced.
Finally, this stew can be made a day in advance as the flavors will continue to develop, making it even more delicious the next day.
Caramelized Onion and Cheese Tortilla

Caramelized Onion and Cheese Tortilla is a delightful Spanish fall recipe that combines the rich flavors of sweet, caramelized onions and savory cheese with the soft texture of a traditional Spanish tortilla. This dish is perfect for those chilly autumn evenings when you crave something warm and comforting.
With its golden-brown crust and soft, flavorful interior, this tortilla is sure to become a family favorite. The combination of caramelized onions and cheese adds a depth of flavor that elevates the classic Spanish tortilla to new heights.
This recipe serves 4-6 people, making it ideal for a family dinner or a cozy gathering with friends. The process of caramelizing the onions may take a bit of time, but the end result is well worth the effort. The cheese adds a creamy, satisfying touch that complements the sweetness of the onions perfectly.
Whether you serve it as a main dish or a side, this Caramelized Onion and Cheese Tortilla is a versatile addition to your fall menu.
Ingredients:
- 6 large eggs
- 2 large potatoes, peeled and thinly sliced
- 2 large onions, thinly sliced
- 1 cup shredded cheese (such as Manchego or cheddar)
- 1/4 cup olive oil
- Salt and pepper to taste
Cooking Instructions:
- Prepare the Ingredients: Start by peeling and thinly slicing the onions and potatoes. Shred the cheese and set it aside.
- Caramelize the Onions: In a large non-stick skillet, heat 2 tablespoons of olive oil over medium heat. Add the sliced onions and a pinch of salt, stirring occasionally. Cook for about 20-25 minutes, or until the onions are golden brown and caramelized. Remove the onions from the pan and set aside.
- Cook the Potatoes: In the same skillet, add the remaining olive oil. Add the sliced potatoes, season with salt and pepper, and cook over medium heat. Stir occasionally, making sure that the potatoes don’t stick to the pan. Cook for about 15 minutes, or until the potatoes are tender.
- Beat the Eggs: While the potatoes are cooking, beat the eggs in a large mixing bowl. Season with salt and pepper.
- Combine Ingredients: Once the potatoes are cooked, add them to the bowl with the beaten eggs. Also, add the caramelized onions and shredded cheese. Stir until all ingredients are well combined.
- Cook the Tortilla: Return the skillet to medium heat. Pour the egg mixture into the skillet, spreading it evenly. Cook for about 5-7 minutes, or until the edges start to set. Use a spatula to lift the edges occasionally to guarantee even cooking.
- Flip the Tortilla: Carefully place a large plate over the skillet and invert the tortilla onto the plate. Slide the tortilla back into the skillet, uncooked side down. Cook for another 5 minutes, or until the tortilla is firm and cooked through.
- Serve: Let the tortilla cool for a few minutes before slicing. Serve warm or at room temperature.
Extra Tips:
When caramelizing onions, patience is key. Allowing them to cook slowly over medium heat will bring out their natural sweetness.
Be sure to keep an eye on the potatoes as they cook to prevent sticking and guarantee even cooking. If you prefer a more robust flavor, consider adding some fresh herbs like parsley or thyme to the egg mixture.
Additionally, using a non-stick skillet will make flipping the tortilla much easier and help maintain its shape. Enjoy your Caramelized Onion and Cheese Tortilla with a simple green salad or crusty bread for a complete meal.
Fig and Honey Glazed Pork Tenderloin
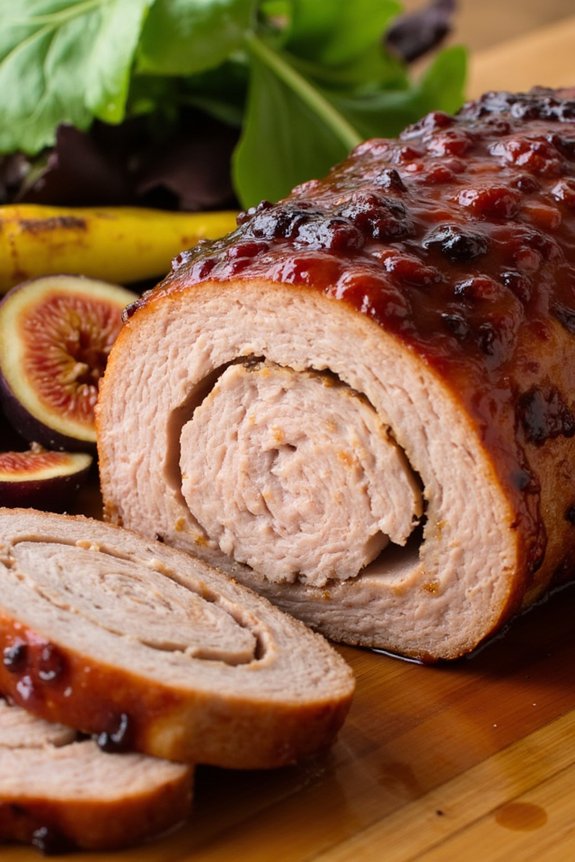
The cooler months of fall call for heartwarming dishes that bring comfort and joy to the dining table, and nothing quite embodies this sentiment like a succulent Fig and Honey Glazed Pork Tenderloin. This dish captures the essence of Spanish cuisine with its harmonious blend of sweet, savory, and aromatic flavors. The tenderloin, a lean and tender cut of pork, is beautifully paired with a luscious glaze made from ripe figs and golden honey. The natural sweetness of the figs complements the savory pork, while the honey adds a rich, caramelized finish.
This dish not only promises to tantalize your taste buds but also provides a stunning centerpiece for any autumn gathering. Preparing this dish is a straightforward yet rewarding process that allows the flavors to meld together perfectly. The key lies in the preparation of the glaze and the careful roasting of the pork to achieve a moist and flavorful result.
When served, the tenderloin’s juicy interior, enveloped in its glossy, sweet coating, is sure to impress both family and guests alike. Accompanied by your choice of sides, such as roasted vegetables or a simple green salad, the Fig and Honey Glazed Pork Tenderloin offers a delightful culinary experience that celebrates the bounty of the fall season.
Ingredients (serving size: 4-6 people):
- 2 pork tenderloins (approximately 1 pound each)
- Salt and freshly ground black pepper
- 1 tablespoon olive oil
- 1 cup fresh figs, quartered
- 1/2 cup honey
- 2 tablespoons balsamic vinegar
- 1 tablespoon Dijon mustard
- 2 cloves garlic, minced
- 1 teaspoon fresh rosemary, chopped
- 1/2 teaspoon ground cinnamon
Cooking Instructions:
- Prepare the Oven and Tenderloins: Preheat your oven to 375°F (190°C). Pat the pork tenderloins dry with paper towels and season generously with salt and freshly ground black pepper on all sides.
- Sear the Pork: In a large oven-safe skillet, heat the olive oil over medium-high heat. Add the tenderloins to the skillet and sear them until browned on all sides, about 3-4 minutes per side. Remove the pork from the skillet and set aside.
- Make the Glaze: In the same skillet, add the quartered figs and cook for 2 minutes until they start to soften. Stir in the honey, balsamic vinegar, Dijon mustard, minced garlic, chopped rosemary, and ground cinnamon. Cook the mixture for an additional 2-3 minutes, stirring occasionally, until it starts to thicken.
- Glaze the Tenderloins: Return the seared pork tenderloins to the skillet, rolling them in the glaze to coat evenly. Spoon some of the glaze over the top to guarantee a good coverage.
- Roast the Pork: Transfer the skillet to the preheated oven. Roast the pork for 20-25 minutes or until the internal temperature reaches 145°F (63°C), indicating that the pork is cooked through but still juicy.
- Rest and Slice: Remove the pork from the oven and let it rest in the skillet for about 5 minutes. This allows the juices to redistribute throughout the meat. Then, transfer the tenderloins to a cutting board and slice them into 1/2-inch thick medallions.
- Serve: Arrange the sliced pork on a serving platter and drizzle with any remaining glaze from the skillet. Garnish with extra fresh figs or rosemary if desired.
Extra Tips:
When preparing this dish, it’s important not to overcook the pork tenderloin, as it can become dry. Using a meat thermometer is highly recommended to ascertain accurate cooking. Additionally, if fresh figs aren’t available, dried figs can be rehydrated in warm water for about 10 minutes before use.
This dish pairs beautifully with a side of creamy mashed potatoes or a seasonal vegetable medley, which can help to balance the sweetness of the glaze. For an extra touch of flavor, consider adding a splash of white wine to the glaze for a more complex taste profile.
Catalan Cream With Nutmeg

Catalan Cream, or “Crema Catalana,” is a classic Spanish dessert that’s often enjoyed in the fall due to its warm, comforting flavors. This creamy custard is flavored with vanilla and a hint of citrus, then topped with a caramelized sugar crust that adds a delightful crunch. The addition of nutmeg in this recipe elevates the traditional flavors, adding a subtle spice that perfectly complements the rich, creamy base.
This dish is perfect for cozy gatherings or as a sweet end to a hearty autumn meal. This recipe serves 4-6 people and is a wonderful way to bring a taste of Catalonia to your home. The preparation involves making a smooth custard, allowing it to set, and then caramelizing the sugar topping before serving.
While it may seem similar to the French crème brûlée, Catalan Cream is made with milk rather than cream, giving it a lighter texture. Follow the steps below to create this delicious dessert, and enjoy the warm flavors of Spain.
Ingredients:
- 4 cups whole milk
- 1 cinnamon stick
- Zest of 1 lemon
- 1 teaspoon vanilla extract
- 6 large egg yolks
- 1 cup granulated sugar, divided
- 3 tablespoons cornstarch
- 1/2 teaspoon ground nutmeg
Instructions:
- Infuse the Milk: In a medium saucepan, combine the milk, cinnamon stick, and lemon zest. Heat over medium heat until it begins to simmer. Remove from heat, cover, and let it steep for 15 minutes to infuse the flavors.
- Prepare the Custard Base: In a large mixing bowl, whisk together the egg yolks, 3/4 cup of sugar, cornstarch, and vanilla extract until smooth and pale in color.
- Combine and Thicken: Slowly pour the infused milk into the egg mixture, whisking constantly to prevent the eggs from curdling. Once combined, pour the mixture back into the saucepan.
- Cook the Custard: Place the saucepan over medium heat, stirring continuously with a wooden spoon until the mixture thickens and coats the back of the spoon, about 10-12 minutes. Be careful not to let it boil.
- Add Nutmeg and Chill: Stir in the ground nutmeg. Remove from heat and strain the custard through a fine-mesh sieve into a clean bowl to remove the cinnamon stick and any cooked egg pieces. Let it cool slightly, then cover with plastic wrap directly on the surface to prevent a skin from forming. Refrigerate for at least 4 hours or until set.
- Caramelize the Sugar: Before serving, evenly sprinkle the remaining 1/4 cup of sugar over the surface of the custard. Using a kitchen torch, carefully caramelize the sugar until it’s golden brown and crisp. Alternatively, place under a hot broiler for a few minutes, keeping a close eye to avoid burning.
Extra Tips: When making Catalan Cream, patience is key for achieving the perfect texture. Be sure to stir continuously while cooking the custard to prevent it from sticking or curdling.
If you don’t have a kitchen torch, the broiler is an excellent alternative for caramelizing the sugar. Just keep a close watch to prevent it from burning. For an added twist, try experimenting with different citrus zests or spices to customize the flavor to your liking. Enjoy your Catalan Cream with a warm cup of coffee or a glass of dessert wine for a truly indulgent experience.
Mulled Sangria

As the crisp autumn air sets in and the leaves turn to shades of amber and gold, there’s nothing quite like a warm, spiced beverage to usher in the cozy season.
Mulled Sangria is a delightful twist on the traditional sangria, infusing the rich flavors of red wine with aromatic spices, fresh fruits, and a hint of brandy. This Spanish-inspired drink is perfect for fall gatherings or a quiet evening by the fireplace. It combines the best of both worlds: the robust taste of a classic red wine sangria and the comforting warmth of mulled wine.
Preparing Mulled Sangria is an easy and enjoyable process, allowing you to infuse your personal touch into the mixture of fruits and spices. The beauty of this recipe lies in its versatility; you can adjust the sweetness, spice level, and fruit selection to your liking.
This recipe is crafted to serve 4-6 people, providing ample opportunity for sharing and spreading warmth on a chilly day. Gather your ingredients, and let’s commence on this flavorful journey.
Ingredients (serves 4-6):
- 1 bottle (750ml) of dry red wine
- 1/4 cup brandy
- 1/4 cup honey or sugar
- 1 orange, sliced
- 1 lemon, sliced
- 1 apple, cored and sliced
- 1 cinnamon stick
- 3 whole cloves
- 2 star anise
- 1/4 teaspoon nutmeg
- 1 cup orange juice
- 1/2 cup water
Instructions:
- Prepare the Fruits: Begin by washing the orange, lemon, and apple thoroughly. Slice the orange and lemon into thin rounds and core the apple before slicing it into wedges. Set the fruit aside.
- Combine the Ingredients: In a large pot or saucepan, combine the red wine, brandy, and honey (or sugar). Stir well to guarantee the honey or sugar dissolves completely into the liquid.
- Add the Spices and Fruits: Add the prepared orange, lemon, and apple slices to the pot. Then, drop in the cinnamon stick, cloves, star anise, and nutmeg. These spices will impart a warm, aromatic flavor to the sangria.
- Add Orange Juice and Water: Pour in the orange juice and water to balance the flavors and prevent the sangria from becoming too strong.
- Heat the Sangria: Place the pot over medium heat. Warm the mixture gently, stirring occasionally. Confirm it doesn’t come to a boil, as boiling can burn off the alcohol and alter the taste.
- Simmer and Infuse: Once the sangria is gently steaming, reduce the heat to low and let it simmer for 20-30 minutes. This allows the flavors to meld beautifully together.
- Taste and Adjust: Taste the sangria and adjust the sweetness or spice according to your preference. You may add more honey or spices as needed.
- Serve: Ladle the warm sangria into mugs, ensuring each serving includes some fruit for added flavor and presentation. Serve immediately to enjoy its full aroma and warmth.
Extra Tips:
For a non-alcoholic version, you can substitute the red wine with grape juice and omit the brandy. Feel free to experiment with different fruits such as pears or berries for a unique twist.
If you have leftovers, store the sangria in the refrigerator and gently reheat it before serving. Remember, the flavors deepen over time, so it can taste even better the next day!