

Spanish cuisine has always been a wonderful way to gather family around the table.
Think of the colorful Paella Valenciana and the comforting Tortilla Española.
These dishes do more than just fill you up; they create lasting memories.
Exploring these classic recipes reminds me of the warmth and joy of Spanish family dinners.
Ready to discover these delicious culinary gems?
Paella Valenciana
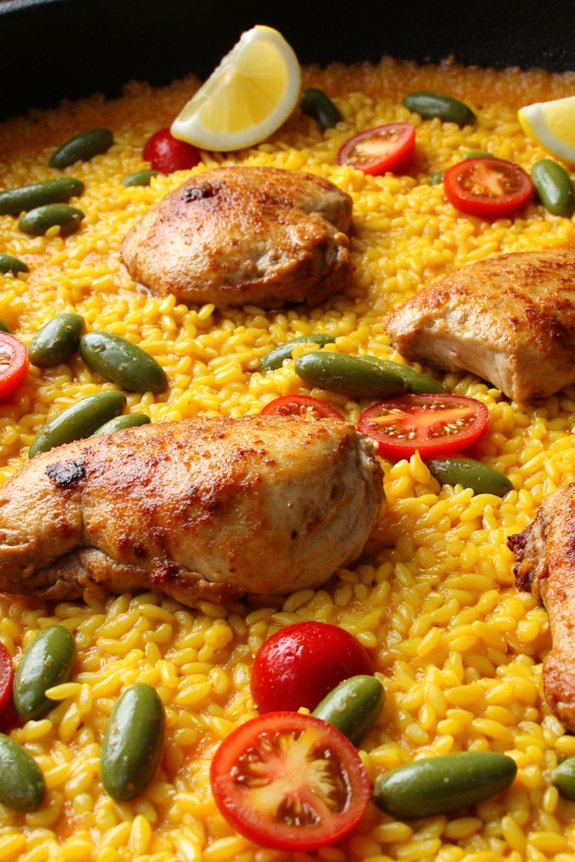
Paella Valenciana is a classic Spanish dish hailing from the region of Valencia. Known for its vibrant colors and rich flavors, this traditional meal is a celebration of local ingredients like saffron, rabbit, chicken, and a variety of vegetables. The key to an authentic Paella Valenciana lies in its preparation, which involves cooking the ingredients together in a wide, shallow pan known as a paellera. This guarantees that the rice absorbs all the wonderful flavors as it cooks, resulting in a dish that’s both hearty and flavorful. It’s perfect for a family dinner, allowing everyone to gather around and enjoy a taste of Spain.
The beauty of Paella Valenciana is in its simplicity and the way it highlights the natural flavors of its components. The dish is traditionally cooked over an open flame, which imparts a subtle smoky aroma to the rice. However, it can also be successfully prepared on a stovetop with the right equipment. With its combination of tender meats, fresh vegetables, and fragrant spices, Paella Valenciana is sure to be a hit at your next family gathering. Here’s how you can make this delicious dish for 4-6 people.
Ingredients for Paella Valenciana (4-6 servings):
- 1/4 cup olive oil
- 1 pound chicken, cut into pieces
- 1 pound rabbit, cut into pieces
- 1/2 pound green beans, trimmed
- 1/2 pound lima beans
- 2 medium tomatoes, grated
- 1 teaspoon sweet paprika
- 1/2 teaspoon saffron threads
- 4 cups chicken broth
- 2 cups short-grain rice
- Salt, to taste
- Lemon wedges, for serving
Cooking Instructions:
- Prepare the Ingredients: Begin by gathering all your ingredients and confirming that everything is prepped and ready to use. This includes cutting the chicken and rabbit into small, manageable pieces, trimming the green beans, and grating the tomatoes.
- Heat the Olive Oil: In a large paellera or a wide, shallow skillet, heat the olive oil over medium heat. Once hot, add the chicken and rabbit pieces. Cook them until they’re browned on all sides. This should take about 10 minutes.
- Add the Vegetables: Stir in the green beans and lima beans, cooking them with the meat for about 5 minutes. This allows the vegetables to soften slightly and absorb some of the flavors from the meat.
- Incorporate the Tomatoes and Spices: Add the grated tomatoes, sweet paprika, and saffron threads to the pan. Stir everything together and let it cook for an additional 5 minutes, allowing the tomatoes to break down and create a rich base for the paella.
- Pour in the Broth: Add the chicken broth to the pan, stirring to combine all ingredients. Increase the heat to bring the mixture to a boil.
- Add the Rice: Once the broth is boiling, add the short-grain rice to the pan. Distribute it evenly without stirring. This guarantees that the rice cooks evenly and absorbs the flavors of the broth.
- Simmer the Paella: Reduce the heat to a simmer and cook the paella for about 20 minutes, or until the rice is tender and the liquid has been absorbed. Avoid stirring the rice during this process to allow the socarrat, or crispy bottom layer, to form.
- Rest and Serve: Once cooked, remove the paella from the heat and cover it with a clean kitchen towel. Let it rest for about 5 minutes before serving. Garnish with lemon wedges and enjoy!
Extra Tips:
For an authentic touch, cook your Paella Valenciana over an open flame or on a barbecue grill. This imparts a slight smoky flavor that enhances the dish. Be sure to use a wide, shallow pan to guarantee even cooking of the rice. If saffron is unavailable, you can substitute with a pinch of turmeric for color, though it won’t replicate the unique flavor of saffron.
Finally, resist the urge to stir the rice once it’s added to the pan; this will aid in developing the socarrat, a prized crispy layer at the bottom of the paella.
Spanish Tortilla

The Spanish Tortilla, also known as Tortilla Española or Tortilla de Patatas, is a classic Spanish dish that’s simple yet incredibly delicious. It’s a staple in Spanish cuisine and can be served as a main course, a side dish, or even as an appetizer. The dish consists primarily of eggs and potatoes, often enhanced with onions, and is cooked in olive oil to achieve a golden, slightly crispy exterior and a soft, tender interior.
Its versatility makes it perfect for family dinners, gatherings, or any occasion where you want to impress with minimal effort. This recipe is designed for serving 4-6 people, making it ideal for a family meal. The key to a great Spanish Tortilla is to use quality ingredients and to cook it patiently. The process involves gently cooking the potatoes and onions until they’re tender, before combining them with beaten eggs and cooking the mixture until it sets. The result is a hearty, satisfying dish that captures the essence of Spanish home cooking.
Ingredients (Serves 4-6):
- 6 large eggs
- 4 medium potatoes, peeled and thinly sliced
- 1 large onion, thinly sliced
- 1 cup olive oil
- Salt, to taste
- Freshly ground black pepper, to taste
Cooking Instructions:
- Prepare the Ingredients: Begin by peeling and thinly slicing the potatoes. Thinly slice the onion. Crack the eggs into a large bowl, add a pinch of salt and freshly ground black pepper, and beat them until well mixed.
- Cook the Potatoes and Onions: In a large, non-stick frying pan, heat the olive oil over medium heat. Add the sliced potatoes and onions to the pan. Cook them gently, stirring occasionally, for about 20-25 minutes until the potatoes are tender but not browned. The aim is to cook them slowly to guarantee they’re soft and flavorful.
- Combine with Eggs: Once the potatoes and onions are cooked, use a slotted spoon to transfer them into the bowl with the beaten eggs. Stir gently to combine, making sure the potatoes and onions are fully coated with the egg mixture.
- Cook the Tortilla: Remove excess oil from the frying pan, leaving about 2 tablespoons. Pour the potato, onion, and egg mixture back into the pan. Cook over low heat for about 5 minutes, gently shaking the pan occasionally to prevent sticking. Use a spatula to lift the edges and let the uncooked egg flow underneath.
- Flip the Tortilla: When the bottom is golden brown and the top is almost set, place a large plate over the pan and carefully flip the tortilla onto the plate. Slide the tortilla back into the pan to cook the other side for another 3-5 minutes until it’s golden brown and fully set.
- Serve: Once cooked, slide the tortilla onto a serving plate. Let it cool slightly before slicing into wedges. Serve warm or at room temperature.
Extra Tips:
For an authentic Spanish Tortilla, patience is key. Cook the potatoes and onions slowly to allow them to soften without browning, which enhances their sweetness and flavor. If you prefer a firmer texture, cook the tortilla a bit longer to guarantee the center is fully set.
Additionally, you can add other ingredients such as bell peppers, chorizo, or herbs like parsley for a variation on the traditional recipe. Finally, use a good quality non-stick pan to make flipping the tortilla easier and assure it doesn’t stick.
Gazpacho Andaluz
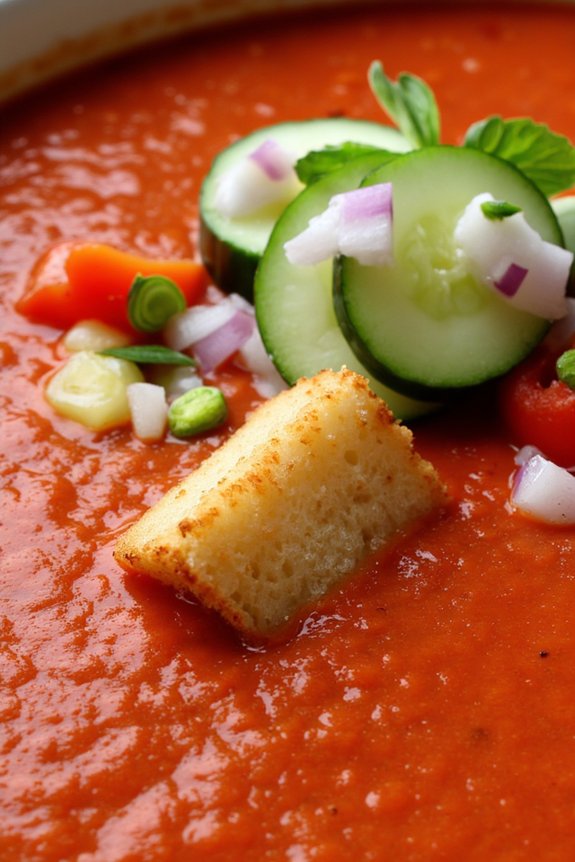
Gazpacho Andaluz is a classic Spanish cold soup that perfectly captures the flavors of summer in a bowl. Originating from the Andalusian region of Spain, this dish is known for its invigorating and light qualities, making it an ideal starter or side dish for a family dinner.
Traditionally, Gazpacho is made with ripe tomatoes, cucumbers, bell peppers, onions, garlic, olive oil, and vinegar, all blended together to create a vibrant and satisfying soup. It’s typically served chilled, allowing the flavors to meld together beautifully, and is often garnished with diced vegetables or croutons for added texture.
The beauty of Gazpacho Andaluz lies in its simplicity and the freshness of its ingredients. This dish isn’t only easy to prepare but also incredibly healthy, as it’s packed with vitamins and antioxidants. It’s a great option for those looking to incorporate more vegetables into their diet without sacrificing taste.
Whether you’re hosting a dinner party or simply enjoying a meal with your family, Gazpacho Andaluz offers a taste of Spain that’s sure to delight everyone at the table.
Ingredients (Serves 4-6 people):
- 6 ripe tomatoes
- 1 cucumber
- 1 green bell pepper
- 1 small red onion
- 2 cloves garlic
- 3 tablespoons extra virgin olive oil
- 2 tablespoons red wine vinegar
- 1 cup water
- Salt and pepper to taste
- Optional: Bread for croutons, diced vegetables for garnish
Instructions:
- Prepare the Vegetables: Begin by washing all the vegetables thoroughly. Core the tomatoes and cut them into quarters. Peel the cucumber and slice it into chunks. Remove the seeds from the green bell pepper and cut it into pieces. Peel and quarter the onion, and peel the garlic cloves.
- Blend the Ingredients: In a blender or food processor, combine the tomatoes, cucumber, green bell pepper, onion, and garlic. Blend until the mixture is smooth. Depending on the size of your blender, you may need to do this in batches.
- Strain the Mixture: Pass the blended mixture through a fine mesh sieve into a large bowl to remove any skins and seeds. This step guarantees a smooth and silky texture for your gazpacho.
- Season and Chill: Add the olive oil, red wine vinegar, and water to the bowl. Stir the mixture well and season with salt and pepper to taste. Cover the bowl with plastic wrap and refrigerate for at least 2 hours to allow the flavors to develop.
- Serve: Before serving, give the gazpacho a good stir. Pour it into chilled bowls or glasses. If desired, garnish with croutons or a small dice of cucumber, bell pepper, or onion for added crunch.
Extra Tips:
For the best flavor, use the ripest tomatoes you can find, as they’re the backbone of this dish. If you prefer a thicker gazpacho, you can add a slice of stale bread to the blender with the vegetables.
If you want to add some heat, consider adding a pinch of cayenne pepper or a small piece of jalapeño to the blend. Gazpacho can be stored in the refrigerator for up to two days, so feel free to make it ahead of time for convenience.
Fabada Asturiana
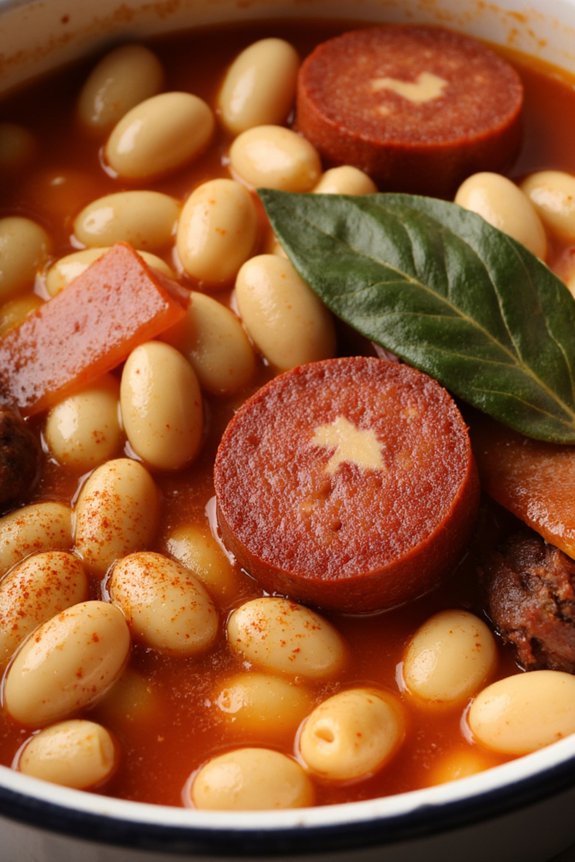
Fabada Asturiana is a traditional Spanish bean stew that originates from the region of Asturias in northern Spain. This hearty dish is perfect for a family dinner, offering a rich and smoky flavor profile that’s both comforting and satisfying. Typically enjoyed during colder months, Fabada Asturiana combines a variety of meats with creamy white beans, seasoned to perfection.
The dish’s signature depth of flavor comes from the use of chorizo, morcilla (blood sausage), and pancetta, which infuse the beans with a savory and slightly spicy taste. Cooking Fabada Asturiana isn’t only about creating a delicious meal but also about embracing the warmth and communal spirit of Spanish family gatherings.
This recipe serves 4-6 people and requires some preparation time, as the beans need to be soaked overnight. However, the cooking process itself is relatively straightforward, allowing the flavors to meld together over a slow simmer. The result is a thick, flavorful stew that’s best enjoyed with crusty bread and a good bottle of Spanish cider or red wine.
Fabada Asturiana is a reflection of the richness of Spanish culinary traditions, offering a comforting and delicious meal that brings people together.
Ingredients (Serves 4-6):
- 500g dried white beans (such as fabes or cannellini)
- 2 chorizo sausages
- 2 morcilla (Spanish blood sausages)
- 200g pancetta or unsmoked bacon
- 1 onion, peeled and chopped
- 2 cloves garlic, peeled and minced
- 1 bay leaf
- 1 teaspoon Spanish paprika (pimentón)
- Salt to taste
- Water (enough to cover the beans and more for soaking)
Cooking Instructions:
- Soak the Beans: Begin by soaking the dried white beans in plenty of cold water overnight. This will help to soften the beans and reduce cooking time.
- Prepare the Ingredients: The next day, drain and rinse the beans. Chop the onion and mince the garlic. Slice the chorizo and morcilla into thick rounds, and cut the pancetta into large cubes.
- Cook the Stew: In a large pot, add the soaked beans and cover them with fresh water. Add the chopped onion, minced garlic, bay leaf, and paprika. Bring to a gentle boil over medium heat.
- Add the Meats: Once the beans begin to boil, reduce the heat to a simmer. Add the chorizo, morcilla, and pancetta to the pot. Let the stew simmer gently for about 2 to 3 hours, stirring occasionally. Confirm that the beans remain covered with water; add more if necessary.
- Season and Finish: About 30 minutes before the stew is done, taste and season with salt as needed. Continue to simmer until the beans are tender and the broth is thick and flavorful.
- Rest Before Serving: Once cooked, allow the Fabada Asturiana to rest for a few minutes before serving. This will help the flavors meld further.
Extra Tips:
For an authentic Fabada Asturiana, sourcing high-quality Spanish sausages is key. If you can’t find morcilla, you can substitute it with another flavorful sausage, but this will slightly alter the traditional taste.
Remember to check the seasoning towards the end of cooking, as the sausages can add a lot of saltiness to the dish. Additionally, allowing the stew to sit for a few hours or even overnight in the refrigerator can enhance its flavors, making it an excellent make-ahead meal.
Serve with crusty bread to soak up the delicious broth, and enjoy the communal spirit of this classic Spanish dish.
Pollo Al Ajillo
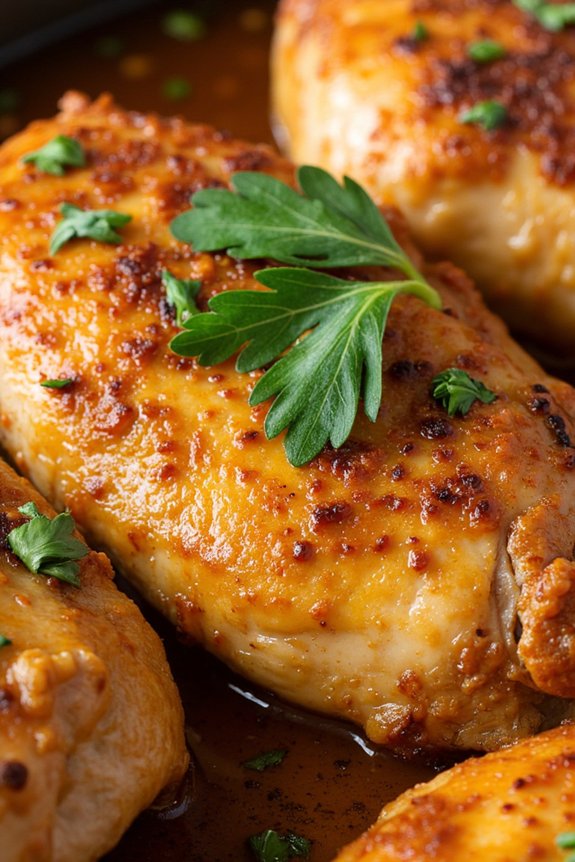
Pollo Al Ajillo, or garlic chicken, is a classic Spanish dish that delivers robust garlic flavors and tender, juicy chicken. This dish isn’t only delicious but also easy to prepare, making it perfect for family dinners or gatherings with friends.
The combination of aromatic garlic, flavorful olive oil, and a hint of white wine creates a savory sauce that beautifully complements the chicken. Traditionally, Pollo Al Ajillo is cooked using bone-in chicken pieces to guarantee maximum flavor and succulence.
The chicken is browned to perfection, giving it a crispy skin, while the inside remains tender and juicy. With minimal ingredients and simple steps, this dish brings a taste of Spain to your dinner table, perfect for serving 4-6 people.
Ingredients:
- 1 whole chicken, cut into pieces
- 10 cloves of garlic, peeled and sliced
- 1 cup of extra virgin olive oil
- 1 cup of dry white wine
- 2 bay leaves
- Salt and pepper to taste
- Fresh parsley, chopped (for garnish)
Instructions:
- Prepare the Chicken: Begin by seasoning the chicken pieces generously with salt and pepper. This will help enhance the flavor as the chicken cooks.
- Heat the Oil: In a large, heavy skillet, heat the olive oil over medium-high heat until it shimmers. This is essential for achieving a nice golden-brown sear on the chicken.
- Brown the Chicken: Place the chicken pieces in the skillet, skin side down, and cook until they’re golden brown on all sides. This should take about 5-7 minutes per side. Work in batches if necessary to avoid overcrowding the pan.
- Add Garlic and Bay Leaves: Once the chicken is browned, add the sliced garlic and bay leaves to the pan. Cook for an additional 2-3 minutes, making sure the garlic doesn’t burn but becomes fragrant.
- Deglaze the Pan: Pour in the white wine, using a wooden spoon to scrape up any browned bits from the bottom of the pan. This will add depth to the sauce.
- Simmer the Chicken: Reduce the heat to low, cover the skillet, and let the chicken simmer for 20-25 minutes, or until the chicken is cooked through and tender. The internal temperature should reach 165°F (75°C).
- Garnish and Serve: Once cooked, transfer the chicken to a serving platter, spooning the garlic sauce over the top. Garnish with fresh parsley and serve hot.
Extra Tips: For an even richer flavor, consider marinating the chicken pieces in the garlic, olive oil, and bay leaves for a few hours before cooking.
If you prefer a spicier version, you can add a pinch of red pepper flakes with the garlic. Serve Pollo Al Ajillo with crusty bread to soak up the delicious garlic sauce, or pair it with a side of roasted potatoes or a fresh green salad for a complete meal.
Bacalao a La Vizcaína
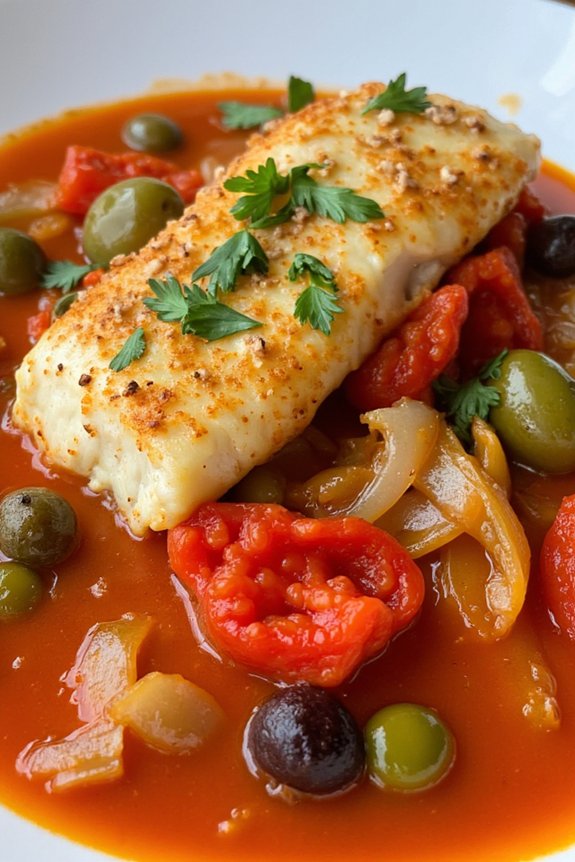
Bacalao a La Vizcaína is a traditional Spanish dish that originated in the Basque region. This savory dish is known for its rich combination of flavors, featuring salt cod simmered in a vibrant sauce made of tomatoes, peppers, onions, and garlic. Perfect for a family dinner, Bacalao a La Vizcaína is both hearty and satisfying, offering a taste of Spanish culinary tradition that brings warmth and comfort to the table.
The key to a successful Bacalao a La Vizcaína lies in the balance of flavors and the slow cooking process that allows each ingredient to meld together beautifully. Traditionally served during the holidays, this dish is a staple in many Spanish households. The use of salt cod, or bacalao, is especially significant as it was historically a means of preserving fish for long periods.
When preparing Bacalao a La Vizcaína, it’s vital to soak the salt cod for at least 24 hours, changing the water multiple times to remove excess salt. This process guarantees that the fish is tender and perfectly seasoned, ready to absorb the robust flavors of the vizcaína sauce. Below is a detailed recipe designed to serve 4-6 people, capturing the essence of this beloved Spanish classic.
Ingredients (Serves 4-6)
- 1 kg salt cod fillets, soaked and desalted
- 1/2 cup olive oil
- 2 large onions, finely chopped
- 4 cloves garlic, minced
- 2 large red bell peppers, roasted and peeled
- 4 ripe tomatoes, peeled and chopped
- 1/2 cup pitted green olives
- 1/4 cup capers
- 1 teaspoon paprika
- Salt and pepper to taste
- Fresh parsley, chopped, for garnish
Cooking Instructions
- Prepare the Cod: Begin by soaking the salt cod for at least 24 hours in cold water, changing the water every 6-8 hours to guarantee the removal of excess salt. Once desalted, pat the cod dry with paper towels and cut it into large pieces.
- Sauté the Aromatics: In a large pan, heat the olive oil over medium heat. Add the chopped onions and garlic, sautéing them until they’re soft and translucent, about 5-7 minutes.
- Create the Sauce: Add the roasted red peppers and chopped tomatoes to the pan. Cook for an additional 10 minutes, allowing the tomatoes to break down and the flavors to meld. Stir in the paprika, olives, and capers, and season the sauce with salt and pepper to taste.
- Simmer the Cod: Gently place the pieces of salt cod into the sauce, making sure they’re well covered. Lower the heat to a simmer and cook for 15-20 minutes, or until the cod is tender and flaky.
- Final Touches: Once cooked, transfer the dish to a serving platter and sprinkle with freshly chopped parsley for a burst of color and freshness. Serve hot with crusty bread or boiled potatoes to soak up the delicious sauce.
Extra Tips
When cooking Bacalao a La Vizcaína, it’s essential to monitor the salt levels carefully, especially since the cod is initially preserved in salt. Taste the sauce before adding additional salt, as the olives and capers also contribute saltiness to the dish.
To save time, you can roast the red peppers ahead of time, or use jarred roasted red peppers if desired. Additionally, when soaking the salt cod, consider placing it in the refrigerator to keep it fresh throughout the desalinization process. Enjoy this comforting dish with a glass of dry Spanish white wine to complement the savory flavors.
Albondigas En Salsa
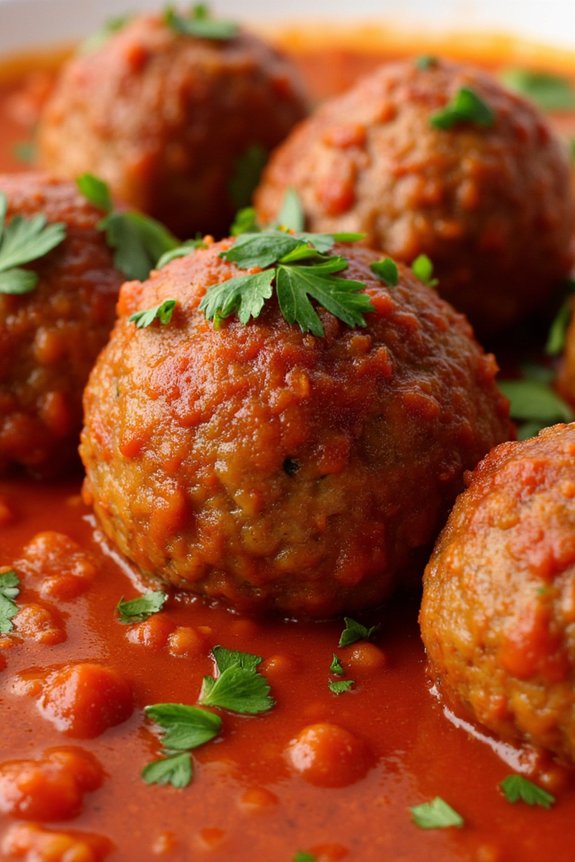
Albondigas En Salsa, or Spanish meatballs in sauce, is a delightful dish that brings together the robust flavors of Spain in a comforting and hearty meal. These succulent meatballs are made from a combination of meats, seasoned with spices, and simmered in a rich tomato-based sauce. This dish is perfect for family dinners, offering a taste of Spain’s culinary heritage right at your dining table.
Whether served with crusty bread or over a bed of fluffy rice, Albondigas En Salsa is sure to be a hit with both adults and children alike.
The secret to great Albondigas En Salsa lies in the blend of ingredients and the slow cooking process that allows the flavors to meld beautifully. By using a combination of beef and pork, the meatballs have a rich taste and tender texture. The sauce, on the other hand, is infused with the savory notes of garlic, onion, and paprika, creating a deliciously aromatic experience.
Let’s explore the recipe and learn how to make this Spanish classic for a serving size of 4-6 people.
Ingredients
- 500g ground beef
- 500g ground pork
- 2 slices of bread, crusts removed
- 1/4 cup milk
- 2 eggs
- 3 cloves garlic, minced
- 1 onion, finely chopped
- 1 teaspoon paprika
- 1 teaspoon salt
- 1/2 teaspoon black pepper
- 2 tablespoons olive oil
- 1 can (400g) crushed tomatoes
- 1/2 cup beef broth
- 1/2 cup red wine (optional)
- 1 tablespoon flour
- 2 tablespoons fresh parsley, chopped
Instructions
- Prepare the Bread: Soak the slices of bread in milk for about 5 minutes until soft. Squeeze out the excess milk and crumble the bread into a large mixing bowl.
- Make the Meatball Mixture: Add the ground beef, ground pork, eggs, minced garlic, paprika, salt, and pepper to the bowl with the bread. Mix everything together until well combined but don’t overmix, as this can make the meatballs tough.
- Form the Meatballs: Using your hands, form the mixture into meatballs about the size of a golf ball. Place them on a tray or plate as you go.
- Brown the Meatballs: Heat olive oil in a large skillet over medium heat. Add the meatballs in batches and brown them on all sides. Remove them from the skillet and set aside.
- Make the Sauce: In the same skillet, add the chopped onion and sauté until translucent. Stir in the flour and cook for another minute. Add the crushed tomatoes, beef broth, and red wine (if using). Stir well and bring the sauce to a simmer.
- Simmer the Meatballs: Return the meatballs to the skillet, cover, and let them simmer in the sauce for about 25-30 minutes, or until they’re cooked through and the sauce has thickened.
- Finish with Parsley: Stir in the fresh parsley just before serving for a burst of freshness and color.
Extra Tips
When making Albondigas En Salsa, it’s important to not overcrowd the skillet when browning the meatballs. This guarantees they brown evenly and develop a nice crust.
If you prefer a thicker sauce, you can let it simmer longer with the lid slightly ajar to allow more evaporation. Additionally, using a combination of beef and pork provides the best flavor and texture, but you can adjust the ratios to suit your taste.
Enjoy your Albondigas En Salsa with a side of crusty bread to soak up the delicious sauce!
Calamares a La Romana
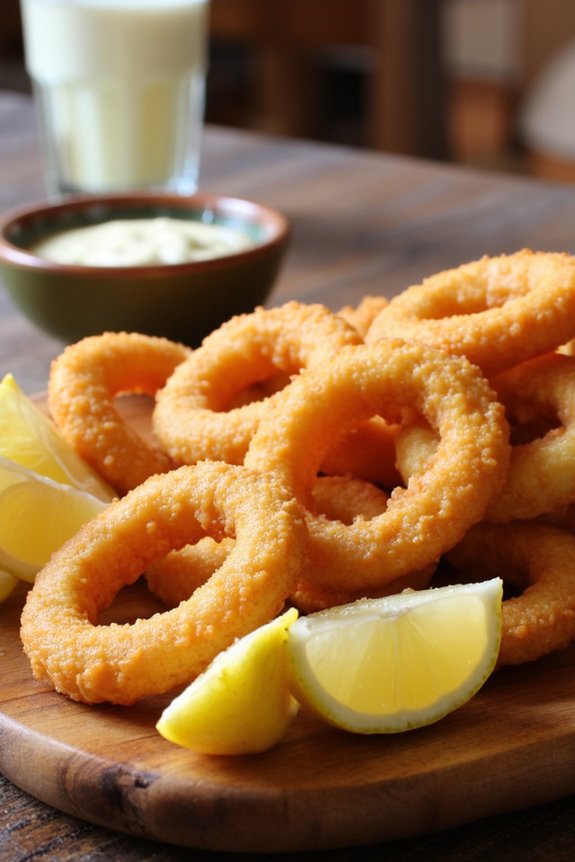
Calamares a La Romana is a classic Spanish dish that features tender squid rings coated in a light, crisp batter, and deep-fried to golden perfection. This dish is a staple in Spanish cuisine, often served as a tapa or appetizer, but it can also be enjoyed as a main course.
The origins of Calamares a La Romana trace back to the coastal regions of Spain, where fresh seafood is abundant. The secret to achieving the perfect texture lies in the quality of the squid and the batter, which should be airy and light, allowing the natural flavors of the squid to shine through.
Cooking Calamares a La Romana is a delightful experience that brings the taste of the Mediterranean to your table. The dish pairs wonderfully with a slice of lemon and a side of aioli or a simple green salad.
When preparing this dish, the key is to guarantee that the squid is fresh and the oil is hot enough to create that signature crunch. This recipe serves 4-6 people, making it perfect for a family dinner or a small gathering with friends.
Ingredients (Serves 4-6)
- 1 kg fresh squid, cleaned and cut into rings
- 1 cup all-purpose flour
- 1/2 cup cornstarch
- 1 teaspoon baking powder
- Salt to taste
- Pepper to taste
- 1 cup cold sparkling water
- Vegetable oil for frying
- Lemon wedges, for serving
Cooking Instructions
- Prepare the Squid: Start by cleaning the squid thoroughly under cold water. Remove the head, skin, and innards, and rinse again. Cut the squid into 1/2-inch thick rings and pat dry with paper towels to remove excess moisture.
- Mix the Batter: In a large mixing bowl, combine the all-purpose flour, cornstarch, baking powder, salt, and pepper. Gradually pour in the cold sparkling water, whisking continuously until you achieve a smooth, lump-free batter. The batter should be slightly thick but still pourable.
- Heat the Oil: In a deep fryer or a heavy-bottomed pan, heat the vegetable oil to 180°C (350°F). It’s important to maintain this temperature to guarantee the squid cooks evenly and the batter crisps up nicely.
- Coat the Squid Rings: Dip the dried squid rings into the batter, ensuring each ring is well-coated. Allow any excess batter to drip off before frying.
- Fry the Squid: Carefully place the battered squid rings into the hot oil, frying in small batches to avoid overcrowding. Fry each batch for about 2-3 minutes, or until they’re golden brown and crispy. Use a slotted spoon to remove the rings from the oil and drain on paper towels.
- Serve: Arrange the Calamares a La Romana on a serving platter and garnish with lemon wedges. Serve immediately while hot, with a side of aioli or your favorite dipping sauce.
Extra Tips
For the best results, guarantee the squid is as fresh as possible—frozen squid can be used, but fresh will provide the best texture and flavor.
The sparkling water is essential in the batter as it contributes to the lightness and crispiness of the coating. Be cautious with the oil temperature; too low and the squid will absorb oil and become greasy, too high and it might burn the batter before the squid is cooked through.
Finally, serve the Calamares a La Romana immediately after frying to enjoy them at their crispiest.
Pisto Manchego
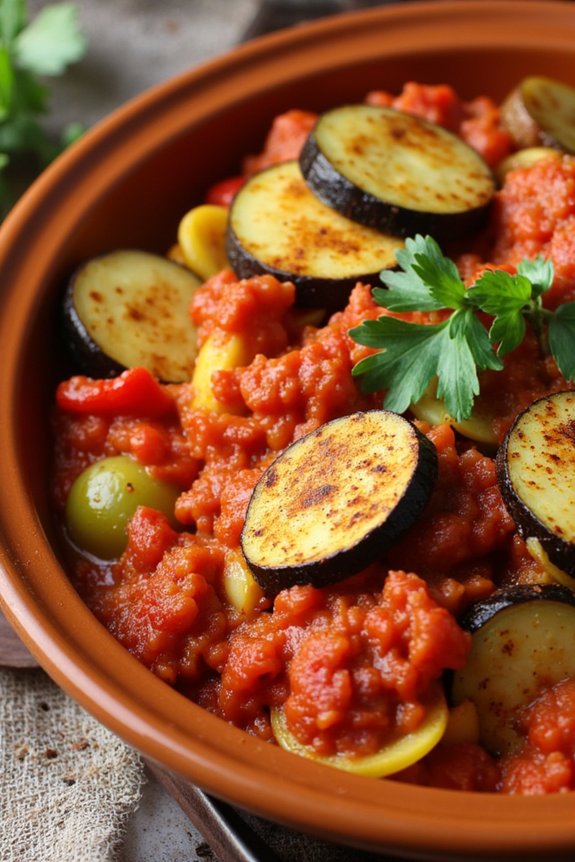
Pisto Manchego is a traditional Spanish dish originating from the region of La Mancha, the same area famously associated with Don Quixote. This rustic vegetable stew is a celebration of fresh, local produce, often enjoyed as a main course or a side dish.
Similar to the French ratatouille, Pisto Manchego brings together seasonal vegetables like tomatoes, bell peppers, zucchini, and eggplant, all cooked down to a flavorful and comforting medley. It’s a favorite in Spanish households, particularly during the summer months when the vegetables are at their peak ripeness.
This dish isn’t only a reflection of the simplicity and richness of Spanish cuisine but also a versatile recipe that can be adapted to personal tastes. Typically, Pisto Manchego is served with crusty bread and topped with a fried egg or a slice of Iberian ham for added richness.
The key to a perfect Pisto Manchego lies in the quality of the vegetables and the slow cooking process that allows the flavors to meld beautifully. Whether you’re serving it as a main dish or as a tapa, Pisto Manchego is sure to bring a taste of Spain to your table.
Ingredients (for 4-6 servings):
- 4 tablespoons olive oil
- 1 large onion, finely chopped
- 2 cloves garlic, minced
- 1 red bell pepper, diced
- 1 green bell pepper, diced
- 1 medium zucchini, diced
- 1 medium eggplant, diced
- 4 ripe tomatoes, peeled and chopped
- Salt and pepper to taste
- 1 teaspoon smoked paprika
- 1 bay leaf
- 2 tablespoons fresh parsley, chopped
- Optional: eggs or Iberian ham for topping
Cooking Instructions:
- Prepare the Vegetables: Begin by washing all the vegetables thoroughly. Dice the onion, peppers, zucchini, and eggplant into uniform pieces. This guarantees even cooking.
- Sauté the Aromatics: In a large skillet or pan, heat the olive oil over medium heat. Add the chopped onion and sauté until it becomes translucent, about 5 minutes. Stir in the minced garlic and cook for another minute, until fragrant.
- Cook the Vegetables: Add the diced red and green bell peppers to the skillet, cooking for about 5 minutes until they start to soften. Next, add the zucchini and eggplant, stirring occasionally, and cook for another 10 minutes.
- Add Tomatoes and Seasonings: Stir in the chopped tomatoes, salt, pepper, smoked paprika, and bay leaf. Mix well to combine all the ingredients. Reduce the heat to low and cover the skillet.
- Simmer the Pisto: Allow the mixture to simmer gently for about 30-40 minutes, stirring occasionally. This slow cooking process helps to develop a rich flavor as the vegetables release their juices and combine. Adjust seasoning if necessary.
- Garnish and Serve: Once the vegetables are tender and the flavors are well combined, remove the bay leaf and sprinkle the chopped parsley over the top. If desired, top each serving with a fried egg or a slice of Iberian ham before serving.
Extra Tips:
For the best flavor, use the freshest vegetables you can find. Pisto Manchego is highly adaptable, so feel free to add other vegetables like mushrooms or squash, depending on what’s in season.
If you’re making it ahead of time, the flavors will only improve as it sits, making it an excellent dish for meal prepping. Finally, be patient with the cooking process; the slow simmering is key to achieving the deep, harmonious flavors that make Pisto Manchego a beloved Spanish classic.
Gambas Al Ajillo
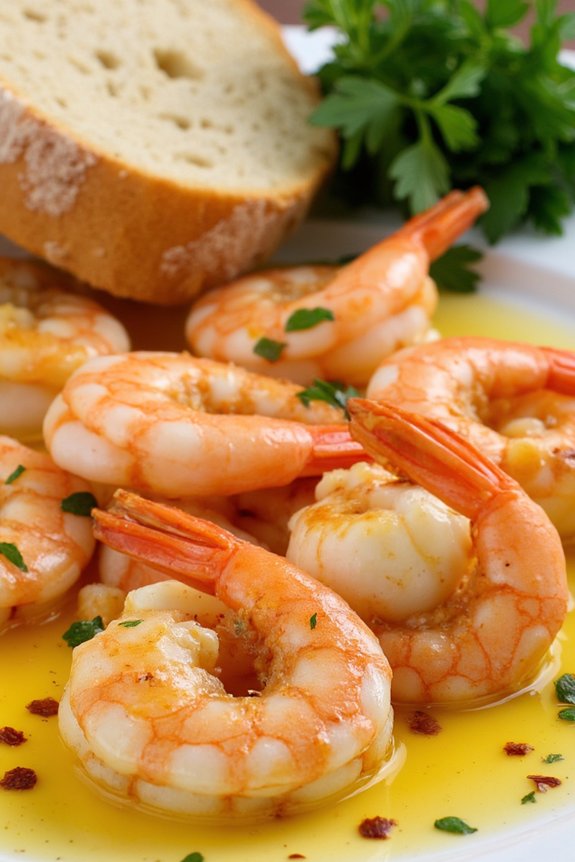
Gambas Al Ajillo, or garlic shrimp, is a classic Spanish dish that’s celebrated for its simplicity and powerful flavors. This dish is a staple in Spanish cuisine and often enjoyed as a tapa, or appetizer, but it can also be served as a main course alongside a crusty loaf of bread to soak up the delicious garlicky sauce.
The key to Gambas Al Ajillo is using fresh, high-quality shrimp and plenty of garlic, which infuses the olive oil with its robust flavor. The dish is quick to prepare, making it an ideal option for a family dinner or any gathering where you want to impress your guests with minimal effort.
The beauty of Gambas Al Ajillo lies in its minimal ingredient list, allowing each component to shine. The shrimp are cooked in a fragrant mixture of olive oil, sliced garlic, and dried chili peppers, then finished with a splash of sherry or white wine for a touch of acidity.
This dish is traditionally cooked in a clay cazuela, but a heavy skillet will work just as well. The result is tender, juicy shrimp bathed in a rich, aromatic sauce that’s perfect for dipping with bread. For a serving size of 4-6 people, follow the recipe below.
Ingredients:
- 1 1/2 pounds of large shrimp, peeled and deveined
- 1/2 cup of extra virgin olive oil
- 8 cloves of garlic, thinly sliced
- 1-2 dried red chili peppers, crushed (adjust to taste)
- 1/4 cup of dry sherry or white wine
- Salt to taste
- Freshly ground black pepper to taste
- 2 tablespoons of fresh parsley, chopped
- Crusty bread for serving
Instructions:
- Prepare the Shrimp: Begin by thoroughly rinsing the shrimp under cold water. Peel and devein them if not already done. Pat the shrimp dry with paper towels to guarantee they sear nicely in the pan.
- Infuse the Olive Oil: In a large skillet or clay cazuela, heat the olive oil over medium-low heat. Add the sliced garlic and crushed chili peppers, and gently sauté until the garlic is golden and fragrant, about 2-3 minutes. Be careful not to burn the garlic, as it will turn bitter.
- Cook the Shrimp: Increase the heat to medium-high, then add the shrimp to the skillet in a single layer. Season with salt and freshly ground black pepper. Cook the shrimp for 1-2 minutes on each side, or until they turn pink and opaque.
- Add the Wine: Pour in the sherry or white wine, and let the mixture simmer for another minute, allowing the alcohol to evaporate and the flavors to meld. The sauce should slightly thicken.
- Garnish and Serve: Remove the skillet from the heat and sprinkle the chopped parsley over the shrimp. Serve immediately with crusty bread on the side for dipping into the garlic-infused oil.
Extra Tips: When preparing Gambas Al Ajillo, it’s crucial to use high-quality olive oil, as it’s a prominent component of the dish. Additionally, adjust the amount of chili pepper based on your preference for spice. If you prefer a milder dish, you can reduce the quantity or remove the seeds from the chili peppers.
Finally, confirm not to overcook the shrimp, as they can become rubbery if cooked for too long. The shrimp should be just cooked through to maintain their tender texture. Enjoy your Gambas Al Ajillo with a glass of white wine or sherry for a truly authentic Spanish experience.
Cocido Madrileño
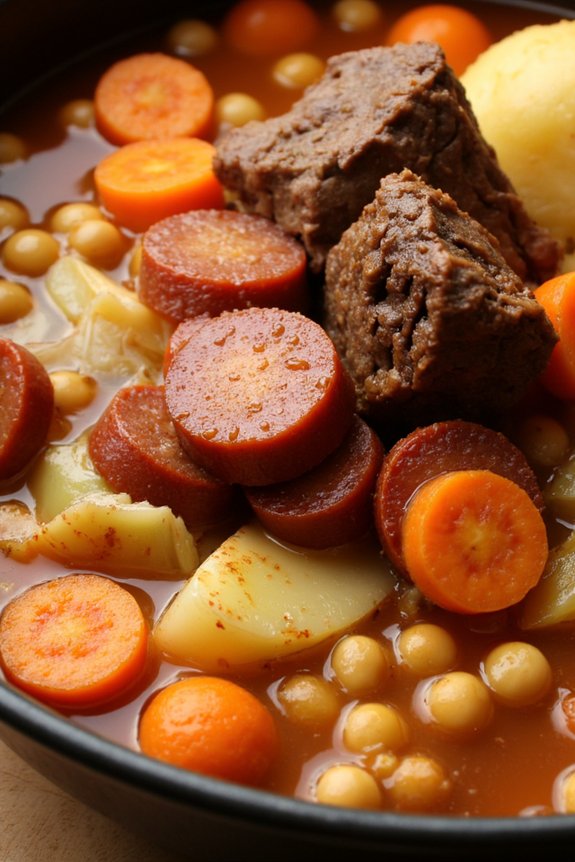
Cocido Madrileño is a traditional Spanish stew originating from Madrid, packed with a variety of meats, chickpeas, and vegetables. This hearty dish is typically served in three courses, with the broth as a soup, followed by the chickpeas and vegetables, and finally the meats. Its rich flavors and comforting nature make it a perfect choice for a family dinner, especially during colder months.
Preparing Cocido Madrileño is a labor of love, as it involves simmering various ingredients to develop deep flavors. The beauty of this dish lies in its simplicity and the quality of ingredients used. This recipe serves 4-6 people, allowing you to enjoy this classic Spanish meal with family or friends.
Ingredients for 4-6 servings:
- 500g dried chickpeas
- 1 kg beef shank
- 500g pork belly
- 1 chorizo sausage
- 1 morcilla (Spanish blood sausage)
- 1 ham bone
- 1 beef marrow bone
- 4 carrots, peeled and cut into chunks
- 1 leek, cleaned and cut into pieces
- 1 cabbage, quartered
- 4 potatoes, peeled
- 2 cloves of garlic, peeled
- Salt to taste
- Water
Cooking Instructions:
- Soak the Chickpeas: The night before cooking, soak the chickpeas in plenty of water. They need to be covered by at least two inches of water as they’ll expand.
- Prepare the Broth: In a large pot, place the beef shank, pork belly, ham bone, and marrow bone. Cover with water and bring to a boil. Skim off any foam that rises to the top to keep the broth clear.
- Cook the Chickpeas: Drain the soaked chickpeas and add them to the pot. Lower the heat to a simmer and cook for about 1.5 hours, or until the chickpeas are tender.
- Add Vegetables and Sausages: Add the carrots, leek, cabbage, potatoes, garlic, chorizo, and morcilla to the pot. Continue to simmer for another 1-1.5 hours, or until all the ingredients are cooked through and tender.
- Season and Serve: Adjust the seasoning with salt to taste. Strain the broth and serve it as a first course. Follow with the chickpeas and vegetables on a platter, and finally the meats, sliced, on a separate plate.
Extra Tips:
For the best flavor, make sure to use quality meats and fresh vegetables. You can prepare Cocido Madrileño a day in advance, as the flavors tend to develop and intensify when reheated.
If you prefer, remove the sausages and slice them before serving to make it easier for guests to serve themselves. Don’t discard the broth leftovers, as it’s a delicious base for other soups or stews.
Enjoy this dish with crusty bread and a good Spanish red wine for an authentic experience.
Empanadas Gallegas

Empanadas Gallegas, a popular dish from the Galicia region of Spain, are savory pastries filled with a variety of ingredients, usually including meat, fish, or vegetables. These empanadas are known for their flaky crust and flavorful fillings, making them a beloved staple in Spanish family dinners. The key to a perfect Empanada Gallega lies not only in the balance of ingredients within the filling but also in the skillful preparation of the dough, which should be light and slightly crispy.
Traditionally, Empanadas Gallegas are baked in large, round pans, and then cut into individual portions, making them ideal for sharing at family gatherings. This recipe will guide you through creating a classic Empanada Gallega with a tuna filling, designed to serve 4-6 people. The combination of tuna, bell peppers, onions, and tomato sauce offers a delightful taste of the sea, intertwined with the sweet and savory flavors of the vegetables.
Ingredients for 4-6 servings:
- 4 cups all-purpose flour
- 1/2 cup olive oil
- 1/2 cup warm water
- 1 teaspoon salt
- 1 tablespoon baking powder
- 2 cans (6 oz each) tuna, drained
- 1 large onion, finely chopped
- 1 bell pepper, finely chopped
- 2 cloves garlic, minced
- 1/2 cup tomato sauce
- 1 teaspoon smoked paprika
- Salt and pepper to taste
- 1 egg, beaten (for egg wash)
Cooking Instructions:
- Prepare the Dough: In a large bowl, mix the flour, baking powder, and salt. Add the olive oil and warm water, and knead the mixture until it forms a smooth dough. Cover and let it rest for about 30 minutes.
- Prepare the Filling: While the dough rests, heat a little olive oil in a pan over medium heat. Sauté the chopped onion and bell pepper until soft, about 5 minutes. Add the garlic and cook for an additional minute.
- Combine Ingredients: Stir in the drained tuna, tomato sauce, and smoked paprika. Season with salt and pepper to taste. Cook for another 5 minutes, allowing the flavors to meld together. Remove from heat and let the filling cool slightly.
- Roll Out the Dough: Preheat your oven to 350°F (175°C). Divide the dough into two equal parts. Roll out one part on a floured surface into a large circle or rectangle, about 1/8 inch thick, and place it on a baking sheet lined with parchment paper.
- Assemble the Empanada: Spread the tuna filling evenly over the rolled-out dough, leaving a small border around the edges. Roll out the second piece of dough and place it over the filling. Press the edges together to seal, and crimp them with a fork for a decorative finish.
- Apply Egg Wash and Bake: Brush the top of the empanada with the beaten egg to help it achieve a golden color. Cut a few slits in the top to allow steam to escape while baking.
- Bake: Place the empanada in the preheated oven and bake for 30-35 minutes, or until the crust is golden brown and cooked through.
Extra Tips:
For the best results, make certain that your dough is well-rested to allow the gluten to relax, making it easier to roll out. If you’re short on time, you can prepare the filling a day in advance and store it in the refrigerator until you’re ready to assemble the empanada.
Additionally, feel free to experiment with different fillings, using chicken, chorizo, or seasonal vegetables to suit your taste.
Patatas Bravas
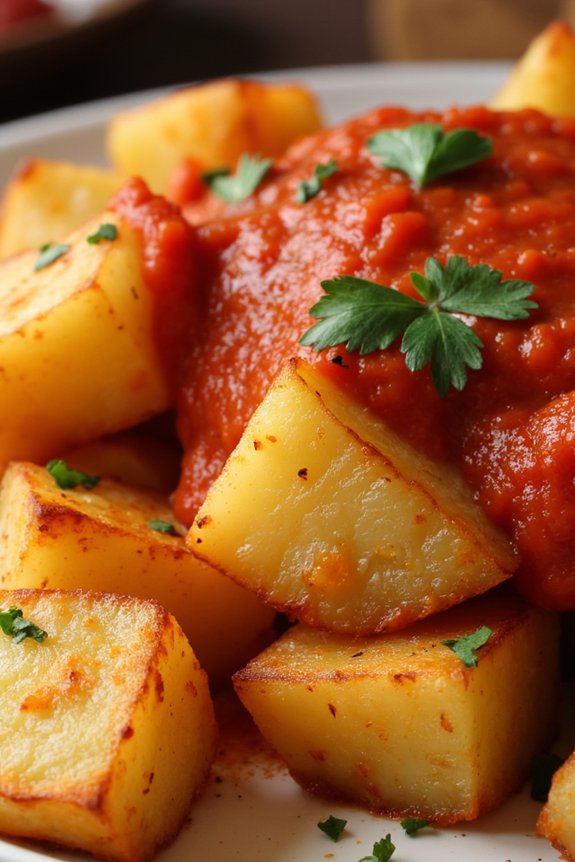
Patatas Bravas is a beloved Spanish tapas dish that brings a taste of Spain right to your dinner table. This classic dish consists of crispy fried potatoes served with a spicy tomato sauce, making it a perfect appetizer or side dish for any family dinner.
Originating from Madrid, Patatas Bravas has become a staple in Spanish cuisine, known for its bold flavors and simplicity. The combination of tender potatoes with a zesty sauce is sure to delight your taste buds and transport you to the vibrant streets of Spain.
To make Patatas Bravas, you’ll need to prepare both the potatoes and the signature bravas sauce. The potatoes are typically cut into cubes and then fried until golden brown, giving them a satisfying crunch. The bravas sauce, on the other hand, is a spicy tomato-based sauce that’s poured over the potatoes to add a kick of flavor.
This dish isn’t only delicious but also easy to make, requiring just a handful of ingredients and a little bit of time. Perfect for serving 4-6 people, Patatas Bravas is a crowd-pleaser that will surely become a favorite in your household.
Ingredients (Serves 4-6):
- 2 pounds of potatoes (preferably russet or Yukon gold)
- 4 tablespoons olive oil
- Salt to taste
- 1 teaspoon smoked paprika
- 1/2 teaspoon cayenne pepper
- 1 cup canned crushed tomatoes
- 2 cloves garlic, minced
- 1 teaspoon sugar
- 1 tablespoon red wine vinegar
- 1/4 cup mayonnaise
- Chopped fresh parsley for garnish
Cooking Instructions:
1. Prepare the Potatoes: Peel the potatoes and cut them into 1-inch cubes. Rinse them under cold water to remove excess starch and then pat them dry with a clean towel.
2. Cook the Potatoes: In a large frying pan, heat 3 tablespoons of olive oil over medium-high heat. Add the potatoes in a single layer, sprinkle with salt, and cook for about 20 minutes, stirring occasionally until they’re golden brown and crispy on all sides.
Once cooked, transfer them to a paper towel-lined plate to drain excess oil.
3. Make the Bravas Sauce: In a separate saucepan, heat the remaining tablespoon of olive oil over medium heat. Add the minced garlic and sauté until fragrant, about 1 minute. Stir in the smoked paprika, cayenne pepper, crushed tomatoes, and sugar.
Let the sauce simmer for about 10 minutes, stirring occasionally. Add the red wine vinegar and cook for an additional 2 minutes. Remove from heat and let it cool slightly.
4. Combine the Sauce and Mayonnaise: In a small bowl, mix the cooled tomato sauce with mayonnaise to create a creamy, spicy sauce.
5. Assemble the Dish: Place the crispy potatoes in a serving dish and drizzle the bravas sauce over the top. Garnish with chopped fresh parsley.
6. Serve: Serve the Patatas Bravas immediately while the potatoes are still warm and crispy.
Extra Tips:
When making Patatas Bravas, consider using a deep fryer for the potatoes to achieve an even crispier texture. If you prefer a spicier sauce, you can adjust the amount of cayenne pepper to suit your taste.
Additionally, for a more authentic touch, you can add a pinch of saffron to the sauce. Finally, serving the dish immediately guarantees the potatoes remain crispy and the flavors are at their peak. Enjoy your homemade Spanish delight with friends and family!
Escalivada Catalana
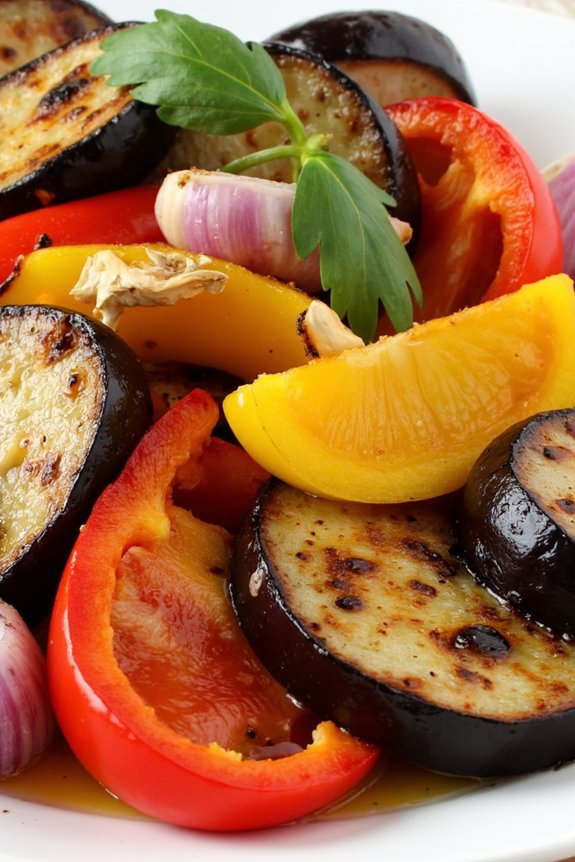
Escalivada Catalana is a traditional Catalan dish that isn’t only delicious but also incredibly simple to prepare. This vibrant vegetable medley features roasted eggplant, bell peppers, and onions, all enhanced with olive oil and garlic.
It’s a versatile dish that can be served as a side, a topping for bread, or even as a main course when paired with grilled meats or fish. The smoky flavors and rustic presentation make Escalivada a perfect choice for family dinners, offering both a feast for the eyes and the palate.
Perfect for serving 4-6 people, Escalivada Catalana is best enjoyed fresh and warm, but it can also be served at room temperature. The key to attaining the authentic taste of this dish lies in the careful roasting of the vegetables, which brings out their natural sweetness and adds a delightful charred flavor.
Whether you’re hosting a gathering or enjoying a cozy family meal, this recipe is sure to bring a taste of Catalonia to your table.
Ingredients:
- 2 large eggplants
- 2 red bell peppers
- 2 yellow bell peppers
- 2 large onions
- 4 cloves garlic
- 1/4 cup olive oil
- Salt to taste
- Freshly ground black pepper to taste
- 2 tablespoons red wine vinegar
- Fresh parsley for garnish (optional)
Instructions:
- Preheat the Oven: Start by preheating your oven to 400°F (200°C). This temperature is ideal for roasting the vegetables to achieve a slightly charred exterior while keeping them tender inside.
- Prepare the Vegetables: Wash and dry the eggplants, bell peppers, and onions. Cut the eggplants into thick slices, about 1/2 inch wide. Halve the bell peppers and remove the seeds. Peel the onions and cut them into wedges.
- Arrange on Baking Sheet: Place the prepared vegetables on a large baking sheet. Confirm they’re evenly spread out to allow for even roasting. Drizzle with olive oil and season with salt and pepper.
- Roast the Vegetables: Place the baking sheet in the preheated oven. Roast the vegetables for about 30-40 minutes, turning them halfway through the cooking process. The vegetables should be tender and slightly charred on the edges.
- Prepare the Garlic: While the vegetables are roasting, peel and thinly slice the garlic cloves. Set aside.
- Cool and Peel: Once the vegetables are done, remove them from the oven and allow them to cool slightly. Peel the skin off the peppers and eggplants; the skins should come off easily if properly roasted.
- Combine and Dress: Slice the roasted vegetables into strips and place them in a serving dish. Add the sliced garlic, drizzle with olive oil and red wine vinegar, and toss everything gently to combine.
- Serve: Taste and adjust seasoning with more salt and pepper if needed. Garnish with freshly chopped parsley if desired. Serve warm or at room temperature.
Extra Tips:
For an extra smoky flavor, consider grilling the vegetables over an open flame instead of roasting them in the oven. This method adds a depth of flavor that’s truly authentic to traditional Escalivada.
Additionally, when peeling the roasted peppers, cover them with a kitchen towel while cooling; the steam will help loosen the skins, making them easier to remove. If you have leftovers, Escalivada can be stored in the refrigerator for up to three days and is a delightful addition to sandwiches or salads.
Rabo De Toro
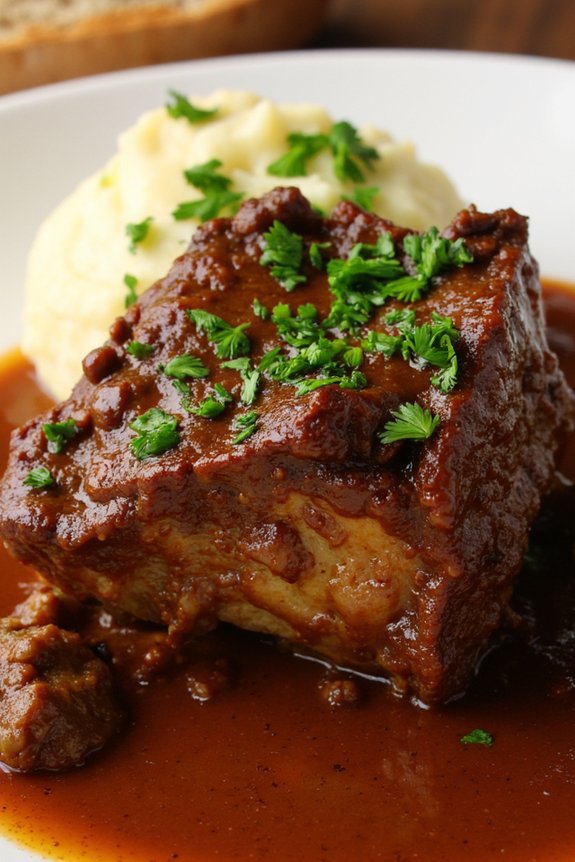
The preparation of Rabo De Toro may require patience, but the result is well worth the effort. Traditionally, this dish is cooked slowly to allow the flavors to develop and the meat to become tender. The key to a perfect Rabo De Toro is to use quality ingredients and to take the time to let the ingredients marry together. This recipe serves 4-6 people, making it perfect for a cozy family gathering or an impressive dinner with friends.
Ingredients
- 3 pounds of oxtail, cut into pieces
- Salt and pepper to taste
- 1/4 cup olive oil
- 2 large onions, chopped
- 4 cloves garlic, minced
- 2 carrots, chopped
- 2 celery stalks, chopped
- 1 red bell pepper, chopped
- 1 bay leaf
- 1 sprig of fresh thyme
- 1 sprig of fresh rosemary
- 1 cup of red wine
- 4 cups beef stock
- 2 tablespoons tomato paste
- 2 teaspoons paprika
- 1 teaspoon ground cumin
- 1/2 teaspoon ground cloves
- 2 tablespoons all-purpose flour
- 2 tablespoons chopped fresh parsley, for garnish
Cooking Instructions
- Season the Oxtail: Begin by seasoning the oxtail pieces generously with salt and pepper. This guarantees that the meat is flavorful throughout.
- Brown the Oxtail: In a large, heavy-bottomed pot or Dutch oven, heat the olive oil over medium-high heat. Add the oxtail pieces in batches, browning each side for about 5 minutes. Once browned, remove them from the pot and set aside.
- Sauté Aromatics: In the same pot, reduce the heat to medium and add the chopped onions, garlic, carrots, celery, and red bell pepper. Cook the vegetables until they’re softened and the onions are translucent, about 8-10 minutes.
- Add Herbs and Spices: Stir in the bay leaf, thyme, rosemary, paprika, ground cumin, and ground cloves. Cook for another 2 minutes, allowing the spices to release their aromas.
- Deglaze with Wine: Pour in the red wine, using it to deglaze the pot by scraping up any browned bits stuck to the bottom. Let the wine simmer for about 5 minutes until it’s slightly reduced.
- Thicken the Sauce: Sprinkle the flour over the vegetables and stir well to incorporate. This will help thicken the sauce as it cooks.
- Combine Ingredients: Return the browned oxtail to the pot. Add the beef stock and tomato paste, stirring to combine everything. Bring the mixture to a gentle simmer.
- Braise the Oxtail: Cover the pot and reduce the heat to low. Allow the oxtail to simmer for 3 to 4 hours, or until the meat is tender and easily pulls away from the bone. Stir occasionally and check the liquid level, adding more stock or water if needed.
- Adjust Seasoning and Serve: Once the oxtail is tender, taste the sauce and adjust the seasoning with salt and pepper as needed. Serve the Rabo De Toro hot, garnished with fresh parsley.
Extra Tips
For the best results, prepare Rabo De Toro a day in advance. This extra time allows the flavors to deepen and meld together, making the dish even more delicious when reheated.
Additionally, using a good-quality red wine will greatly enhance the richness of the sauce. If possible, choose a robust Spanish red wine to keep the dish authentic.
Finally, serve Rabo De Toro with crusty bread or over a bed of creamy mashed potatoes to soak up the flavorful sauce.