

Are you ready to explore the colorful world of Spanish cuisine with me? Let’s discover 15 bold, authentic tapas recipes that will bring some fun to your evenings. Picture crispy Patatas Bravas next to succulent Gambas Al Ajillo. Each dish offers a delightful explosion of flavors, reflecting Spain’s rich culinary heritage. Pair these bites with Spanish wines and turn your table into a vibrant gathering spot.
Patatas Bravas
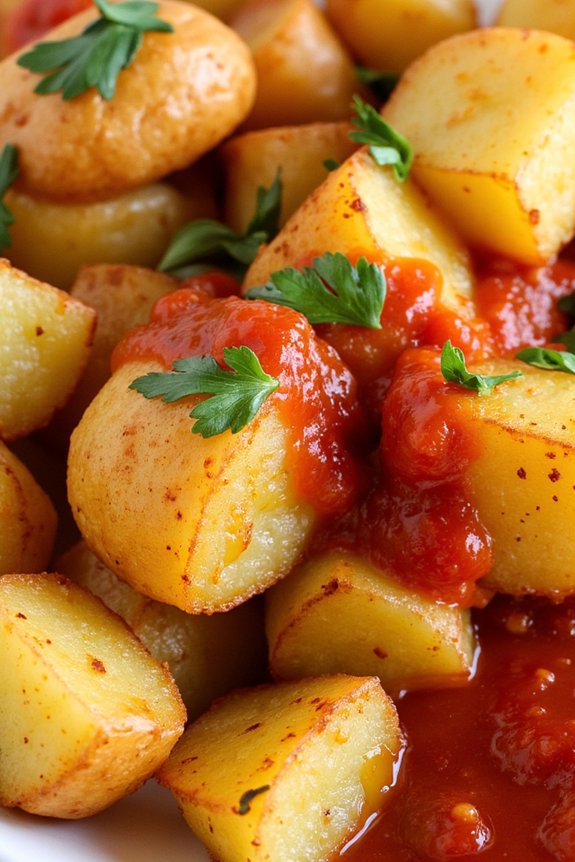
Patatas Bravas is a classic Spanish tapas dish characterized by crispy potatoes paired with a spicy, flavorful sauce. This dish embodies the essence of Spanish culinary tradition with its simple yet bold ingredients.
Often found in tapas bars throughout Spain, Patatas Bravas is a favorite among locals and tourists alike. The dish is perfect for sharing and pairs wonderfully with a variety of other tapas dishes or a glass of Spanish wine.
The key to making perfect Patatas Bravas lies in achieving the right balance between the crispy potatoes and the spicy, tangy sauce. The potatoes should be golden brown and crunchy on the outside while remaining soft on the inside.
The sauce, typically made with a combination of tomatoes, spices, and sometimes mayonnaise or aioli, should have a kick that complements the neutral taste of the potatoes. This recipe will guide you through creating an authentic Patatas Bravas that serves 4-6 people, ideal for a gathering or a family meal.
Ingredients for 4-6 servings:
- 2 pounds of potatoes, peeled and cut into 1-inch cubes
- 1 cup of olive oil (for frying)
- 1 teaspoon of smoked paprika
- 1/2 teaspoon of cayenne pepper
- Salt to taste
- 1 cup of tomato sauce
- 2 cloves of garlic, minced
- 1 tablespoon of white wine vinegar
- 1/2 cup of mayonnaise or aioli (optional)
- Chopped parsley for garnish
Cooking Instructions:
1. Prepare the Potatoes: Start by peeling and cutting the potatoes into 1-inch cubes. Rinse them in cold water to remove excess starch. Pat them dry completely with a clean kitchen towel.
2. Fry the Potatoes: Heat the olive oil in a large frying pan over medium-high heat. Once the oil is hot, carefully add the potatoes in batches to avoid overcrowding the pan. Fry the potatoes for about 10-15 minutes, or until they’re golden brown and crispy.
Remove them from the oil with a slotted spoon and drain on paper towels. Season with salt and set aside.
3. Make the Bravas Sauce: In a separate pan, heat a tablespoon of olive oil over medium heat. Add the minced garlic and sauté for about 1 minute until fragrant. Stir in the tomato sauce, smoked paprika, cayenne pepper, and white wine vinegar.
Let the mixture simmer for about 5 minutes, allowing the flavors to meld together. Taste and adjust the seasoning if necessary.
4. Combine and Serve: Once the sauce is ready, either drizzle it over the fried potatoes or serve it on the side. For an optional creamy variation, you can mix the sauce with mayonnaise or aioli before serving.
Garnish with chopped parsley for a fresh touch.
Extra Tips:
For the crispiest potatoes, make sure they’re completely dry before frying. You can also parboil the potatoes for a few minutes before frying to achieve a fluffy interior.
Adjust the heat in the sauce to your preference by modifying the amount of cayenne pepper used. If you prefer a smokier flavor, increase the smoked paprika.
For a more authentic presentation, serve the dish in small tapas plates and enjoy with a selection of other Spanish dishes.
Gambas Al Ajillo
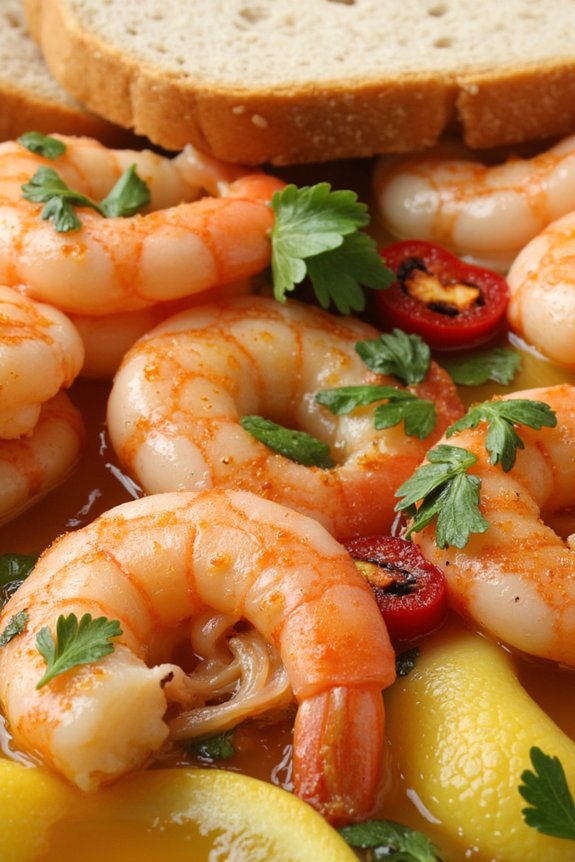
Gambas Al Ajillo, also known as Garlic Shrimp, is a classic Spanish tapas dish that’s popular for its simplicity and bold flavors. This dish is typically served as an appetizer, but it can also make for a delightful main course when paired with crusty bread or a fresh salad.
The combination of succulent shrimp, aromatic garlic, and a hint of spice from chili peppers creates a mouthwatering dish that’s perfect for any occasion, whether it’s a casual dinner or a festive gathering.
Originating from the southern regions of Spain, Gambas Al Ajillo is a staple in Spanish cuisine and showcases the vibrant flavors of Mediterranean cooking. The dish is typically prepared quickly over high heat, allowing the shrimp to absorb the rich flavors of garlic-infused olive oil. This recipe serves 4-6 people, making it ideal for sharing with family and friends.
Ingredients for 4-6 servings:
- 1 pound (450g) large shrimp, peeled and deveined
- 1/3 cup olive oil
- 8 cloves of garlic, thinly sliced
- 1-2 dried red chili peppers, sliced
- 1/4 cup fresh parsley, chopped
- 1 teaspoon smoked paprika
- 1 tablespoon lemon juice
- Salt, to taste
- Freshly ground black pepper, to taste
Cooking Instructions:
- Prepare the Shrimp: Rinse the peeled and deveined shrimp under cold water and pat them dry with paper towels. This helps them cook evenly and prevents excess water from diluting the sauce.
- Heat the Oil: In a large skillet, heat the olive oil over medium heat. Once the oil is hot but not smoking, add the sliced garlic and chili peppers. Sauté for about 1-2 minutes until the garlic is fragrant and lightly golden. Be careful not to burn the garlic as it can turn bitter.
- Cook the Shrimp: Increase the heat to medium-high and add the shrimp to the skillet. Season with salt, black pepper, and smoked paprika. Cook for 2-3 minutes on each side, or until the shrimp turn pink and opaque.
- Add Fresh Flavors: Once the shrimp are cooked, remove the skillet from the heat. Stir in the lemon juice and chopped parsley, mixing well to coat the shrimp evenly in the flavorful sauce.
- Serve Immediately: Transfer the shrimp and garlic sauce to a serving dish. Serve hot, accompanied by slices of crusty bread to soak up the delicious garlic-infused oil.
Extra Tips:
For the best flavor, always use fresh shrimp and high-quality olive oil. If you prefer a spicier dish, adjust the number of chili peppers to your liking.
Additionally, you can prepare this dish in a clay cazuela for a more authentic Spanish presentation. When serving, offer extra lemon wedges on the side for those who enjoy an extra citrusy kick. Enjoy your Gambas Al Ajillo with a chilled glass of Spanish white wine for a delightful culinary experience.
Tortilla Española

Tortilla Española, also known as Spanish Omelette, is a classic dish that highlights the simplicity and deliciousness of Spanish cuisine. Traditionally made with just a few ingredients, this dish is all about the perfect balance of eggs, potatoes, and onions.
It’s a versatile dish that can be enjoyed at any time of the day, whether as a hearty breakfast, a satisfying lunch, or a delightful tapas at dinner. The key to a perfect Tortilla Española lies in the slow cooking process that allows the potatoes and onions to caramelize gently, enhancing their natural sweetness and flavor.
The beauty of Tortilla Española is its adaptability; you can keep it simple or add additional ingredients like bell peppers, chorizo, or herbs to suit your taste. However, mastering the classic recipe is an art in itself. The tortilla should be moist in the center and firm on the outside, with a golden-brown crust.
Once you’ve perfected the basic version, you can start experimenting with other variations. This recipe serves 4-6 people, making it perfect for a small gathering or a family meal.
Ingredients:
- 6 large eggs
- 4 medium potatoes, peeled and thinly sliced
- 1 large onion, finely sliced
- 1/2 cup olive oil
- Salt, to taste
- Black pepper, to taste
Cooking Instructions:
- Prepare the Ingredients: Begin by peeling the potatoes and slicing them thinly. Finely slice the onion as well. Confirm that all slices are even to allow for uniform cooking.
- Cook the Potatoes and Onions: In a non-stick frying pan, heat the olive oil over medium heat. Add the sliced potatoes and onions, making sure they’re fully submerged in the oil. Cook gently, stirring occasionally, for about 20-25 minutes until the potatoes are tender and the onions are soft. They shouldn’t brown, so adjust the heat as necessary.
- Drain and Cool: Once cooked, use a slotted spoon to remove the potatoes and onions from the pan and place them on a paper towel-lined plate to drain excess oil. Let them cool slightly.
- Beat the Eggs: In a large bowl, beat the eggs with a pinch of salt and pepper. Add the cooled potatoes and onions to the eggs and mix gently to combine. Let the mixture sit for about 10 minutes to allow the flavors to meld.
- Cook the Tortilla: Heat a little of the reserved olive oil in the same frying pan over medium heat. Pour in the egg and potato mixture, spreading it evenly in the pan. Cook for about 5-7 minutes until the bottom is set and lightly golden.
- Flip the Tortilla: To flip the tortilla, place a large plate over the frying pan and carefully invert the pan to transfer the tortilla onto the plate. Slide the tortilla back into the pan to cook the other side for an additional 5 minutes or until fully set and lightly golden.
- Serve: Once cooked, slide the tortilla onto a serving plate. Allow it to cool slightly before slicing into wedges. Serve warm or at room temperature.
Extra Tips:
When making Tortilla Española, it’s essential to use a non-stick pan to prevent sticking and to make flipping easier. If you’re nervous about flipping the tortilla, you can finish the top under a broiler instead of flipping.
Also, make sure to adjust the heat appropriately during the cooking process to avoid browning the potatoes and onions too quickly. For a more flavorful tortilla, let the cooked dish rest for a few minutes before serving, allowing the flavors to develop further.
Albondigas
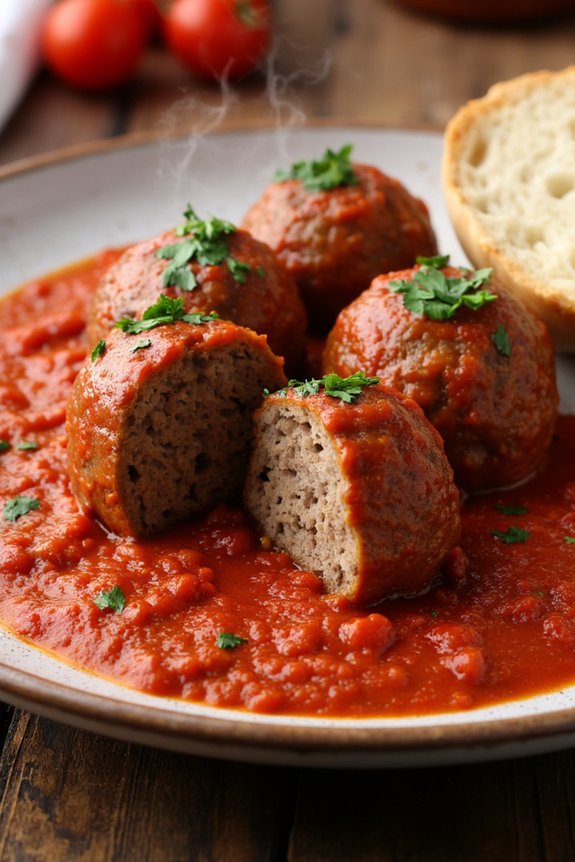
Albondigas, or Spanish meatballs, are a hearty and flavorful dish often enjoyed as a tapas option in Spanish cuisine. These succulent meatballs are typically made from a mixture of ground meats, such as beef and pork, and are seasoned with a variety of spices to create a savory blend bursting with flavor. The meatballs are then simmered in a rich tomato sauce, allowing the flavors to meld together beautifully.
Served with crusty bread or as part of a tapas spread, albondigas are a comforting dish perfect for gatherings or a cozy meal at home. The key to making great albondigas lies in balancing the spices and ensuring the meatballs are tender and moist. The inclusion of breadcrumbs soaked in milk helps achieve a perfect texture, while ingredients like garlic, onion, and fresh herbs provide depth of flavor.
When cooked in the tomato sauce, the meatballs absorb the savory juices, resulting in a dish that’s both satisfying and incredibly delicious. Whether you’re throwing a tapas party or simply craving a taste of Spain, this albondigas recipe won’t disappoint.
Ingredients (Serves 4-6):
- 500g ground beef
- 500g ground pork
- 1/2 cup breadcrumbs
- 1/4 cup milk
- 1 small onion, finely chopped
- 3 cloves garlic, minced
- 1 egg
- 2 tablespoons chopped fresh parsley
- 1 teaspoon smoked paprika
- 1 teaspoon ground cumin
- Salt and pepper to taste
- 2 tablespoons olive oil
- 1 can (400g) crushed tomatoes
- 1/2 cup chicken or beef broth
- 1 bay leaf
- 1 teaspoon sugar (optional)
- Fresh parsley for garnish
Cooking Instructions:
- Prepare the Breadcrumb Mixture: In a small bowl, combine breadcrumbs and milk. Let the breadcrumbs soak in the milk for about 5 minutes until they’re fully absorbed. This will help to keep the meatballs moist and tender.
- Mix the Meatball Ingredients: In a large mixing bowl, combine the ground beef, ground pork, soaked breadcrumbs, chopped onion, minced garlic, egg, chopped parsley, smoked paprika, ground cumin, salt, and pepper. Mix well using your hands until all ingredients are evenly distributed.
- Form the Meatballs: Using your hands, shape the mixture into small balls, about 1 inch in diameter. Place the meatballs on a tray or plate as you form them.
- Brown the Meatballs: In a large skillet, heat olive oil over medium heat. Add the meatballs in batches and cook until browned on all sides, about 5-7 minutes. Use a slotted spoon to remove the meatballs from the skillet and set them aside.
- Prepare the Tomato Sauce: In the same skillet, add the crushed tomatoes, chicken or beef broth, bay leaf, and sugar (if using). Stir well and bring the mixture to a simmer.
- Simmer the Meatballs: Return the browned meatballs to the skillet, ensuring they’re submerged in the tomato sauce. Cover and let simmer on low heat for about 25-30 minutes, allowing the flavors to meld and the meatballs to cook through.
- Serve: Remove the bay leaf before serving. Garnish the albondigas with freshly chopped parsley and serve hot with crusty bread or as part of your tapas spread.
Extra Tips:
For added flavor, consider including a pinch of red pepper flakes for a bit of heat, or experiment with adding different herbs such as oregano or thyme.
When forming the meatballs, wetting your hands with water can help prevent the mixture from sticking. If you prefer a thicker sauce, allow it to simmer uncovered for a few extra minutes to reduce and thicken to your desired consistency.
Albondigas can be made ahead of time and reheated, making them an excellent choice for meal prepping or entertaining.
Boquerones En Vinagre
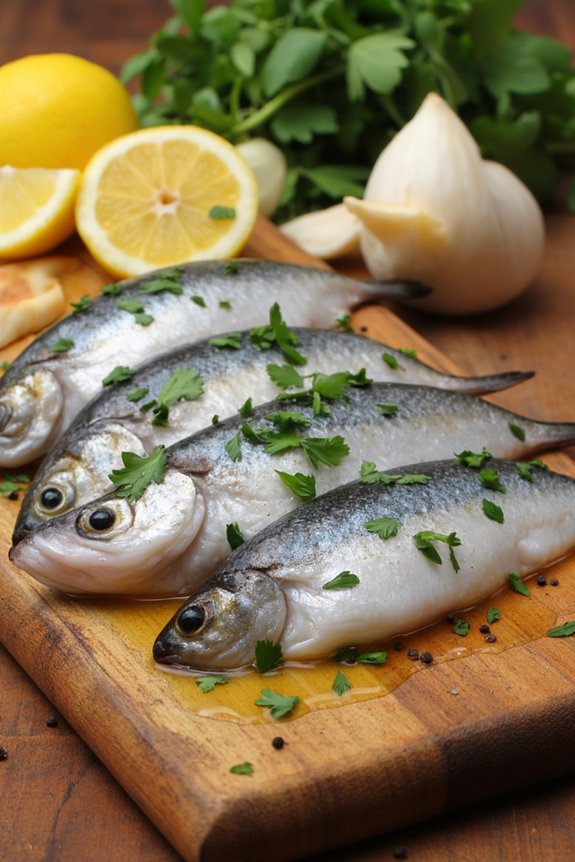
Boquerones en vinagre is a classic Spanish tapas dish that features fresh anchovies marinated in a tangy mixture of vinegar and olive oil. This dish is beloved for its delicate balance of flavors, combining the briny taste of the sea with the sharpness of vinegar and the smoothness of olive oil. Typically served as an appetizer, boquerones en vinagre are perfect for warm summer days and pair beautifully with a glass of chilled white wine or a revitalizing Spanish cider.
Preparing boquerones en vinagre requires fresh, high-quality anchovies, which are cleaned and filleted before being marinated. The marination process not only enhances the flavors but also helps to preserve the fish, making it a popular choice for tapas bars across Spain. This dish is simple yet elegant, showcasing the anchovy in its most natural form, complemented by a few choice ingredients that highlight its flavor.
Ingredients for 4-6 servings:
- 500g fresh anchovies
- 1 cup white wine vinegar
- 1/2 cup water
- 1 tablespoon sea salt
- 3 cloves garlic, thinly sliced
- 1/4 cup fresh parsley, finely chopped
- 1/2 cup extra virgin olive oil
- Black pepper to taste
- Lemon wedges for serving (optional)
Cooking Instructions:
- Prepare the Anchovies: Start by cleaning the anchovies. Remove the heads and guts, then carefully slice them open and remove the backbone. Rinse the fillets under cold water to remove any remaining blood.
- Marinate the Anchovies: In a shallow dish, arrange the anchovy fillets in a single layer. In a bowl, mix the white wine vinegar, water, and sea salt until the salt dissolves. Pour this mixture over the anchovies, making sure they’re fully submerged. Cover the dish with plastic wrap and refrigerate for at least 2 to 3 hours, or until the anchovies turn white.
- Prepare the Garlic and Parsley: While the anchovies are marinating, slice the garlic and chop the parsley. Set aside.
- Drain and Dress the Anchovies: Once marinated, drain the anchovies from the vinegar mixture and gently pat them dry with paper towels. Arrange them in a serving dish, layering with sliced garlic and chopped parsley.
- Add the Olive Oil: Drizzle the extra virgin olive oil over the anchovies, making sure they’re well coated. Season with black pepper to taste.
- Serve: Allow the anchovies to sit at room temperature for about 10 minutes before serving. This will let the flavors meld together. Serve with lemon wedges on the side if desired.
Extra Tips:
When making boquerones en vinagre, the freshness of the anchovies is vital. Always choose the freshest fish available to guarantee the best flavor and texture.
For an extra burst of flavor, you can add a pinch of red pepper flakes or a bit of finely grated lemon zest to the marinade. Additionally, it’s important to use high-quality extra virgin olive oil, as it adds a rich, flavorful finish to the dish.
Remember that patience is key in this recipe; allowing the anchovies to marinate fully will result in a more flavorful and tender dish.
Chorizo Al Vino
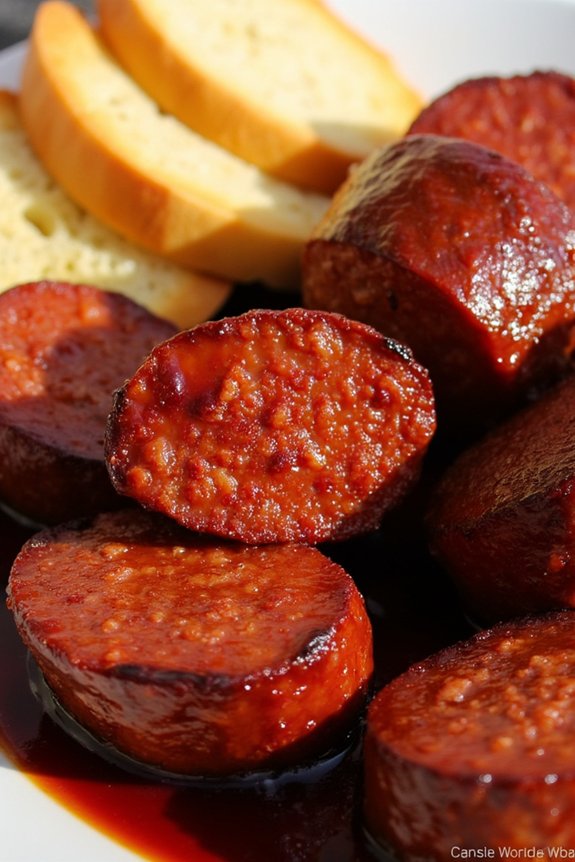
Chorizo Al Vino is a classic Spanish tapas dish that combines the robust flavors of chorizo sausage with the rich, bold taste of red wine. This simple yet flavorful recipe is perfect for entertaining guests or enjoying a casual evening at home.
The fat from the chorizo infuses the wine with a deep, smoky essence while the wine tenderizes the sausage, creating a harmonious blend of tastes that’s guaranteed to tantalize your taste buds.
Traditionally, Chorizo Al Vino is served as an appetizer or a part of a larger tapas spread. The dish is best enjoyed with crusty bread, which can be used to soak up the delectable sauce, and accompanied by a glass of Spanish red wine.
Whether you’re hosting a dinner party or simply looking for a new way to enjoy chorizo, this recipe is both easy to prepare and full of flavor, making it a must-try for any tapas enthusiast.
Ingredients for 4-6 servings:
- 500g Spanish chorizo sausage
- 2 cups dry red wine
- 2 tablespoons olive oil
- 3 cloves garlic, minced
- 1 bay leaf
- Salt and pepper to taste
Cooking Instructions:
- Prepare the Chorizo: Begin by slicing the chorizo sausage into bite-sized pieces, about 1/2 inch thick. This will guarantee even cooking and allow the flavors to meld nicely with the wine.
- Heat the Oil: In a large skillet or frying pan, heat the olive oil over medium heat. Once the oil is shimmering, add the minced garlic and sauté for about 1 minute until fragrant, being careful not to let it burn.
- Cook the Chorizo: Add the sliced chorizo to the pan, stirring occasionally. Cook for about 5 minutes until the edges start to brown and the chorizo releases its oils.
- Simmer with Wine: Pour the red wine into the pan with the chorizo, making sure the sausage is mostly submerged. Add the bay leaf, and season with salt and pepper to taste. Bring the mixture to a gentle simmer.
- Reduce the Sauce: Allow the chorizo to simmer in the wine for about 15-20 minutes, stirring occasionally, until the liquid reduces by half and the chorizo is fully cooked through. The sauce should be thickened and flavorful.
- Serve: Remove the bay leaf before serving. Transfer the chorizo and sauce to a serving dish and enjoy with crusty bread on the side.
Extra Tips:
To enhance the flavor of this dish, consider using a good quality Spanish red wine, such as a Rioja or Tempranillo. The wine’s characteristics will complement the chorizo’s spices beautifully.
Additionally, if you prefer a bit of heat, opt for spicy chorizo, or add a pinch of red pepper flakes during cooking. This dish can be prepared in advance and reheated gently before serving, as the flavors continue to develop over time.
Pimientos De Padrón
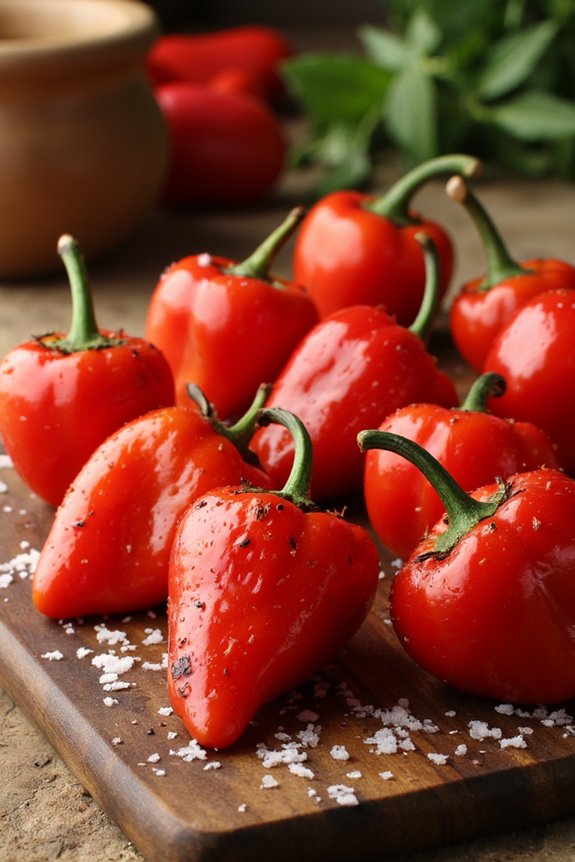
Pimientos De Padrón are a traditional Spanish tapa known for their unique taste and the surprise that some peppers might be spicier than others. Originating from the region of Galicia in northwestern Spain, these small green peppers are typically mild, but about one in ten can have a spicy kick. The dish is simple yet delicious, highlighting the fresh flavor of the peppers with a light seasoning of salt. It’s perfect for sharing with friends and family as an appetizer or snack.
The preparation of Pimientos De Padrón is straightforward and involves just a few ingredients, making it an easy dish to whip up quickly. The peppers are usually fried in olive oil until blistered and then sprinkled with coarse sea salt just before serving. This method enhances their natural flavor and creates a delightful combination of textures. When cooked properly, these peppers are tender with slightly charred skin, offering a delightful burst of flavor in each bite.
Ingredients (serving size: 4-6 people):
- 500 grams of Pimientos De Padrón
- 3 tablespoons of extra virgin olive oil
- Coarse sea salt (to taste)
Cooking Instructions:
- Prepare the Peppers: Rinse the Pimientos De Padrón thoroughly under cold water to remove any dirt. Pat them dry with a kitchen towel, as excess water will cause the oil to splatter during cooking.
- Heat the Oil: In a large skillet or frying pan, heat the extra virgin olive oil over medium-high heat. The oil should be hot but not smoking to guarantee the peppers cook evenly.
- Cook the Peppers: Add the dried peppers to the hot oil in a single layer. Don’t overcrowd the pan to allow them to blister properly. Fry the peppers, turning occasionally, until they’re blistered and slightly charred on all sides, which should take about 5-7 minutes.
- Season and Serve: Transfer the cooked peppers to a serving dish using a slotted spoon to drain any excess oil. Sprinkle them generously with coarse sea salt immediately while they’re still warm. Serve the peppers hot and enjoy them as a finger food, encouraging guests to eat them whole.
Extra Tips:
When cooking Pimientos De Padrón, it’s important to keep an eye on the heat. Too high a temperature can burn the peppers quickly, while too low may not blister them properly. Adjust the heat accordingly to maintain a steady sizzle.
If you prefer a milder flavor, you can remove the seeds before cooking, although traditionally the peppers are cooked whole. Remember, the fun part of this dish is the surprise of the occasional spicy pepper, so embrace the unpredictability!
Croquetas De Jamón
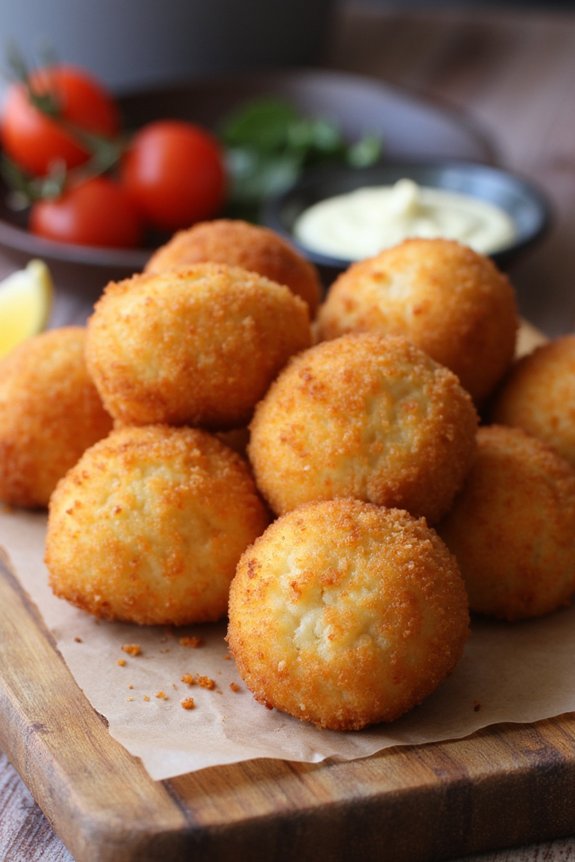
Croquetas De Jamón are a classic Spanish tapa, beloved for their creamy texture and savory flavor. These delightful croquettes are made with a béchamel sauce base mixed with finely chopped jamón (Spanish ham), then breaded and fried to perfection. The result is a crispy exterior that gives way to a soft, flavorful interior, making them a perfect appetizer or snack to enjoy with friends and family.
The secret to perfect Croquetas De Jamón lies in the béchamel sauce, which should be smooth and rich. The addition of jamón imparts a distinct, salty flavor that balances beautifully with the creamy sauce. Once the mixture is cooled, it’s shaped into small cylinders, coated in breadcrumbs, and fried to golden perfection.
These croquettes are traditionally served hot, often accompanied by a glass of chilled sherry or a revitalizing beer.
Ingredients (Serves 4-6):
- 1 cup diced jamón (Spanish ham)
- 4 tablespoons unsalted butter
- 1/2 cup all-purpose flour
- 2 cups whole milk
- 1/4 teaspoon nutmeg
- Salt and pepper to taste
- 2 large eggs, beaten
- 1 cup breadcrumbs
- Vegetable oil, for frying
Cooking Instructions:
- Prepare the Béchamel Sauce: In a medium saucepan, melt the butter over medium heat. Once melted, add the flour and stir continuously for about 2-3 minutes until the mixture is smooth and lightly golden.
- Incorporate the Milk: Gradually add the milk to the flour mixture, whisking constantly to avoid lumps. Continue stirring until the sauce thickens and becomes smooth, about 5-7 minutes.
- Season and Add Jamón: Once the béchamel has thickened, add the nutmeg, salt, and pepper. Stir in the diced jamón, making sure it’s evenly distributed throughout the sauce. Remove from heat and let the mixture cool to room temperature, then refrigerate for at least 2 hours until firm.
- Shape the Croquettes: Once the mixture is firm, use your hands to shape it into small cylinders or balls, about 2 inches in length.
- Bread the Croquettes: Set up a breading station with beaten eggs in one bowl and breadcrumbs in another. Dip each croquette into the beaten egg, then coat with breadcrumbs, ensuring they’re fully covered.
- Fry the Croquettes: In a large frying pan, heat vegetable oil over medium-high heat until hot. Fry the croquettes in batches, turning occasionally, until they’re golden brown on all sides, about 3-4 minutes per batch. Drain on a paper towel-lined plate.
- Serve: Serve the croquettes hot, ideally with a side of alioli or a squeeze of lemon juice for added flavor.
Extra Tips:
To guarantee your croquetas have the perfect texture, make sure the béchamel sauce is thick enough to hold its shape when cooled. If the mixture is too runny, it will be difficult to form into croquettes.
Also, when frying, maintain a consistent oil temperature to prevent the croquettes from absorbing too much oil and becoming greasy. If you’re preparing them ahead of time, you can shape and bread the croquettes, then freeze them until you’re ready to fry. Just add a couple of extra minutes to the frying time if cooking from frozen.
Pulpo a La Gallega
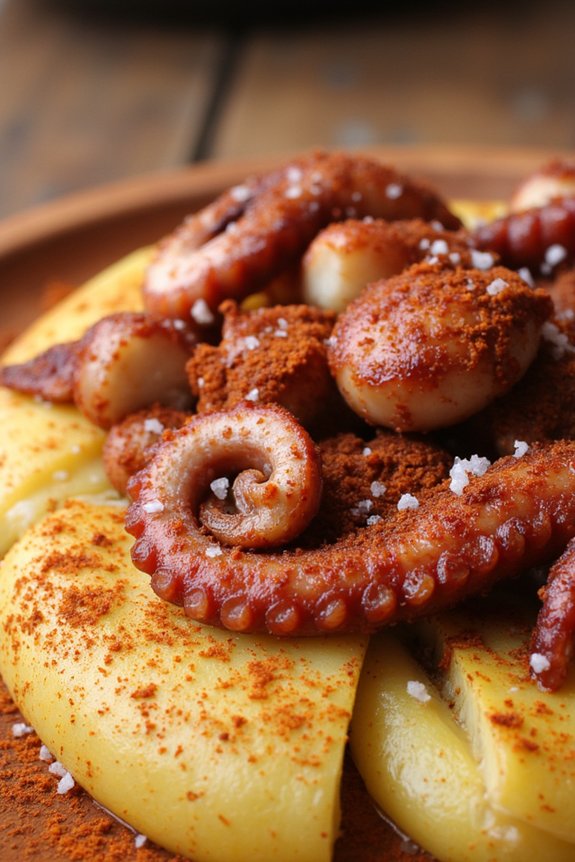
Pulpo a La Gallega, also known as Galician-style octopus, is a traditional Spanish tapas dish that originates from the region of Galicia. Known for its simple yet flavorful preparation, this dish highlights the natural flavor of the octopus by pairing it with a few key ingredients. The octopus is boiled to perfection until tender, then seasoned with olive oil, salt, and smoky Spanish paprika, creating a harmonious balance of taste and texture.
It’s often served on a wooden platter, enhancing the rustic presentation and the overall experience of savoring this delectable dish. This classic recipe is cherished for its minimalistic approach, allowing the quality of each ingredient to shine through.
While it may seem challenging to prepare octopus at home, the process is straightforward and rewarding. Whether you’re hosting a tapas night or simply want to explore authentic Spanish cuisine, Pulpo a La Gallega is a must-try dish that promises to impress with its unique flavors and presentation. Perfect for serving 4-6 people, this recipe invites you to enjoy a taste of Galicia in the comfort of your own home.
Ingredients (serves 4-6):
- 1 large octopus (about 2.5 to 3 pounds)
- 4 large potatoes
- 1 onion
- 2 bay leaves
- 1 tablespoon sea salt
- 1 tablespoon sweet Spanish paprika (pimentón)
- 1 tablespoon smoky Spanish paprika (pimentón de la Vera)
- 1/4 cup extra virgin olive oil
- Coarse sea salt for seasoning
Cooking Instructions:
- Prepare the Octopus: Rinse the octopus thoroughly under cold water to remove any impurities. If the octopus isn’t already cleaned, remove the beak and eyes.
- Boil the Octopus: Fill a large pot with water and add the onion and bay leaves. Bring the water to a rolling boil. Dip the octopus into the boiling water three times to help the tentacles curl, then fully submerge it in the pot. Allow the octopus to cook for about 40-50 minutes, or until it becomes tender when pierced with a fork.
- Cook the Potatoes: While the octopus is boiling, peel and slice the potatoes into thick rounds. In a separate pot, boil the potatoes in salted water until they’re fork-tender, about 15-20 minutes. Drain and set aside.
- Slice the Octopus: Once the octopus is tender, remove it from the pot and let it cool slightly. Cut the tentacles into bite-sized pieces and slice the head if desired.
- Assemble the Dish: Arrange the potato slices on a serving platter or individual plates. Top the potatoes with the octopus pieces.
- Season the Dish: Drizzle the octopus and potatoes generously with olive oil. Sprinkle both types of paprika evenly over the top, followed by a good pinch of coarse sea salt for added flavor.
- Serve: Serve the Pulpo a La Gallega warm or at room temperature as part of your tapas spread.
Extra Tips:
For the best texture, make sure not to overcook the octopus, as it can become rubbery. If you’re new to cooking octopus, you can ask your fishmonger to clean it for you.
When selecting paprika, choose high-quality Spanish varieties for an authentic taste. If you prefer a spicier dish, you can add a touch of hot paprika to the mix. Additionally, serving the dish on a wooden platter not only enhances the presentation but also stays true to traditional Galician serving methods.
Ensaladilla Rusa
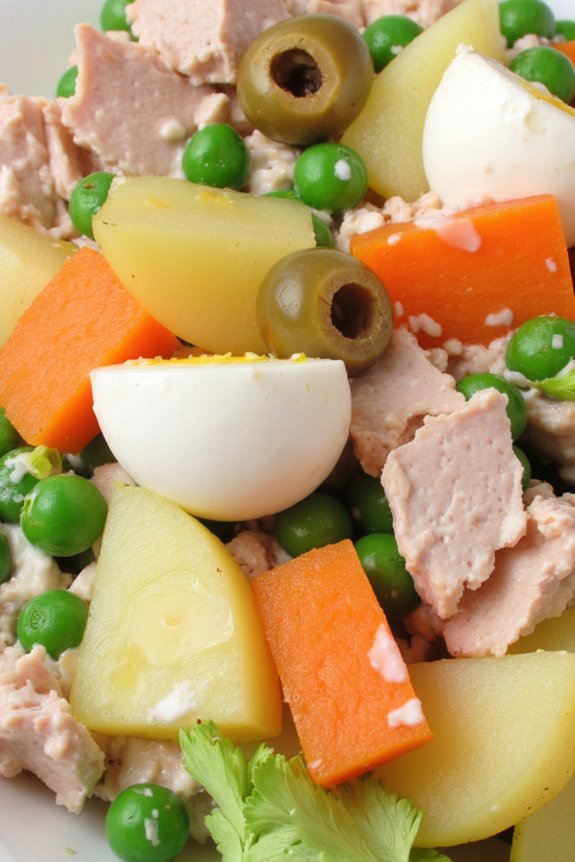
Ensaladilla Rusa is a popular Spanish tapa that brings a rejuvenating twist to the traditional potato salad. This dish is known for its creamy texture and rich flavors, making it a must-try for anyone interested in Spanish cuisine. Originating from Russia, Ensaladilla Rusa has been embraced by the Spanish and is commonly found at tapas bars throughout the country.
It’s a versatile dish that can be enjoyed as a starter, side dish, or even a light meal. The beauty of Ensaladilla Rusa lies in its simplicity and the harmonious blend of its ingredients. The combination of boiled potatoes, carrots, peas, and tuna, all mixed with creamy mayonnaise, creates a delightful contrast of flavors and textures.
This dish is best served chilled, making it a perfect appetizer for warm weather gatherings or casual dinners. Here’s how you can make Ensaladilla Rusa for a serving size of 4-6 people.
Ingredients for 4-6 people:
- 4 medium potatoes
- 2 medium carrots
- 1 cup frozen peas
- 2 large eggs
- 1 can (about 185g) of tuna in oil
- 1 cup mayonnaise
- Salt and pepper to taste
- 1 tablespoon olive oil
- Optional: pitted green olives for garnish
Cooking Instructions:
- Boil the Potatoes and Carrots: Peel the potatoes and carrots, then dice them into small, uniform cubes. Place them in a large pot of salted water and bring to a boil. Cook for about 15-20 minutes, or until the vegetables are tender but not mushy. Drain and set aside to cool.
- Cook the Peas: In a small saucepan, bring water to a boil and add the frozen peas. Cook for about 3-5 minutes until tender, then drain and rinse under cold water to stop the cooking process. Set aside.
- Boil the Eggs: In another small pot, place the eggs and cover them with water. Bring to a boil, then reduce the heat and let them simmer for 10 minutes. Once done, transfer the eggs to a bowl of cold water. Peel and chop them into small pieces once cooled.
- Prepare the Tuna: Drain the oil from the can of tuna and flake the fish into smaller pieces with a fork.
- Combine Ingredients: In a large mixing bowl, combine the cooked potatoes, carrots, peas, chopped eggs, and flaked tuna. Add the mayonnaise and gently mix until all the ingredients are well-coated. Season with salt and pepper to taste.
- Chill the Salad: Cover the bowl with plastic wrap and refrigerate the salad for at least an hour to allow the flavors to meld together.
- Serve: Before serving, drizzle a tablespoon of olive oil over the salad for an extra touch of flavor. Garnish with pitted green olives, if desired, and serve chilled.
Extra Tips:
For a more flavorful Ensaladilla Rusa, consider adding other ingredients like diced pickles, red bell peppers, or roasted red peppers. You can also experiment with different kinds of fish, like shrimp or crabmeat, for a more luxurious twist.
If you prefer a tangier salad, mix in a tablespoon of lemon juice with the mayonnaise. This dish is very adaptable, so feel free to customize it to your taste preferences. Remember to always taste and adjust the seasoning before serving.
Calamares a La Romana
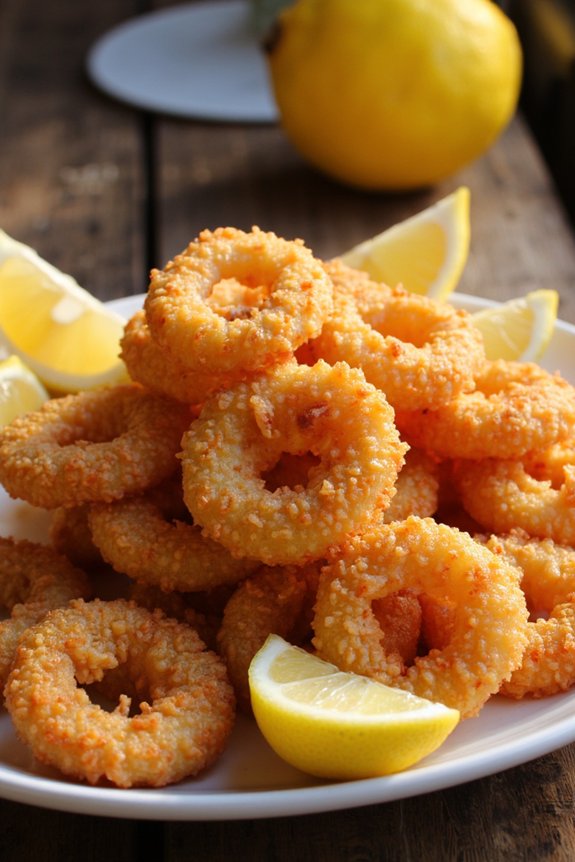
Calamares a La Romana is a classic Spanish tapas dish that highlights the simplicity and deliciousness of fried calamari. It features tender rings of squid coated in a light, crispy batter, perfectly seasoned and fried to golden perfection. This dish is a staple in Spanish cuisine and is often enjoyed with a squeeze of lemon or a side of garlic aioli. The key to mastering Calamares a La Romana is attaining the perfect balance of crispy exterior and tender, juicy interior, making it a delightful appetizer or snack.
The origins of this dish can be traced back to the coastal regions of Spain, where fresh seafood is abundant. Calamares a La Romana is typically served as a tapa in bars and restaurants, allowing people to enjoy it as a part of a larger meal or as a standalone treat. The simplicity of the recipe, combined with the fresh flavors of the sea, makes it a favorite among seafood lovers.
Preparing this dish at home is quite straightforward, and with the right ingredients and techniques, you’ll be able to recreate this Spanish classic for your family and friends.
Ingredients for 4-6 people:
- 1 kg fresh squid, cleaned and cut into rings
- 200 g all-purpose flour
- 1 teaspoon baking powder
- 1 teaspoon salt
- 1 teaspoon paprika
- 2 large eggs
- 200 ml cold sparkling water
- Vegetable oil, for frying
- Lemon wedges, for serving
Cooking Instructions:
- Prepare the Squid: Start by cleaning the squid if not pre-cleaned. Make sure to remove the head, tentacles, and any internal parts, then rinse thoroughly under cold water. Pat the squid rings dry with paper towels to remove excess moisture.
- Make the Batter: In a mixing bowl, combine the all-purpose flour, baking powder, salt, and paprika. Mix well to confirm the dry ingredients are evenly distributed. In a separate bowl, beat the eggs and then add the cold sparkling water. Gradually whisk the wet mixture into the dry ingredients until you achieve a smooth batter.
- Heat the Oil: In a large frying pan or deep fryer, heat vegetable oil to 180°C (350°F). Make sure there’s enough oil to fully submerge the squid rings for even cooking.
- Coat the Squid: Dip the squid rings into the batter, ensuring each piece is well-coated. Allow any excess batter to drip off before frying.
- Fry the Squid: Carefully place the coated squid rings into the hot oil, frying in batches to avoid overcrowding. Fry for about 2-3 minutes, or until they turn golden brown and crispy. Use a slotted spoon to remove the squid from the oil and place them on a paper towel-lined plate to drain any excess oil.
- Serve: Once all the squid rings are fried, transfer them to a serving platter. Serve hot with lemon wedges on the side for squeezing over the top.
Extra Tips:
For the crispiest results, confirm the squid is very dry before coating it in batter. The cold sparkling water in the batter helps create a light and airy coating.
Also, maintain the oil temperature consistently throughout the frying process to prevent the batter from absorbing too much oil. If you prefer a spicier version, add a pinch of cayenne pepper to the batter.
Calamares a La Romana is best enjoyed immediately after frying, so plan to serve it fresh and hot!
Empanadillas

Empanadillas are a delightful Spanish tapas dish, perfect for any occasion. These small, savory pastries are filled with a variety of ingredients, typically including meats, vegetables, and spices. Originating from Spain, empanadillas have become a popular choice across the globe for their versatility and rich flavors.
They’re often served as an appetizer or as a part of a tapas spread, making them an ideal dish for gatherings or casual meals. The beauty of empanadillas lies in their adaptability, allowing you to experiment with different fillings and create your own signature version.
The dough for empanadillas is traditionally made from flour, water, and a bit of fat, often lard or butter, resulting in a flaky and tender crust. The filling can vary greatly, but a classic version includes a mixture of ground beef, onions, bell peppers, and spices, all cooked to perfection before being enveloped in the dough.
Once assembled, the empanadillas are either baked or fried until golden brown. Below is a classic recipe for empanadillas that serves 4-6 people, providing a taste of Spain with every bite.
Ingredients:
- 2 cups all-purpose flour
- 1/2 teaspoon salt
- 1/2 cup unsalted butter, chilled and diced
- 1/3 cup cold water
- 1 tablespoon olive oil
- 1 small onion, finely chopped
- 1/2 red bell pepper, diced
- 1/2 green bell pepper, diced
- 1 clove garlic, minced
- 1/2 pound ground beef
- 1 teaspoon smoked paprika
- 1/2 teaspoon ground cumin
- Salt and pepper to taste
- 1/4 cup tomato sauce
- 1 egg, beaten (for egg wash)
Cooking Instructions:
- Prepare the Dough: In a large bowl, combine the all-purpose flour and salt. Add the diced butter and use your fingers or a pastry cutter to work the butter into the flour until the mixture resembles coarse crumbs. Gradually add the cold water, mixing until the dough comes together into a ball. Wrap the dough in plastic wrap and refrigerate for at least 30 minutes.
- Cook the Filling: Heat olive oil in a skillet over medium heat. Add the chopped onion and diced bell peppers, cooking until they soften, about 5 minutes. Add the minced garlic and cook for an additional minute.
- Brown the Meat: Add the ground beef to the skillet, breaking it apart with a spoon. Cook until browned and cooked through, about 7-10 minutes. Drain any excess fat.
- Season and Simmer: Stir in the smoked paprika, ground cumin, salt, pepper, and tomato sauce. Reduce the heat to low and let the mixture simmer for 5-10 minutes, allowing the flavors to meld together. Remove from heat and let it cool slightly.
- Roll and Fill the Dough: Preheat your oven to 375°F (190°C). Roll the chilled dough on a lightly floured surface to about 1/8-inch thickness. Cut out circles using a 4-inch round cutter. Place a spoonful of the meat filling in the center of each circle.
- Shape the Empanadillas: Fold the dough over the filling to create a half-moon shape. Press the edges together, then crimp with a fork to seal. Place the empanadillas on a baking sheet lined with parchment paper.
- Brush and Bake: Brush the tops of the empanadillas with the beaten egg. Bake in the preheated oven for 20-25 minutes, or until golden brown. Let them cool slightly before serving.
Extra Tips:
For an added twist, try incorporating different fillings such as cooked chorizo, olives, or hard-boiled eggs. If you prefer a vegetarian version, substitute the ground beef with sautéed mushrooms or a mix of your favorite vegetables.
When sealing the empanadillas, make sure the edges are tightly crimped to prevent them from opening during baking. Leftovers can be stored in the refrigerator and reheated in the oven to maintain their crispiness. Enjoy these empanadillas fresh for the best flavor and texture!
Queso Manchego Con Membrillo
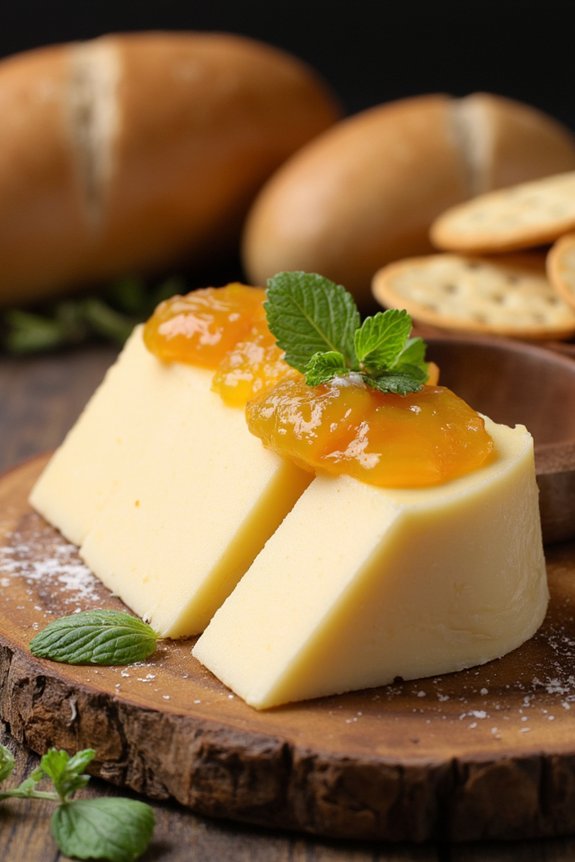
Queso Manchego Con Membrillo is a classic Spanish tapa that combines the rich, nutty flavors of Manchego cheese with the sweet, fruity notes of quince paste (membrillo). This delightful pairing is often served as an appetizer or a simple snack, showcasing the harmonious blend of sweet and savory elements.
Originating from the La Mancha region, the dish celebrates the local ingredients and culinary traditions of Spain, making it a must-try for anyone interested in authentic Spanish cuisine.
Perfect for gatherings or as a pre-dinner nibble, Queso Manchego Con Membrillo is both easy to prepare and a sure crowd-pleaser. The creamy texture of the cheese complements the smooth, jelly-like consistency of the quince paste, creating a delightful contrast in every bite.
This recipe serves 4-6 people and can be prepared in a matter of minutes, making it an ideal choice for entertaining with minimal effort.
Ingredients (serving size: 4-6 people):
- 12 ounces (340 grams) Manchego cheese
- 8 ounces (225 grams) quince paste (membrillo)
- Fresh baguette or crackers (optional)
- Fresh mint leaves for garnish (optional)
Instructions:
- Prepare the Cheese and Quince Paste: Begin by cutting the Manchego cheese into thin, even slices, about 1/4 inch thick. Aim for a size that will be easy to handle and pair well with the quince paste.
- Slice the Quince Paste: Using a sharp knife, cut the quince paste into thin slices, similar in size to the cheese. This will guarantee that each piece is balanced in flavor.
- Assemble the Tapas: On a serving platter, lay out the slices of Manchego cheese. Top each slice of cheese with a piece of quince paste. You can layer them directly on top of each other or slightly offset them for a more visually appealing presentation.
- Optional Garnishing: If desired, add a fresh mint leaf on top of each cheese and quince paste pairing for an added hint of freshness and color.
- Serve with Bread or Crackers: Arrange slices of fresh baguette or a selection of crackers around the platter. This adds a crunchy element to the soft textures of the cheese and quince paste.
Extra Tips:
When selecting Manchego cheese, opt for a semi-cured variety if you prefer a milder taste, or a more aged version for a stronger, nuttier flavor.
Manchego pairs beautifully with a variety of wines, such as a robust Rioja or a crisp Cava, enhancing the overall tasting experience.
If quince paste is hard to find, you can substitute it with a similar fruit paste, like fig or apricot, though the authentic taste might differ slightly.
Always serve Queso Manchego Con Membrillo at room temperature to allow the flavors to fully develop.
Espinacas Con Garbanzos
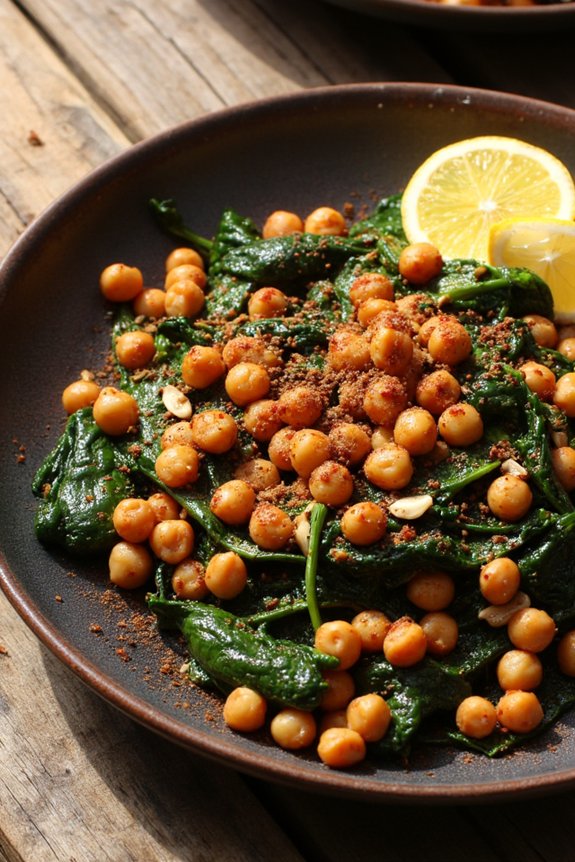
Espinacas Con Garbanzos, or Spinach with Chickpeas, is a classic Spanish tapa originating from the Andalusian region. This hearty and flavorful dish is perfect for both vegetarians and those who love a robust, earthy meal. It combines the richness of chickpeas with the vibrant green of spinach, all brought together by a blend of spices and flavors that highlight the best of Spanish cuisine.
It’s a dish that not only satisfies the palate but also provides a healthy dose of essential nutrients. Traditionally served as a tapa, Espinacas Con Garbanzos can also be enjoyed as a main course when paired with crusty bread or rice. The ingredients are simple yet impactful, allowing the natural flavors to shine through.
It’s an easy dish to prepare, making it perfect for a cozy dinner at home or as part of a larger spread of Spanish dishes for a gathering. This recipe serves 4-6 people, making it ideal for sharing with family and friends.
Ingredients (for 4-6 servings):
- 2 tablespoons olive oil
- 1 onion, finely chopped
- 3 cloves garlic, minced
- 1 teaspoon smoked paprika
- 1/2 teaspoon ground cumin
- 1/4 teaspoon red pepper flakes
- 1 can (15 oz) of chickpeas, drained and rinsed
- 10 oz fresh spinach
- 1/2 cup tomato sauce
- Salt and pepper to taste
- 2 tablespoons red wine vinegar
- 1/4 cup toasted pine nuts (optional)
- Lemon wedges for serving
Cooking Instructions:
- Prepare the Base: Heat the olive oil in a large skillet over medium heat. Add the chopped onion and sauté until translucent, about 5 minutes. Stir in the minced garlic, smoked paprika, ground cumin, and red pepper flakes. Cook for another minute until the spices are fragrant.
- Add Chickpeas: Add the drained and rinsed chickpeas to the skillet. Stir well to coat them with the onion and spice mixture. Cook for 3-4 minutes, allowing the chickpeas to absorb the flavors.
- Incorporate Spinach: Gradually add the fresh spinach to the skillet, stirring continuously. Cook until the spinach wilts completely, which should take about 5 minutes.
- Simmer with Sauce: Pour in the tomato sauce and season with salt and pepper. Mix everything well and let it simmer for about 10 minutes, allowing the flavors to meld together.
- Add Vinegar: Stir in the red wine vinegar, which will add a tangy contrast to the rich flavors of the dish. Cook for an additional 2-3 minutes.
- Finish and Serve: If using, sprinkle the toasted pine nuts over the top just before serving. Serve the dish warm with lemon wedges on the side for an extra burst of freshness.
Extra Tips:
When preparing Espinacas Con Garbanzos, using fresh spinach is highly recommended as it provides a vibrant flavor and texture that frozen spinach can’t match. However, if fresh spinach is unavailable, frozen spinach can be used as a substitute; just be sure to thaw and drain it well before adding it to the skillet.
To enhance the dish’s flavors, consider using smoked paprika for a deeper, more authentic taste. Additionally, serving the dish with a squeeze of fresh lemon juice can brighten the flavors and balance the richness of the chickpeas and spinach.
Jamón Ibérico Y Pan Con Tomate
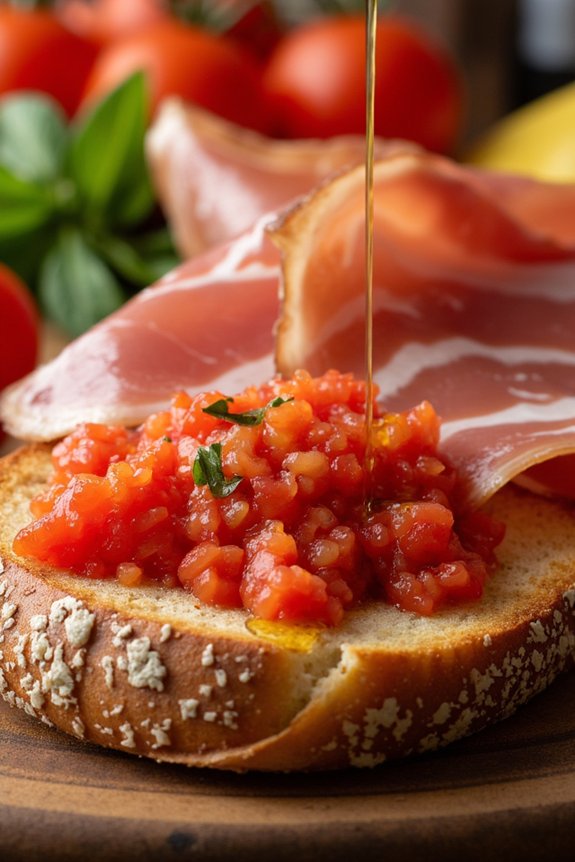
Jamón Ibérico y Pan Con Tomate is a classic Spanish tapas dish that beautifully highlights the exquisite flavors of Jamón Ibérico, a prized Spanish cured ham. This dish is a celebration of simplicity and quality ingredients, making it a staple in tapas bars across Spain. It combines the rich, nutty taste of the ham with the fresh, tangy flavors of ripe tomatoes on a crisp, toasted slice of bread. Perfect for an appetizer or a light meal, this dish is quick to prepare and guaranteed to impress.
The key to this dish lies in using high-quality ingredients. The Jamón Ibérico, known for its melt-in-your-mouth texture and complex flavor, should be thinly sliced to guarantee it complements rather than overwhelms the dish. The bread should be crusty and firm enough to hold the juicy tomato mixture without becoming soggy. And for the tomatoes, ripe and flavorful ones are essential as they form the base of the topping. This simple yet delectable combination makes Jamón Ibérico y Pan Con Tomate a must-try for anyone looking to experience authentic Spanish cuisine.
Ingredients (Serves 4-6)
- 12 slices of Jamón Ibérico
- 1 large baguette or rustic bread
- 3 ripe tomatoes
- 2 cloves of garlic
- Extra virgin olive oil
- Sea salt
- Freshly ground black pepper
Cooking Instructions
- Prepare the Bread: Preheat your oven to 375°F (190°C). Slice the baguette or rustic bread into 12 pieces, about 1/2 inch thick. Place the slices on a baking sheet and lightly brush each side with extra virgin olive oil. Toast in the oven for about 5-7 minutes, or until the slices are golden and crisp.
- Prepare the Tomato Mixture: While the bread is toasting, grate the tomatoes using a box grater. Discard the skins. Place the grated tomatoes in a bowl and add a pinch of sea salt and freshly ground black pepper to taste. Mix well and set aside.
- Prepare the Garlic: Peel and cut the garlic cloves in half. Once the bread is out of the oven and cool enough to handle, gently rub the cut side of the garlic on the top of each slice of toasted bread. This will infuse the bread with a subtle garlic flavor.
- Assemble the Tapas: Spoon a generous amount of the tomato mixture onto each slice of garlic-rubbed bread. Drizzle a little more extra virgin olive oil over the top for added richness.
- Add the Jamón Ibérico: Place a slice of Jamón Ibérico on top of each tomato-topped bread slice. For added presentation, you can fold the ham into a decorative shape.
- Serve: Arrange the completed tapas on a serving platter and enjoy immediately while the bread is still warm and the flavors are fresh.
Extra Tips
For an authentic touch, consider using pan de cristal, a type of Spanish bread known for its light, airy texture and thin crust. If you can’t find Jamón Ibérico, you can substitute with another high-quality cured ham like prosciutto, although the flavor profile will be slightly different.
Confirm your tomatoes are at peak ripeness for the best taste, and don’t skimp on the olive oil, as it adds depth and richness to the dish. Finally, this dish is best enjoyed fresh, so try to prepare it just before serving to maintain the crispness of the bread and the vibrant flavors of the toppings.