

Spanish cuisine has a special place in my heart, especially when artichokes are involved. Their creamy texture and rich flavor make them the perfect star for these 12 snack recipes. From tasty dips to crunchy crostini, these artichoke delights are ideal for any gathering. Want to elevate your snack game with these Spanish-inspired treats? Let’s explore these delicious recipes together.
Classic Spanish Artichoke Dip

The Classic Spanish Artichoke Dip is a delicious and creamy appetizer that pays homage to the vibrant flavors of Spain. This dish combines the earthy taste of artichokes with creamy cheeses and a hint of garlic, resulting in a savory dip that’s perfect for any gathering.
Whether you’re hosting a tapas night or simply looking for a delightful snack, this artichoke dip is bound to be a crowd-pleaser. The rich flavors and smooth texture make it a perfect accompaniment to toasted bread slices or fresh vegetables.
This recipe is designed to serve 4-6 people, making it an ideal choice for a small get-together or family meal. The preparation process is straightforward, requiring just a few simple steps to achieve a delectable dip that will have everyone reaching for more.
By using quality ingredients and following the instructions carefully, you can create a dip that highlights the best of Spanish culinary traditions.
Ingredients (serves 4-6):
- 2 cups canned or jarred artichoke hearts, drained and chopped
- 1 cup mayonnaise
- 1 cup grated Manchego cheese
- 1 cup grated Parmesan cheese
- 1/2 cup sour cream
- 2 cloves garlic, minced
- 1 tablespoon lemon juice
- 1/2 teaspoon smoked paprika
- Salt and pepper to taste
- Fresh parsley, chopped (for garnish)
- 1 baguette or assorted vegetables (for serving)
Cooking Instructions:
- Preheat the Oven: Begin by preheating your oven to 350°F (175°C). This guarantees that your dip will cook evenly and reach the right consistency.
- Prepare the Artichoke Mixture: In a large mixing bowl, combine the chopped artichoke hearts, mayonnaise, Manchego cheese, Parmesan cheese, sour cream, minced garlic, lemon juice, and smoked paprika. Mix well until all ingredients are thoroughly combined.
- Season the Mixture: Taste the mixture and add salt and pepper according to your preference. Adjusting these seasonings will help balance the flavors of the dish.
- Transfer to Baking Dish: Pour the artichoke mixture into an oven-safe baking dish, spreading it out evenly. This will guarantee that the dip cooks uniformly and achieves a golden-brown crust.
- Bake the Dip: Place the baking dish in the preheated oven and bake for 25-30 minutes, or until the top is bubbly and lightly golden. This baking time allows the flavors to meld together and the cheeses to melt perfectly.
- Prepare the Garnish and Sides: While the dip is baking, slice the baguette into thin slices or prepare your choice of fresh vegetables for dipping. Chop the fresh parsley for garnish.
- Serve: Once the dip is ready, remove it from the oven and let it cool slightly. Sprinkle with chopped parsley for a fresh touch. Serve warm with the sliced baguette or vegetables.
Extra Tips:
For an added layer of flavor, consider incorporating a pinch of cayenne pepper into the mixture for a slight kick.
If you prefer a smoother texture, you can use a food processor to blend the artichoke hearts before mixing with the other ingredients. Additionally, using freshly grated cheeses instead of pre-packaged ones can greatly enhance the dish’s flavor.
Make sure that you drain the artichoke hearts well to avoid excess moisture in the dip. This dish is best served warm, so try to time your preparation so that it’s fresh out of the oven when your guests arrive.
Creamy Artichoke and Manchego Crostini

Creamy Artichoke and Manchego Crostini is a delightful appetizer that pairs the rich flavors of Spanish cuisine with a crunchy twist. This dish combines the creamy texture of artichokes and the nutty, slightly tangy taste of Manchego cheese to create an elegant yet simple starter. Perfect for gatherings and special occasions, these crostini can be served warm or at room temperature, making them a flexible addition to your menu.
This recipe is designed to serve 4-6 people, ideal for a small dinner party or a cozy family meal. The creamy artichoke spread is made from a blend of tender artichoke hearts, smooth cream cheese, and a hint of garlic, all topped with shredded Manchego cheese. The mixture is then generously spread over toasted baguette slices to create the perfect balance of flavors and textures.
Ingredients:
- 1 baguette, sliced into 1/2 inch rounds
- 1 (14-ounce) can of artichoke hearts, drained and chopped
- 1 cup of grated Manchego cheese
- 8 ounces of cream cheese, softened
- 2 cloves of garlic, minced
- 1 tablespoon of olive oil
- Salt and pepper to taste
- Fresh parsley for garnish (optional)
Instructions:
- Preheat the Oven: Set your oven to 350°F (175°C). Arrange the baguette slices on a baking sheet and lightly brush each slice with olive oil. Toast in the oven for 10 minutes or until they’re golden brown and crispy. Remove from the oven and set aside.
- Prepare the Artichoke Mixture: In a mixing bowl, combine the drained and chopped artichoke hearts with the softened cream cheese and minced garlic. Mix until well combined. Season the mixture with salt and pepper to taste.
- Spread the Mixture: Generously spread the artichoke mixture over each toasted baguette slice. Then, sprinkle the grated Manchego cheese evenly over the top of each crostini.
- Bake the Crostini: Return the crostini to the oven and bake for an additional 8-10 minutes, or until the cheese is melted and bubbly. Keep an eye on them to verify the cheese doesn’t burn.
- Garnish and Serve: Once done, remove the crostini from the oven and transfer them to a serving platter. For a touch of color, garnish with fresh chopped parsley if desired. Serve warm or at room temperature.
Extra Tips: When selecting artichoke hearts, opt for those packed in water rather than oil to better control the dish’s flavor and fat content. If you prefer a bit of heat, consider adding a pinch of red pepper flakes to the artichoke mixture before spreading it on the crostini. For an extra flavor boost, use a garlic-infused olive oil to brush the baguette slices. Finally, if Manchego cheese isn’t available, you can substitute with a sharp cheddar or Gruyere for a slightly different but equally delicious taste.
Artichoke-Stuffed Piquillo Peppers
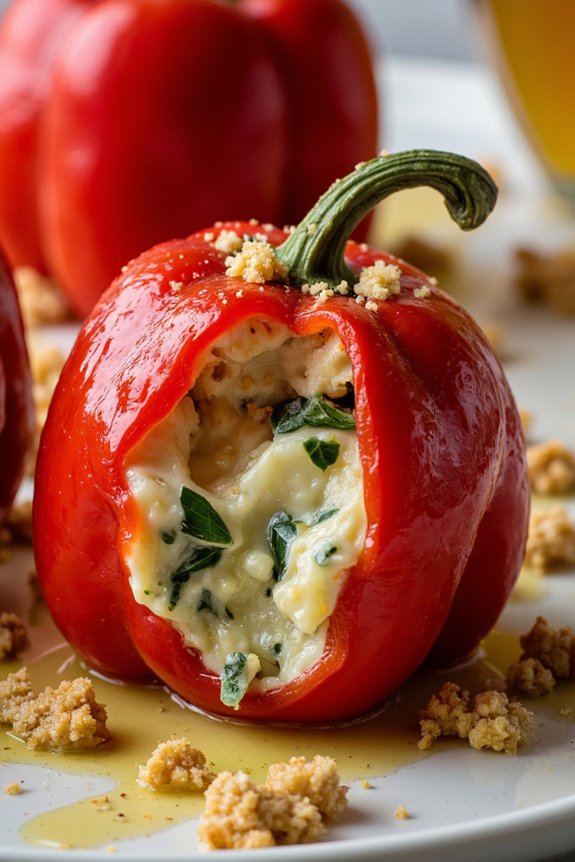
Artichoke-Stuffed Piquillo Peppers are a delightful Spanish tapas dish that brings together the tender sweetness of piquillo peppers and the rich, creamy flavor of artichoke hearts. This dish isn’t only visually appealing with its vibrant colors but also offers a burst of flavors with every bite. Perfect for gatherings or as an appetizer, these stuffed peppers are bound to impress your guests with their sophisticated yet comforting taste.
The recipe involves carefully stuffing roasted piquillo peppers with a savory filling made from artichokes, cheese, and a blend of herbs. The combination of the mildly spicy piquillo peppers with the creamy filling creates a harmonious balance of taste and texture. Ideal for a serving size of 4-6 people, this dish can be prepared ahead of time and baked just before serving, making it a convenient yet elegant addition to any meal.
Ingredients for 4-6 People:
- 12-15 piquillo peppers (canned or jarred)
- 1 can (14 oz) of artichoke hearts, drained and chopped
- 1 cup cream cheese, softened
- 1/2 cup grated Parmesan cheese
- 1/4 cup breadcrumbs
- 2 cloves garlic, minced
- 2 tablespoons fresh parsley, chopped
- 1 tablespoon lemon juice
- Salt and pepper to taste
- Olive oil for drizzling
Cooking Instructions:
- Preheat the Oven: Preheat your oven to 375°F (190°C). This will guarantee it’s at the right temperature when you’re ready to bake the stuffed peppers.
- Prepare the Filling: In a large mixing bowl, combine the chopped artichoke hearts, cream cheese, grated Parmesan cheese, breadcrumbs, minced garlic, chopped parsley, lemon juice, salt, and pepper. Mix until all ingredients are well incorporated into a creamy filling.
- Stuff the Peppers: Carefully open each piquillo pepper, making sure not to tear them. Using a spoon, fill each pepper with the artichoke mixture. Be generous with the filling but make sure you can still close the peppers without them bursting.
- Arrange and Drizzle: Place the stuffed piquillo peppers in a single layer in a baking dish. Drizzle a little olive oil over the top of the peppers to help them roast evenly and to add flavor.
- Bake: Place the baking dish in the preheated oven and bake for about 20-25 minutes, or until the peppers are tender and the filling is heated through and slightly golden on top.
- Serve: Once baked, remove the dish from the oven and let the peppers cool for a few minutes. Serve warm as an appetizer or a side dish.
Extra Tips:
When selecting piquillo peppers, opt for those that are uniform in size for even cooking. If you prefer a bit more heat, sprinkle a pinch of red pepper flakes into the filling. You can prepare the filling a day ahead and refrigerate it, making assembly quick on the day of serving.
For added flavor, consider adding a sprinkle of smoked paprika on top before baking. If you have leftovers, these stuffed peppers can be stored in an airtight container in the refrigerator for up to two days and gently reheated before serving.
Garlic and Herb Artichoke Spread

Garlic and Herb Artichoke Spread is a delightful and versatile dish that can serve as a perfect appetizer or a flavorful addition to a variety of meals. This spread combines the earthy taste of artichokes with the rich, aromatic flavors of garlic and fresh herbs, creating a creamy and savory dish that’s certain to delight your taste buds.
Whether you’re planning a gathering or simply want to enjoy a delicious snack, this spread can be paired with crusty bread, crackers, or even used as a topping for grilled meats and vegetables.
In this recipe, we’ll guide you through the process of creating a Garlic and Herb Artichoke Spread that serves 4-6 people. The ingredients are simple, yet they come together to create an unforgettable flavor. The spread isn’t only delicious but also packed with nutrients, making it a healthy choice for any occasion.
Follow these steps to create a dish that will become a staple in your culinary repertoire.
Ingredients:
- 2 cans (14 oz each) of artichoke hearts, drained
- 1/2 cup mayonnaise
- 1/2 cup grated Parmesan cheese
- 1/4 cup sour cream
- 3 cloves garlic, minced
- 2 tablespoons fresh lemon juice
- 1 tablespoon olive oil
- 1 tablespoon fresh parsley, chopped
- 1 tablespoon fresh basil, chopped
- Salt and pepper to taste
Instructions:
- Prepare the Artichokes: Begin by draining the canned artichoke hearts thoroughly. Pat them dry with a paper towel to remove excess moisture. This will help ascertain your spread isn’t too watery.
- Mix the Base Ingredients: In a large mixing bowl, combine the mayonnaise, Parmesan cheese, and sour cream. Stir until the mixture is smooth and well blended.
- Add Flavorings: Add the minced garlic, fresh lemon juice, and olive oil to the mayonnaise mixture. Mix well to incorporate all the flavors.
- Incorporate the Artichokes: Gently fold the artichoke hearts into the mixture. Be careful not to break them up too much, as you want to maintain some texture in the spread.
- Add Fresh Herbs: Stir in the chopped parsley and basil. Season with salt and pepper to taste, and mix until everything is evenly combined.
- Chill the Spread: Transfer the spread into a serving dish, cover it with plastic wrap, and refrigerate for at least 1 hour before serving. This will allow the flavors to meld together beautifully.
- Serve and Enjoy: Once chilled, serve the Garlic and Herb Artichoke Spread with your choice of bread, crackers, or as a topping for grilled dishes.
Extra Tips:
To enhance the flavor of your Garlic and Herb Artichoke Spread, consider roasting the garlic before mincing it. Roasted garlic provides a sweeter, more mellow flavor that can add depth to the spread.
Additionally, if you prefer a smoother consistency, you can use a food processor to blend the artichokes with the mayonnaise mixture. For a more robust herb flavor, try experimenting with other fresh herbs like dill or chives.
Remember to taste and adjust the seasoning as needed, since the flavor of the spread can vary depending on the freshness and quality of the ingredients used.
Artichoke and Olive Tapenade

Artichoke and Olive Tapenade is a delightful Spanish-inspired appetizer that brings together the rich flavors of artichokes, olives, and other Mediterranean ingredients.
This tapenade is perfect for serving at a gathering, as its tangy and savory notes pair wonderfully with crusty bread or crackers. It’s a versatile dish that can also be used as a spread for sandwiches or a topping for grilled meats or fish.
The combination of artichokes and olives creates a robust flavor profile that’s both satisfying and revitalizing. The creaminess of the artichokes complements the briny intensity of the olives, while garlic and lemon juice add an extra layer of complexity.
This recipe is simple to prepare and can be made ahead of time, making it an excellent choice for entertaining guests or simply enjoying a taste of Spain at home.
Ingredients (Serves 4-6):
- 1 can (14 oz) of artichoke hearts, drained
- 1 cup of pitted kalamata olives
- 2 cloves of garlic
- 2 tablespoons of capers, drained
- 3 tablespoons of fresh lemon juice
- 1/4 cup of extra virgin olive oil
- 1/4 cup of fresh parsley leaves
- Salt and pepper to taste
- Optional: 1/4 teaspoon of red pepper flakes
Cooking Instructions:
- Prepare the Ingredients: Begin by draining the artichoke hearts and olives. If the olives aren’t pitted, make sure to remove the pits. Peel the garlic cloves and set aside.
- Combine Ingredients: In a food processor, combine the artichoke hearts, kalamata olives, garlic cloves, and capers. Pulse the ingredients until they’re coarsely chopped but not pureed, maintaining a slightly chunky texture.
- Add Liquid Ingredients: Pour in the fresh lemon juice and extra virgin olive oil. Add the fresh parsley leaves. Pulse the mixture again until everything is well combined, but still has some texture.
- Season the Tapenade: Taste the tapenade and season with salt and pepper according to your preference. If you desire a little heat, add the optional red pepper flakes and pulse a couple more times to incorporate.
- Chill and Serve: Transfer the tapenade to a bowl, cover, and refrigerate for at least 30 minutes to allow the flavors to meld. Serve chilled with your choice of crusty bread, crackers, or as a topping for various dishes.
Extra Tips:
For the best flavor, make the tapenade a day ahead of time. This will give the ingredients ample time to meld together, enhancing the overall taste.
If you prefer a smoother texture, you can process the mixture longer, but be careful not to turn it into a paste. Adjust the seasoning after chilling, as the flavors can develop and change slightly.
If you’re looking for a more robust flavor, try adding a touch of anchovy paste or chopped sun-dried tomatoes to the mix.
Artichoke and Chorizo Quesadillas

Artichoke and Chorizo Quesadillas offer a delightful fusion of rich flavors and textures, perfect for a family dinner or a gathering with friends. The combination of tender artichoke hearts and spicy chorizo creates a savory filling that’s balanced beautifully by the creamy melted cheese and crisp tortilla. This dish brings a touch of Spanish flair to the classic Mexican quesadilla, making it both unique and satisfying.
These quesadillas aren’t only delicious but also simple to prepare, making them an excellent option for both novice and experienced cooks. The key is to use quality ingredients that bring out the best in each other. With the right balance of cheese and filling, the quesadillas deliver a perfect bite every time. Whether served as an appetizer or a main course, Artichoke and Chorizo Quesadillas are sure to impress.
Ingredients (Serves 4-6):
- 8 large flour tortillas
- 1 cup cooked and sliced chorizo sausage
- 1 can (14 oz) artichoke hearts, drained and chopped
- 2 cups shredded Monterey Jack cheese
- 1 cup shredded cheddar cheese
- 1 medium red onion, finely chopped
- 1 tablespoon olive oil
- 1 teaspoon smoked paprika
- Salt and pepper to taste
- Fresh cilantro for garnish (optional)
- Sour cream and salsa for serving (optional)
Instructions:
- Prepare the Filling: Heat the olive oil in a large skillet over medium heat. Add the chopped red onion and sauté until it becomes translucent, about 3-4 minutes. Add the sliced chorizo and continue to cook for another 5 minutes until it begins to brown.
- Add the Artichokes: Stir in the chopped artichoke hearts, smoked paprika, salt, and pepper. Cook for another 2-3 minutes, allowing the flavors to meld together. Remove the skillet from heat and set aside.
- Assemble the Quesadillas: Lay out the tortillas on a clean surface. Evenly distribute the chorizo and artichoke mixture over one half of each tortilla. Sprinkle a generous amount of Monterey Jack and cheddar cheese over the filling.
- Cook the Quesadillas: Fold the tortillas in half to enclose the filling. Heat a large non-stick skillet or griddle over medium heat. One at a time, place the folded quesadillas onto the skillet. Cook each side for about 3-4 minutes, or until the tortillas are golden brown and the cheese has melted.
- Serve: Once cooked, remove the quesadillas from the skillet and cut them into wedges. Garnish with fresh cilantro if desired and serve with sour cream and salsa on the side.
Extra Tips: For a touch of heat, consider adding some sliced jalapeños to the filling. You can also substitute Monterey Jack and cheddar cheese with your favorite melting cheese, such as mozzarella or a Mexican cheese blend. If you prefer a vegetarian version, simply omit the chorizo and add more vegetables like bell peppers or mushrooms.
Be sure to watch the heat while cooking the quesadillas to prevent burning the tortillas before the cheese melts completely. Enjoy your Artichoke and Chorizo Quesadillas hot off the skillet for the best flavor and texture.
Cheesy Artichoke Empanadas

Cheesy Artichoke Empanadas are a delightful blend of savory flavors encased in a crispy, golden pastry. This Spanish-inspired dish combines the rich taste of artichokes with a creamy cheese filling, resulting in a delectable appetizer or snack that’s perfect for any gathering.
These empanadas are easy to make and can be prepared ahead of time, making them an ideal choice for entertaining guests or enjoying a cozy night in.
The heart of this recipe lies in the filling, where artichokes are combined with a mixture of cheeses, herbs, and spices to create a mouthwatering flavor profile. The empanada dough, which can be homemade or store-bought for convenience, is rolled out and filled before being baked to perfection.
When finished, these empanadas offer a crispy exterior with a gooey, cheesy interior that’s sure to please anyone who tries them.
Ingredients for 4-6 servings:
- 2 cups canned or jarred artichoke hearts, drained and chopped
- 1 cup shredded mozzarella cheese
- 1/2 cup grated Parmesan cheese
- 1/2 cup cream cheese, softened
- 1/4 cup chopped fresh parsley
- 1/4 teaspoon garlic powder
- 1/4 teaspoon onion powder
- Salt and pepper to taste
- 1 package of empanada dough discs (12 pieces)
- 1 egg, beaten (for egg wash)
Cooking Instructions:
- Preheat the Oven: Preheat your oven to 375°F (190°C). Line a baking sheet with parchment paper to prevent sticking.
- Prepare the Filling: In a large bowl, combine the chopped artichoke hearts, mozzarella cheese, Parmesan cheese, cream cheese, parsley, garlic powder, and onion powder. Mix well until all the ingredients are thoroughly combined. Season with salt and pepper to taste.
- Assemble the Empanadas: Lay out your empanada dough discs on a clean surface. Place approximately 1-2 tablespoons of the artichoke filling in the center of each disc. Be careful not to overfill to prevent leaking.
- Seal the Empanadas: Fold the dough over the filling to form a half-moon shape. Press the edges together, then use a fork to crimp and seal the edges securely.
- Apply the Egg Wash: Place the empanadas on the prepared baking sheet. Brush each empanada with the beaten egg, which will give them a beautiful golden color as they bake.
- Bake: Bake the empanadas in the preheated oven for 20-25 minutes, or until they’re golden brown and the filling is bubbly.
Extra Tips:
For an even richer flavor, consider adding a pinch of red pepper flakes to the filling for a subtle kick. If you’re using frozen empanada dough, make sure to let it thaw completely before filling.
These empanadas can also be made ahead and frozen before baking; simply add a few extra minutes of baking time if cooking from frozen. Serve with a side of salsa or a light salad for a complete meal.
Artichoke and Red Pepper Bruschetta
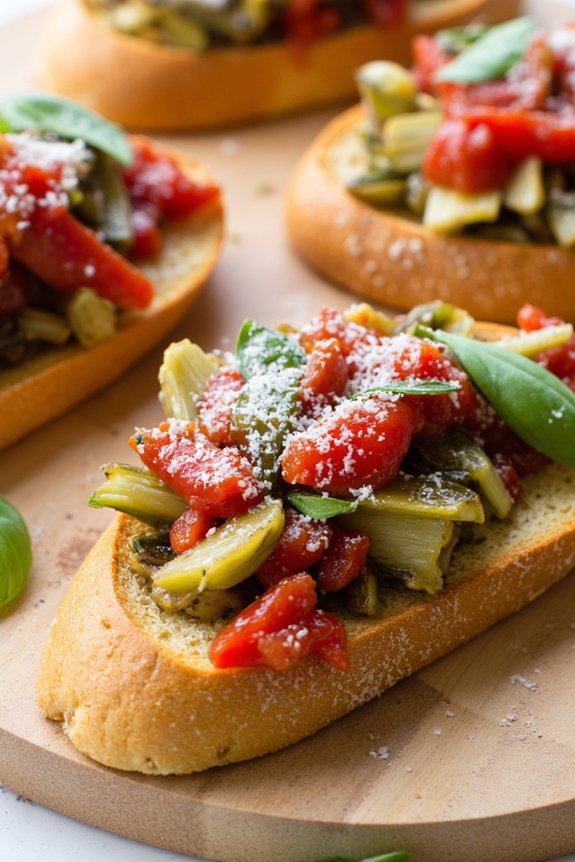
Artichoke and Red Pepper Bruschetta is a delightful appetizer that brings together the vibrant flavors of the Mediterranean. This dish combines the earthy, nutty taste of artichokes with the sweet, roasted notes of red peppers, all perched atop crispy, toasted baguette slices. Perfect for a gathering or a cozy night in, this bruschetta isn’t only delicious but also visually appealing with its colorful ingredients.
The preparation is straightforward and can be done in a relatively short amount of time. The key to this recipe is using fresh, high-quality ingredients to guarantee the flavors are as bold and authentic as possible. Whether you’re an experienced cook or just starting out, this recipe is approachable and rewarding, offering a taste of Spanish cuisine that’s sure to impress.
Ingredients for 4-6 People:
- 1 French baguette
- 1 jar (14 ounces) of marinated artichoke hearts, drained and chopped
- 1 large red bell pepper
- 2 cloves of garlic, minced
- 1/4 cup of extra virgin olive oil
- 1 tablespoon of balsamic vinegar
- Salt and freshly ground black pepper, to taste
- 1/4 cup of fresh basil leaves, chopped
- 1/2 cup of grated Parmesan cheese
Cooking Instructions:
- Prepare the Baguette: Preheat your oven to 375°F (190°C). Slice the baguette into 1/2-inch thick slices and arrange them on a baking sheet. Brush each slice lightly with olive oil. Place the baking sheet in the oven and toast the baguette slices for about 5-7 minutes, or until they’re golden brown and crispy.
- Roast the Red Pepper: While the baguette is toasting, place the red bell pepper on a gas stove flame or under the broiler, turning occasionally, until the skin is charred and blistered on all sides. Transfer the pepper to a bowl, cover with plastic wrap, and let it steam for 10 minutes. This will make the skin easier to remove. Peel off the charred skin, remove the seeds and stem, and chop the pepper into small pieces.
- Prepare the Bruschetta Topping: In a medium bowl, combine the chopped artichoke hearts, roasted red pepper, minced garlic, olive oil, balsamic vinegar, salt, and pepper. Mix well to combine all the flavors.
- Assemble the Bruschetta: Spoon the artichoke and red pepper mixture onto each toasted baguette slice. Sprinkle with freshly chopped basil and top with grated Parmesan cheese.
- Serve: Arrange the bruschetta on a serving platter and enjoy immediately while the bread is still warm and crispy.
Extra Tips:
For an extra layer of flavor, consider adding a dash of red pepper flakes to the artichoke and red pepper mixture for a spicy kick. If you prefer a more intense garlic flavor, you can rub a cut clove of garlic directly onto the baguette slices after toasting.
Additionally, this dish can be made ahead by preparing the topping a few hours in advance and storing it in the refrigerator until ready to serve. Just remember to bring the mixture back to room temperature for the best flavor before assembling the bruschetta.
Creamy Artichoke and Spinach Flatbread

Creamy Artichoke and Spinach Flatbread is a delightful dish that combines the rich flavors of artichokes and spinach with a creamy, cheesy topping on a crispy flatbread base. This recipe is perfect for a light lunch, dinner, or as an appetizer for gatherings. The creamy sauce, infused with garlic and herbs, complements the earthiness of the spinach and the subtle tang of the artichokes, creating a harmonious blend of flavors that’s both satisfying and elegant.
This dish isn’t only delicious but also quick and easy to prepare, making it ideal for busy weeknights. With minimal preparation and cooking time, you can have a restaurant-quality meal ready in less than 30 minutes. The use of pre-made flatbread saves time without compromising on taste, allowing you to focus on the freshness of the toppings.
Whether you’re hosting a dinner party or simply want to treat yourself to something special, this Creamy Artichoke and Spinach Flatbread is sure to captivate.
Ingredients for 4-6 people:
- 2 pre-made flatbreads
- 1 cup canned artichoke hearts, drained and chopped
- 1 cup fresh spinach, chopped
- 1/2 cup cream cheese, softened
- 1/4 cup sour cream
- 1/4 cup grated Parmesan cheese
- 1 cup shredded mozzarella cheese
- 2 cloves garlic, minced
- 1 tablespoon olive oil
- 1 teaspoon dried oregano
- Salt and pepper to taste
Cooking Instructions:
- Preheat the Oven: Start by preheating your oven to 400°F (200°C). This guarantees that the flatbread will be perfectly crispy and the cheese will melt evenly.
- Prepare the Creamy Sauce: In a medium-sized bowl, combine the softened cream cheese, sour cream, minced garlic, and dried oregano. Mix well until the ingredients are fully integrated and smooth. Season with a pinch of salt and pepper to taste.
- Assemble the Flatbread: Place the flatbreads on a baking sheet. Spread an even layer of the creamy sauce over each flatbread, leaving a small border around the edges.
- Add the Toppings: Distribute the chopped artichoke hearts and spinach evenly over the creamy sauce on each flatbread. Sprinkle Parmesan cheese over the top, followed by the shredded mozzarella cheese.
- Bake the Flatbread: Drizzle each flatbread with a little olive oil, then place the baking sheet in the preheated oven. Bake for 12-15 minutes, or until the cheese is melted and bubbly, and the edges of the flatbread are golden brown.
- Serve: Once cooked, remove the flatbreads from the oven and let them cool for a minute or two. Slice into pieces and serve warm.
Extra Tips:
For an extra burst of flavor, consider adding a sprinkle of red pepper flakes or a drizzle of balsamic glaze before serving. You can also experiment with different cheeses or add a handful of sun-dried tomatoes for a different twist.
If you’re preparing this dish ahead of time, assemble the flatbreads and store them in the refrigerator until you’re ready to bake. Just be sure to bring them to room temperature before putting them in the oven for even cooking.
Enjoy your Creamy Artichoke and Spinach Flatbread with a fresh side salad or as a stand-alone treat!
Artichoke and Sun-Dried Tomato Tartlets

Artichoke and Sun-Dried Tomato Tartlets make for an elegant appetizer or light lunch that bursts with Mediterranean flavors. These bite-sized delights are perfect for entertaining or simply treating yourself to a gourmet experience at home. The combination of tender artichokes, tangy sun-dried tomatoes, and creamy cheese all encased in a flaky pastry shell creates a harmonious blend of textures and tastes that are sure to impress your guests or family.
The tartlets are easy to prepare and can be made ahead of time, making them a convenient option for busy hosts. The filling is a delightful mixture of artichokes and sun-dried tomatoes, complemented by a hint of garlic and fresh herbs, all nestled within a buttery crust. These tartlets not only taste delicious but also present beautifully, making them a wonderful addition to any table spread.
Ingredients (Serves 4-6):
- 1 sheet of puff pastry, thawed
- 1 cup canned or jarred artichoke hearts, drained and chopped
- 1/2 cup sun-dried tomatoes, chopped
- 1/2 cup grated Parmesan cheese
- 1/4 cup cream cheese, softened
- 2 tablespoons olive oil
- 2 cloves garlic, minced
- 1 tablespoon fresh basil, chopped
- 1 tablespoon fresh parsley, chopped
- Salt and pepper, to taste
- 1 egg, beaten (for egg wash)
Cooking Instructions:
- Prepare the Puff Pastry: Preheat your oven to 400°F (200°C). Roll out the puff pastry on a lightly floured surface. Cut the pastry into 12 equal squares and place them into a greased muffin tin to form small pastry shells. Prick the bottom of each pastry with a fork to prevent puffing during baking.
- Prepare the Filling: In a medium-sized bowl, combine the chopped artichoke hearts, sun-dried tomatoes, Parmesan cheese, cream cheese, olive oil, minced garlic, basil, parsley, salt, and pepper. Mix until well combined.
- Assemble the Tartlets: Spoon the artichoke and sun-dried tomato mixture evenly into each pastry shell, filling them generously. Brush the edges of the pastry with the beaten egg to give them a golden finish.
- Bake the Tartlets: Place the muffin tin in the preheated oven and bake for about 20-25 minutes, or until the pastry is golden brown and the filling is bubbly.
- Cool and Serve: Remove the tartlets from the oven and let them cool slightly in the tin before transferring them to a serving platter. Serve warm or at room temperature.
Extra Tips:
For best results, make sure your puff pastry is well chilled before working with it; this helps in maintaining its flakiness. You can prepare the filling a day in advance and store it in the refrigerator, which allows the flavors to meld beautifully.
If you prefer a different cheese, goat cheese or feta can be excellent substitutes for Parmesan. Should you have leftover tartlets, they can be reheated in a warm oven for a few minutes to refresh their crispness. Enjoy these tartlets with a glass of chilled white wine for a truly delightful pairing.
Artichoke and Goat Cheese Stuffed Mushrooms

Artichoke and Goat Cheese Stuffed Mushrooms is a delightful appetizer that combines the earthy flavors of mushrooms with the creamy texture of goat cheese and the subtle tang of artichokes. This dish is perfect for serving as a starter at dinner parties or as a savory snack. The combination of ingredients brings out a rich and complex flavor profile that’s certain to impress your guests.
By using fresh artichokes and quality goat cheese, this recipe guarantees a burst of flavor in every bite. The mushrooms serve as the perfect vehicle, offering a tender yet firm base that holds the stuffing beautifully. This dish isn’t only easy to prepare but also a visually appealing addition to any table spread, making it an ideal choice for entertaining.
Ingredients (Serving Size: 4-6 people):
- 24 large button mushrooms, stems removed
- 1 tablespoon olive oil
- 1 small onion, finely chopped
- 2 cloves garlic, minced
- 1 cup canned artichoke hearts, chopped
- 4 ounces goat cheese, softened
- 1/4 cup grated Parmesan cheese
- 1/4 teaspoon salt
- 1/4 teaspoon black pepper
- 1 tablespoon fresh parsley, chopped
- 2 tablespoons breadcrumbs
Cooking Instructions:
- Prepare the Mushrooms: Preheat your oven to 375°F (190°C). Clean the mushrooms by gently wiping them with a damp paper towel. Remove the stems and set them aside. Place the mushroom caps on a baking sheet lined with parchment paper.
- Cook the Aromatics: Heat olive oil in a skillet over medium heat. Add the chopped onion and sauté for about 2-3 minutes until it becomes translucent. Add the minced garlic and cook for an additional minute until fragrant.
- Prepare the Filling: Chop the mushroom stems and artichoke hearts finely. Add them to the skillet with the onions and garlic. Cook for about 5 minutes until the mixture is tender. Remove from heat and allow it to cool slightly.
- Mix the Cheese Filling: In a mixing bowl, combine the cooled vegetable mixture with goat cheese, Parmesan cheese, salt, and black pepper. Stir until well combined and creamy.
- Stuff the Mushrooms: Using a spoon, fill each mushroom cap with the cheese and vegetable mixture. Press down gently to make sure the filling is compact.
- Top with Breadcrumbs: Sprinkle the tops of the stuffed mushrooms with breadcrumbs and fresh parsley for added texture and flavor.
- Bake the Mushrooms: Place the baking sheet in the preheated oven and bake for 15-20 minutes, or until the mushrooms are tender and the tops are golden brown.
- Serve and Enjoy: Remove from the oven and let cool slightly before serving. These stuffed mushrooms are best served warm.
Extra Tips: For an added layer of flavor, consider mixing some chopped fresh herbs such as thyme or rosemary into the filling. If you prefer a spicier kick, add a pinch of red pepper flakes to the mixture.
It’s important not to overstuff the mushrooms to prevent the filling from overflowing during baking. If you’re making this dish in advance, you can prepare the filling ahead of time and stuff the mushrooms just before baking.
Artichoke and Leek Frittata Bites

Artichoke and Leek Frittata Bites are a delightful and savory dish that showcases the flavors of Spanish cuisine. These bite-sized frittatas are perfect for breakfast, brunch, or as a delightful appetizer at your next gathering. The combination of tender artichokes and the mild, onion-like flavor of leeks creates a harmonious blend that’s both satisfying and delicious.
This dish isn’t only easy to prepare but also a fantastic way to incorporate more vegetables into your meals. The frittata bites are versatile and can be served warm or at room temperature, making them ideal for entertaining guests. They’re cooked in a muffin tin, which makes them easy to serve and enjoy without the need for utensils.
With a fluffy egg base, these bites are baked to perfection, resulting in a golden exterior and a soft, flavorful interior. Prepare to impress your family and friends with this Spanish-inspired recipe that’s sure to become a favorite.
Ingredients (Serves 4-6):
- 8 large eggs
- 1 cup cooked and chopped artichoke hearts
- 1 cup thinly sliced leeks (white and light green parts only)
- 1/2 cup grated Manchego cheese
- 1/4 cup milk or cream
- 2 tablespoons olive oil
- 1 teaspoon salt
- 1/2 teaspoon black pepper
- 1/4 teaspoon smoked paprika
- 1 tablespoon chopped fresh parsley (optional, for garnish)
Instructions:
- Preheat the Oven: Preheat your oven to 375°F (190°C). Lightly grease a standard 12-cup muffin tin with olive oil or cooking spray.
- Prepare the Vegetables: Heat the olive oil in a skillet over medium heat. Add the sliced leeks and sauté for 4-5 minutes until they become soft and translucent. Add the chopped artichoke hearts to the skillet and cook for an additional 2 minutes. Remove from heat and set aside to cool slightly.
- Make the Egg Mixture: In a large mixing bowl, whisk together the eggs, milk (or cream), salt, black pepper, and smoked paprika until well combined. Stir in the grated Manchego cheese.
- Combine Ingredients: Add the sautéed leeks and artichokes to the egg mixture, stirring until all the ingredients are evenly distributed.
- Fill the Muffin Tin: Pour the egg mixture into the prepared muffin tin, filling each cup about three-quarters full.
- Bake: Place the muffin tin in the preheated oven and bake for 20-25 minutes, or until the frittata bites are set and the tops are lightly golden.
- Cool and Serve: Allow the frittata bites to cool in the tin for a few minutes before carefully removing them. Serve warm or at room temperature, garnished with fresh parsley if desired.
Extra Tips:
For the best results, ascertain that the leeks are thoroughly cleaned before slicing, as dirt can often be trapped between the layers. If fresh artichokes aren’t available, canned or jarred artichoke hearts work well and save time.
Feel free to experiment by adding other ingredients like sun-dried tomatoes or diced bell peppers for additional flavor variations. These frittata bites can be made ahead of time and stored in the refrigerator for up to three days, making them a convenient option for meal prep. Enjoy them as part of a tapas spread or alongside a fresh salad for a complete meal.