

As a lover of all things Spanish cuisine, I’m thrilled to share some of my favorite authentic recipes with you. Each dish brings a taste of Spain’s unique regions right to your kitchen. From the sizzling gambas al ajillo to the comforting tortilla Española, these recipes are sure to inspire. Let’s explore the classic flavors that make Spanish food so delightful. Ready to add some vibrant Spanish flair to your meal planning?
Classic Spanish Paella
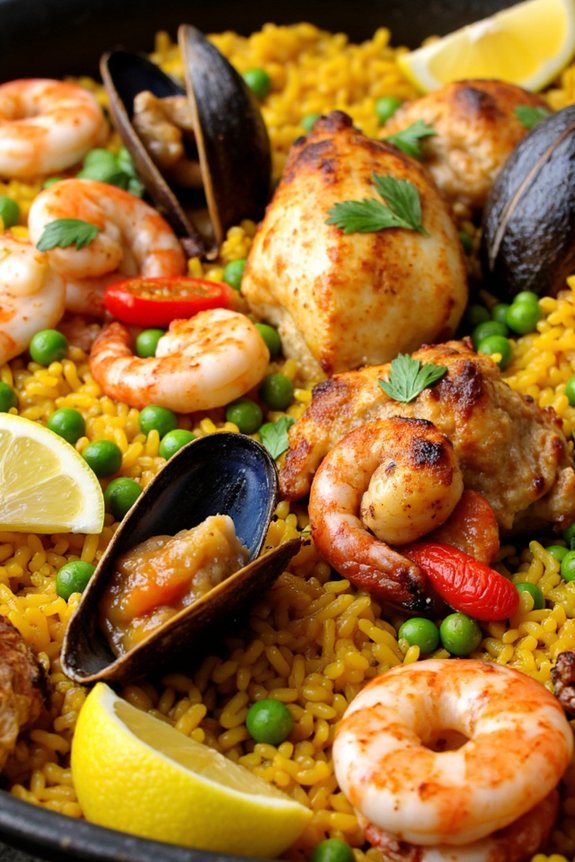
Paella is a traditional Spanish dish that originates from the region of Valencia. It’s widely recognized as a quintessential example of Spanish cuisine, embodying a fusion of rich flavors derived from various ingredients like seafood, chicken, saffron, and rice. This dish isn’t just food; it’s a celebration of Spanish culture and history, often enjoyed during large family gatherings and festivities.
While there are many variations of paella, the classic version typically features a combination of seafood and chicken, offering a delightful blend of land and sea in each bite.
Cooking paella is as much about the process as it’s about the ingredients. The key to a perfect paella lies in the use of high-quality saffron and a proper paella pan that allows for even cooking. This recipe for Classic Spanish Paella serves 4-6 people and will guide you through the steps to create a dish that’s not only flavorful but also visually stunning with its vibrant colors and aromatic spices.
Gather your ingredients, and let’s commence on this culinary journey to Spain!
Ingredients for 4-6 people:
- 2 tablespoons olive oil
- 8 chicken drumsticks or thighs
- 1 teaspoon smoked paprika
- Salt and freshly ground black pepper
- 1 onion, finely chopped
- 2 cloves garlic, minced
- 1 red bell pepper, chopped
- 1 green bell pepper, chopped
- 2 tomatoes, diced
- 2 cups Bomba or Calasparra rice
- 4 cups chicken stock
- 1/2 teaspoon saffron threads, soaked in 2 tablespoons warm water
- 1 pound mussels, cleaned and debearded
- 1 pound squid, cleaned and cut into rings
- 1/2 pound shrimp, peeled and deveined
- 1 cup frozen peas
- 1 lemon, cut into wedges
- Chopped fresh parsley for garnish
Cooking Instructions:
- Prepare the Chicken: Heat olive oil in a large paella pan over medium heat. Season the chicken with smoked paprika, salt, and pepper. Sear the chicken in the pan until golden brown on all sides. Remove and set aside.
- Sauté the Vegetables: In the same pan, add the onion, garlic, and bell peppers. Cook until the vegetables are softened and the onion is translucent. Add the diced tomatoes and continue to cook for another 5 minutes.
- Add the Rice and Saffron: Stir in the rice, making sure each grain is coated with the oil and vegetable mixture. Pour in the chicken stock and add the soaked saffron along with its soaking water. Stir everything together and bring to a simmer.
- Add the Chicken and Cook: Nestle the seared chicken pieces back into the pan. Reduce the heat to low and let the mixture simmer, uncovered, for about 15 minutes, or until the rice begins to absorb the liquid.
- Incorporate the Seafood: Spread the mussels, squid rings, and shrimp evenly over the rice. Continue to cook for another 10-12 minutes until the seafood is cooked through and the mussels have opened.
- Finish with Peas and Lemon: Sprinkle the frozen peas over the top during the last 5 minutes of cooking. Once the paella is fully cooked, remove from heat and let it rest for 5 minutes. Serve with lemon wedges and garnish with chopped parsley.
Extra Tips:
For the best paella, avoid stirring the rice once you add the stock; this allows the socarrat, a crispy layer of rice on the bottom, to form, which is a prized feature of this dish.
If you don’t have a paella pan, use a wide, shallow pan to make sure of even cooking. Always use fresh seafood and quality saffron for the most authentic flavor.
Adjust the seasoning to your preference, but remember that the seafood will add its own salty flavor to the dish. Enjoy your paella with a side of crusty bread and a glass of chilled Spanish white wine for a truly authentic experience.
Tortilla Española (Spanish Omelette)
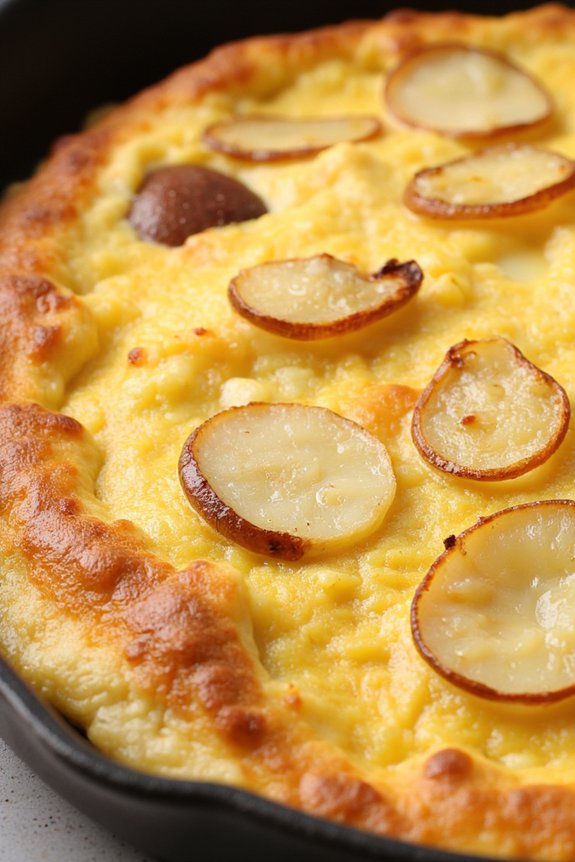
Tortilla Española, also known as Spanish Omelette, is a classic and beloved dish from Spain that epitomizes simplicity and flavor. This rustic dish is made primarily with eggs, potatoes, and onions, and is known for its golden exterior and creamy interior. It’s a versatile dish that can be enjoyed hot or cold, making it perfect for any time of day, whether as a main course or a tapa.
With its rich history rooted in Spanish culture, the Tortilla Española is a staple in Spanish households and an essential part of Spanish cuisine.
The key to a perfect Tortilla Española lies in the careful preparation of its few ingredients and the cooking technique. The potatoes should be slowly cooked in olive oil to guarantee they’re tender and flavorful, while the eggs should be cooked to achieve a delicate balance between being set and creamy.
With just a few simple ingredients, this dish comes together to create a satisfying and hearty meal that’s both comforting and elegant. Below is a recipe that will guide you through the process of making a traditional Tortilla Española for 4-6 people.
Ingredients:
- 6 large eggs
- 4 medium potatoes (about 1 pound or 450 grams)
- 1 large onion
- 1 cup olive oil
- Salt to taste
- Freshly ground black pepper to taste
Instructions:
- Prepare the Ingredients: Peel the potatoes and slice them into thin, even slices about 1/8-inch thick. Peel the onion and slice it thinly as well.
- Cook the Potatoes and Onion: In a large non-stick frying pan, heat the olive oil over medium heat. Add the sliced potatoes and onions, making sure they’re submerged in the oil. Cook them gently for about 15-20 minutes, stirring occasionally, until the potatoes are soft but not browned. They should be tender enough to break with a fork.
- Drain the Oil: Once the potatoes and onions are cooked, use a slotted spoon to remove them from the pan and drain off the excess oil. Reserve a couple of tablespoons of the oil for later use.
- Beat the Eggs: In a large bowl, beat the eggs thoroughly. Season with salt and pepper to taste.
- Combine: Add the cooked potatoes and onions to the beaten eggs. Stir gently to combine, making certain that the mixture is well-coated.
- Cook the Tortilla: In the same frying pan, heat the reserved olive oil over medium heat. Pour the potato, onion, and egg mixture into the pan, spreading it evenly. Cook for about 5-7 minutes, or until the edges start to set and the bottom is lightly browned.
- Flip the Tortilla: To flip the tortilla, place a large plate over the pan, and carefully invert the pan so that the tortilla falls onto the plate. Slide the tortilla back into the pan, uncooked side down. Cook for an additional 5 minutes, or until the eggs are fully set and the tortilla is golden brown on both sides.
- Serve: Allow the tortilla to cool slightly before slicing it into wedges. Serve warm or at room temperature.
Extra Tips:
When making Tortilla Española, it’s important to use a non-stick pan to prevent sticking and guarantee easy flipping. The potatoes should be cooked slowly to develop their flavor without browning.
If you prefer a more set tortilla, cook it longer on a lower heat to avoid over-browning. Additionally, you can experiment by adding ingredients like red peppers or chorizo for a different twist on the classic recipe. Enjoy your Tortilla Española as a main dish or as part of a tapas spread!
Gambas Al Ajillo (Garlic Shrimp)
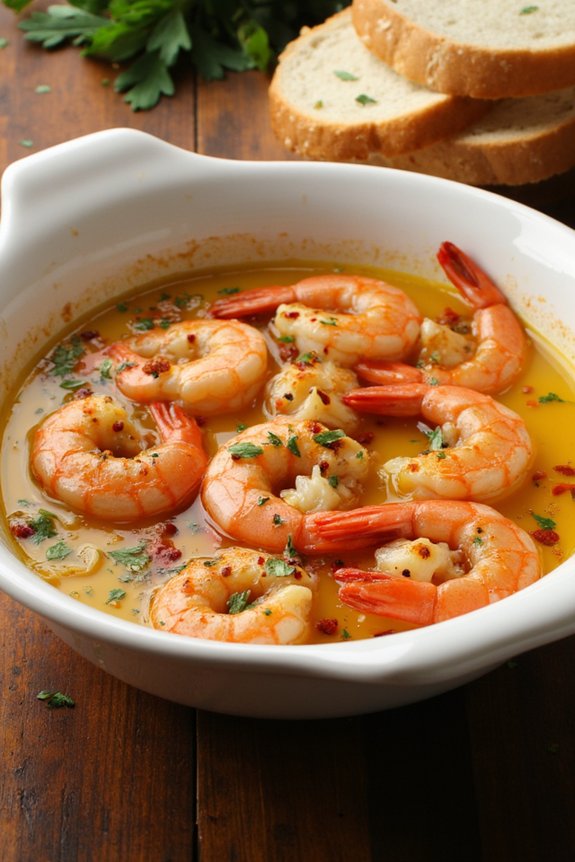
Gambas Al Ajillo, or Garlic Shrimp, is a classic Spanish tapas dish that brings together the fresh flavors of the sea with the robust taste of garlic. Originating from the coastal regions of Spain, this dish is a staple in Spanish cuisine and is often enjoyed as a simple yet delicious appetizer.
It’s traditionally served sizzling hot, straight from the pan, offering a delightful aromatic experience that captivates the senses.
The beauty of Gambas Al Ajillo lies in its simplicity. With only a handful of ingredients, this dish is quick and easy to prepare, making it perfect for both casual gatherings and elegant dinner parties. The shrimp are cooked in a generous amount of olive oil infused with garlic, creating a rich and flavorful sauce that begs to be mopped up with crusty bread. A touch of chili adds a gentle spice that perfectly complements the sweetness of the shrimp.
Ingredients for 4-6 servings:
- 1 ½ pounds of large shrimp, peeled and deveined
- 6 cloves of garlic, thinly sliced
- ½ cup of extra virgin olive oil
- 1-2 dried red chilies, crushed
- 1 tablespoon of fresh lemon juice
- Salt, to taste
- Freshly ground black pepper, to taste
- 2 tablespoons of chopped fresh parsley
- Crusty bread, for serving
Cooking Instructions:
- Prepare the Shrimp: Rinse the shrimp under cold water, and pat them dry with paper towels. Confirm they’re peeled and deveined, leaving the tails on for added flavor.
- Heat the Oil: In a large skillet or frying pan, heat the olive oil over medium heat. Once the oil is hot but not smoking, add the sliced garlic and crushed red chilies. Cook for about 1-2 minutes until the garlic is fragrant and lightly golden, taking care not to burn it.
- Cook the Shrimp: Increase the heat to medium-high and add the shrimp to the skillet. Season with salt and freshly ground black pepper. Cook the shrimp for about 2-3 minutes on each side, or until they turn pink and opaque.
- Add Lemon Juice and Parsley: Once the shrimp are cooked, remove the skillet from the heat. Stir in the fresh lemon juice and sprinkle the chopped parsley over the shrimp. Toss everything together to confirm the shrimp are well coated with the flavorful oil and herbs.
- Serve: Transfer the shrimp to a serving dish, and pour the garlic-infused oil over them. Serve immediately with slices of crusty bread to soak up the delicious sauce.
Extra Tips:
For the best flavor, use fresh and high-quality shrimp. If fresh shrimp aren’t available, frozen shrimp can be used, but make sure they’re fully thawed before cooking.
Adjust the amount of chili according to your spice preference; you can omit it altogether for a milder dish. Additionally, be mindful of the garlic; browning it too much can result in a bitter taste, so watch it closely as it cooks.
Finally, this dish is best enjoyed immediately after cooking, so plan to serve it as soon as it’s ready for the ultimate experience.
Gazpacho Andaluz
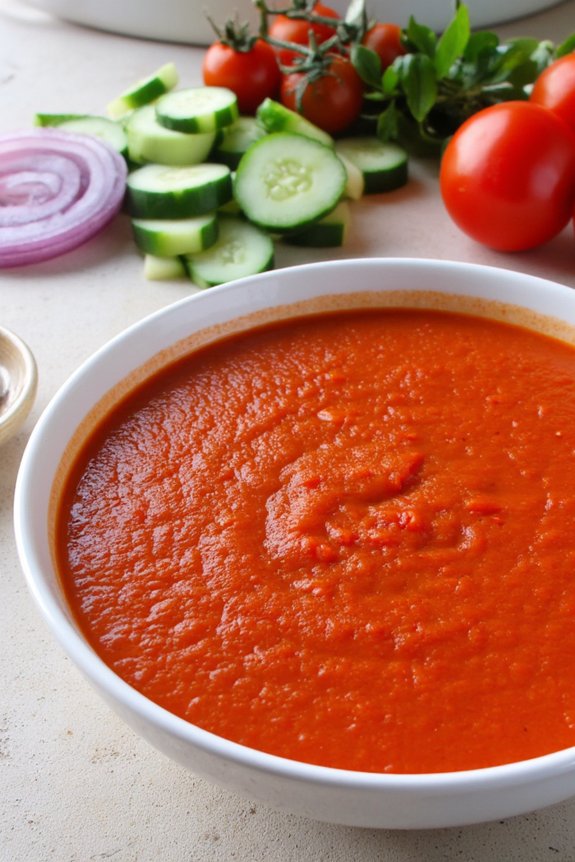
Gazpacho Andaluz is a invigorating cold soup that originates from the Andalusian region of southern Spain. This traditional dish is perfect for hot summer days, offering a delightful blend of raw vegetables with a hint of garlic and olive oil. Its vibrant flavor and smooth texture make it a beloved staple in Spanish cuisine.
The key to an authentic Gazpacho Andaluz lies in using ripe, juicy tomatoes and high-quality olive oil, which together create a wonderfully rich and satisfying taste.
The preparation of Gazpacho Andaluz is simple yet rewarding. It involves blending fresh vegetables, which are then chilled to enhance their flavors and served cold. This dish isn’t only a celebration of fresh produce but also a proof of the simplicity and elegance of Spanish cooking.
Whether you’re hosting a summer gathering or simply craving a light meal, Gazpacho Andaluz is sure to impress with its bold flavors and invigorating quality.
Ingredients for 4-6 servings:
- 6 ripe tomatoes
- 1 cucumber
- 1 green bell pepper
- 2 cloves of garlic
- 1 small red onion
- 3 tablespoons of extra virgin olive oil
- 2 tablespoons of sherry vinegar
- Salt to taste
- 1 cup of cold water
- Optional: 1 slice of stale bread (for thicker consistency)
Cooking Instructions:
- Prepare the Vegetables: Start by washing all the vegetables thoroughly. Peel the cucumber and remove any seeds. Cut the tomatoes, cucumber, green bell pepper, and red onion into large chunks. If using bread, soak it in water for a few minutes, then squeeze out the excess moisture.
- Blend the Ingredients: In a blender or food processor, combine the chopped tomatoes, cucumber, green bell pepper, red onion, and garlic cloves. Add the soaked bread if desired. Blend until the mixture is smooth.
- Add Seasonings: Gradually add the extra virgin olive oil and sherry vinegar to the blended mixture. Continue blending until all the ingredients are well incorporated. Add salt to taste and blend briefly again.
- Adjust Consistency: For a smoother texture, strain the mixture through a fine sieve, pressing down with a spatula to extract as much liquid as possible. Return the strained soup to the blender and add cold water. Blend once more to achieve the desired consistency.
- Chill the Gazpacho: Transfer the gazpacho to a large bowl or pitcher and refrigerate for at least 2 hours. Chilling the soup allows the flavors to meld and enhances the invigorating quality of the dish.
- Serve: Once chilled, stir the gazpacho well and taste for seasoning adjustments. Serve in bowls or glasses, garnished with a drizzle of olive oil or finely chopped vegetables if desired.
Extra Tips:
For the best flavor, use tomatoes that are at their peak ripeness and a high-quality extra virgin olive oil. If you prefer a spicier kick, consider adding a small red chili pepper or a dash of hot sauce.
Gazpacho Andaluz can be made a day in advance, as the flavors develop beautifully with time. Always serve it cold, and feel free to add ice cubes to the soup to keep it chilled during serving, especially on extremely hot days.
Patatas Bravas
Patatas Bravas is a classic Spanish tapa that has won the hearts of many food enthusiasts around the world. This dish, which translates to “fierce potatoes,” is known for its crispy fried potatoes and spicy, tangy sauce. It’s a perfect representation of Spanish cuisine, balancing simple ingredients with bold flavors.
Patatas Bravas is a versatile dish, often enjoyed as an appetizer, a side dish, or as part of a larger tapas spread. The combination of crispy potatoes with a fiery sauce offers a delightful contrast in textures and flavors, making it a favorite among those who love a little spice in their meals.
The beauty of Patatas Bravas lies in its simplicity and the way it brings together a few basic ingredients to create something truly special. The potatoes are traditionally fried until golden brown and crispy, then generously drizzled with a bravas sauce that combines tomatoes, vinegar, and spices.
This dish is perfect for sharing and is a staple in many Spanish households and tapas bars. Preparing it at home allows you to modify the heat level in the sauce to your liking, making it as mild or as spicy as you prefer. Whether you’re hosting a dinner party or simply craving a taste of Spain, Patatas Bravas is sure to impress.
Ingredients for 4-6 servings:
- 4 large potatoes
- Vegetable oil for frying
- Salt to taste
- 1 small onion
- 2 cloves garlic
- 1 teaspoon smoked paprika
- 1/2 teaspoon cayenne pepper
- 1/4 cup tomato sauce
- 2 tablespoons white wine vinegar
- 1/4 cup mayonnaise
- 1 tablespoon extra virgin olive oil
- Fresh parsley for garnish
Cooking Instructions:
- Prepare the Potatoes:
- Peel the potatoes and cut them into 1-inch cubes. Rinse them under cold water to remove excess starch, then pat them dry with a clean kitchen towel.
- Fry the Potatoes:
- Heat vegetable oil in a deep fryer or heavy-bottomed pot to 350°F (175°C). Carefully add the potato cubes in batches, frying them for about 10-12 minutes until they’re golden brown and crispy. Use a slotted spoon to transfer the potatoes to a paper towel-lined plate, and season with salt immediately.
- Make the Bravas Sauce:
- In a saucepan, heat 1 tablespoon of olive oil over medium heat. Add the chopped onion and minced garlic, sautéing until the onion is translucent. Stir in the smoked paprika and cayenne pepper, cooking for another minute.
- Combine with Tomato and Vinegar:
- Add the tomato sauce and white wine vinegar to the onion mixture, stirring well to combine. Allow the sauce to simmer for 5-7 minutes, letting the flavors meld and the sauce thicken slightly.
- Prepare the Aioli:
- In a small bowl, mix the mayonnaise with a little extra virgin olive oil until smooth. This will serve as a cooling contrast to the spicy bravas sauce.
- Assemble the Dish:
- Place the fried potatoes on a serving plate. Drizzle the bravas sauce generously over the top, followed by a drizzle of the aioli. Garnish with fresh chopped parsley for a touch of color and freshness.
Extra Tips:
When making Patatas Bravas, it’s important to get the potatoes as dry as possible before frying to guarantee maximum crispiness. If you prefer a less spicy bravas sauce, you can adjust the amount of cayenne pepper to taste.
Remember to serve the dish immediately after assembling for the best texture and flavor experience. Additionally, if you want to save time, the sauce can be made in advance and stored in the refrigerator for up to two days, allowing the flavors to develop even more.
Chorizo a La Sidra (Chorizo in Cider)
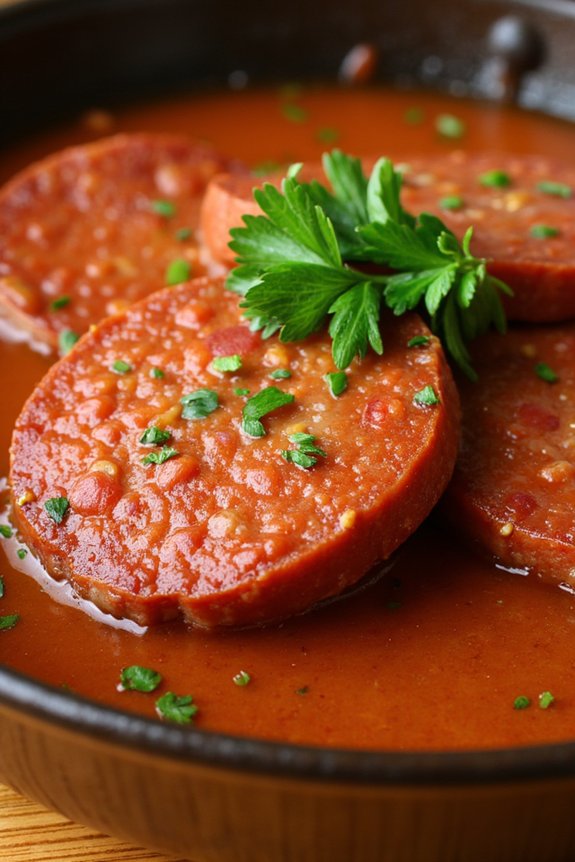
Chorizo a La Sidra, or Chorizo in Cider, is a classic Spanish dish that combines the robust flavors of chorizo sausage with the sweet and tangy notes of cider. This dish hails from the Asturias region in northern Spain, where cider is a staple beverage and is often used in cooking to enhance the depth of flavors in traditional recipes.
The dish is perfect as a tapa or a main course, served with crusty bread to soak up the flavorful sauce. The combination of the spicy chorizo and the slightly sweet cider creates a harmonious balance that captures the essence of Spanish cuisine.
The preparation of Chorizo a La Sidra is straightforward, making it an ideal dish for those looking to bring a taste of Spain into their kitchen without too much fuss. The key to this dish is using high-quality chorizo and a good, dry cider to guarantee the flavors are authentic and pronounced.
The chorizo is cooked slowly in the cider, allowing the spices to infuse into the liquid, creating a rich and aromatic sauce that perfectly complements the sausage. Whether you’re hosting a dinner party or simply want to enjoy a comforting meal, this dish is sure to impress with its simplicity and flavor.
Ingredients (Serves 4-6):
- 500g Spanish chorizo sausage, sliced into thick rounds
- 500ml dry cider
- 2 tablespoons olive oil
- 2 bay leaves
- 1 small onion, finely chopped
- 2 cloves garlic, minced
- Salt and pepper to taste
- Fresh parsley, chopped (for garnish)
Cooking Instructions:
- Prepare the Ingredients: Begin by slicing the chorizo into thick rounds. Finely chop the onion and mince the garlic. These steps will help guarantee that the ingredients are ready to go once you start cooking.
- Heat the Olive Oil: In a large skillet or frying pan, heat the olive oil over medium heat. Once the oil is hot, add the chopped onion and sauté for about 5 minutes, or until the onion becomes translucent.
- Add the Garlic: Stir in the minced garlic and continue to sauté for an additional 1-2 minutes. Be careful not to burn the garlic, as it can become bitter.
- Cook the Chorizo: Add the sliced chorizo to the pan. Cook for about 5 minutes, turning occasionally, until the chorizo starts to brown and release its oil.
- Pour in the Cider: Add the dry cider to the pan, guaranteeing that the chorizo is mostly covered. Toss in the bay leaves and bring the mixture to a simmer.
- Simmer the Dish: Reduce the heat to low and let the dish simmer for 15-20 minutes. This allows the flavors to meld together and the cider to reduce slightly, creating a flavorful sauce.
- Season and Garnish: Season with salt and pepper to taste. Remove the bay leaves and transfer the chorizo and sauce to a serving dish. Garnish with chopped fresh parsley before serving.
Extra Tips:
For the best results, choose a Spanish chorizo that isn’t overly spicy, as the cider will complement and enhance the natural flavors of the sausage. If you prefer a thicker sauce, allow the dish to simmer for an additional 5-10 minutes to reduce the cider further.
Serve the Chorizo a La Sidra with crusty bread or alongside roasted potatoes to soak up the flavorful sauce. This dish pairs wonderfully with a glass of the same cider used in cooking, bringing a cohesive taste experience to your meal.
Pisto Manchego
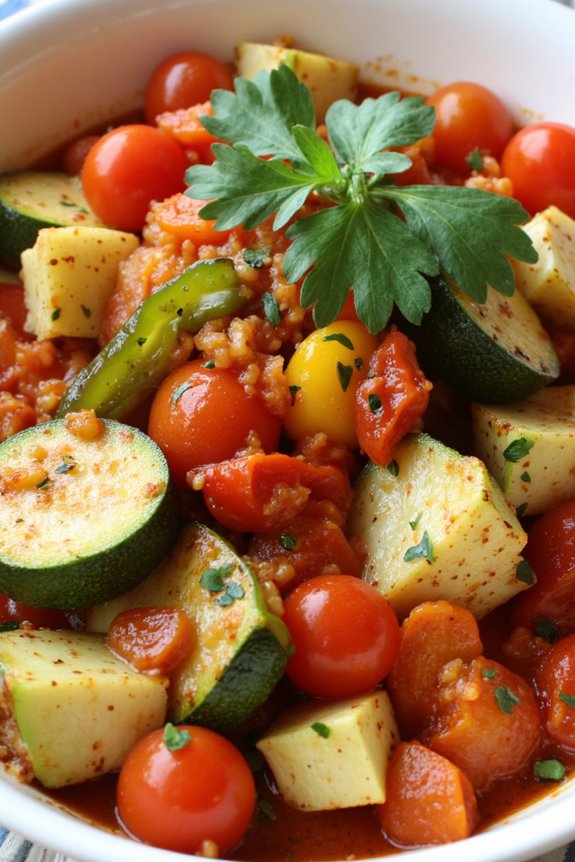
The roots of Pisto Manchego lie in the resourceful use of seasonal vegetables, making it an ideal dish for those looking to enjoy a healthy and satisfying meal without much fuss. The beauty of this recipe is its adaptability – it can be made with whatever vegetables are on hand, allowing for a personal touch with each preparation.
Despite its simplicity, the dish is deeply flavorful and satisfying, making it a staple in Spanish homes. Here’s how you can prepare this delightful dish for a serving size of 4-6 people.
Ingredients:
- 1/4 cup olive oil
- 2 medium onions, finely chopped
- 2 cloves garlic, minced
- 2 green bell peppers, diced
- 2 red bell peppers, diced
- 2 medium zucchinis, diced
- 6 ripe tomatoes, peeled and chopped
- 1 teaspoon sugar
- Salt and pepper to taste
- 2 teaspoons smoked paprika
- 1/4 cup freshly chopped parsley
Instructions:
- Prepare the Ingredients: Begin by gathering all your ingredients. Wash and chop the vegetables as indicated to guarantee they’re ready for cooking.
- Cook the Onions and Garlic: In a large pan, heat the olive oil over medium heat. Add the chopped onions and garlic, cooking them gently until they’re soft and translucent, which will take about 5-7 minutes. Stir occasionally to prevent the garlic from burning.
- Add the Peppers: Once the onions are ready, add the diced green and red bell peppers to the pan. Stir them well to guarantee they’re coated with the oil and let them cook for another 5 minutes until they begin to soften.
- Incorporate the Zucchini: Add the diced zucchinis to the pan, stirring to combine all the vegetables thoroughly. Cook for an additional 5 minutes to allow the zucchini to soften slightly.
- Add Tomatoes and Seasonings: Stir in the chopped tomatoes, sugar, salt, pepper, and smoked paprika. Mix well and bring the mixture to a gentle simmer. The sugar helps to balance the acidity of the tomatoes.
- Simmer the Pisto: Cover the pan with a lid and let the pisto simmer gently on low heat for about 30 minutes. Stir occasionally to prevent sticking and guarantee even cooking. The vegetables should be soft and melded together into a thick stew.
- Finish with Parsley: Once the pisto has reached the desired consistency, remove it from the heat and stir in the freshly chopped parsley. Taste and adjust seasoning if necessary.
- Serve: Serve the Pisto Manchego warm, either on its own or with a slice of crusty bread. Alternatively, it can be served as a side dish or topped with a fried egg for a more filling meal.
Extra Tips: For an authentic touch, consider using a mix of sweet and spicy smoked paprika to add depth to the flavor. If fresh tomatoes aren’t available, canned tomatoes can be used as a substitute, though fresh ones are preferable for their vibrant taste.
To make peeling the tomatoes easier, blanch them quickly in boiling water before peeling. Pisto Manchego can be made ahead of time and stored in the refrigerator for up to three days; the flavors will continue to develop, making it even more delicious when reheated.
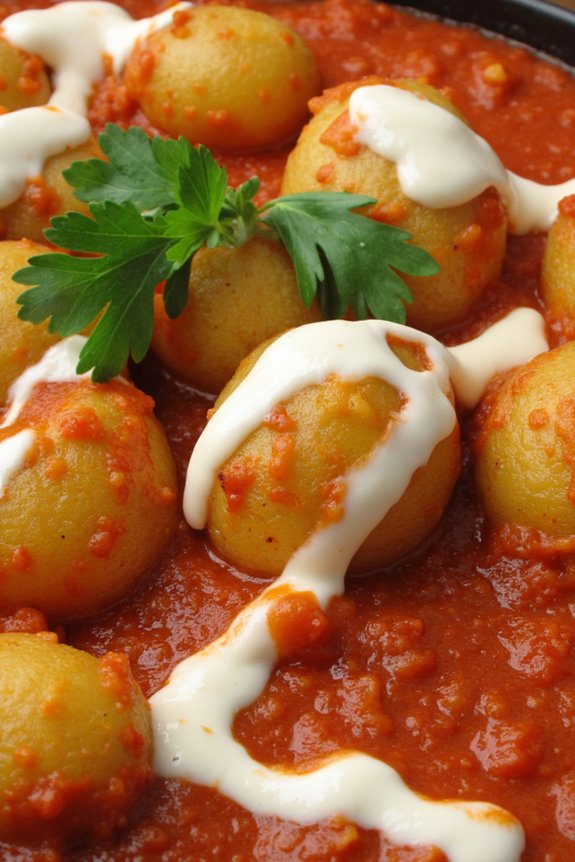
Albondigas (Spanish Meatballs)

Albondigas, or Spanish Meatballs, are a delicious and comforting dish that brings the flavors of Spain right to your kitchen. These meatballs are typically made with a combination of beef and pork, seasoned with a variety of spices and fresh herbs, and simmered in a rich tomato sauce. The dish is perfect for family gatherings or a cozy dinner, offering a taste of traditional Spanish cuisine.
The succulent meatballs are often served with crusty bread or over rice, making them a versatile addition to any meal.
The key to perfect Albondigas lies in the blend of ingredients and the cooking technique. By carefully mixing the meats with breadcrumbs, eggs, and aromatic spices, and then simmering them in a tomato-based sauce, you guarantee that the meatballs remain tender and flavorful. This recipe is designed to serve 4-6 people, making it ideal for a small group or as leftovers for the next day.
Ingredients:
- 1 lb ground beef
- 1 lb ground pork
- 2 large eggs
- 1 cup breadcrumbs
- 4 cloves garlic, minced
- 1 onion, finely chopped
- 1/4 cup fresh parsley, chopped
- 1 teaspoon ground cumin
- 1 teaspoon smoked paprika
- Salt and pepper to taste
- 2 tablespoons olive oil
- 1 can (28 oz) crushed tomatoes
- 1 cup beef or chicken broth
- 1 teaspoon sugar
- 1 bay leaf
Instructions:
- Prepare the Meatball Mixture: In a large mixing bowl, combine the ground beef, ground pork, eggs, breadcrumbs, minced garlic, chopped onion, parsley, cumin, smoked paprika, salt, and pepper. Mix until all ingredients are well combined but don’t overwork the meat.
- Form the Meatballs: Using your hands, shape the mixture into small balls, about 1-1.5 inches in diameter. This should yield around 20-24 meatballs.
- Cook the Meatballs: Heat the olive oil in a large skillet over medium heat. Add the meatballs in batches, making sure not to overcrowd the pan. Brown the meatballs on all sides, about 5-7 minutes per batch. Remove the meatballs and set aside.
- Prepare the Sauce: In the same skillet, add the crushed tomatoes, beef or chicken broth, sugar, and bay leaf. Stir well to combine and bring to a gentle simmer.
- Simmer the Meatballs: Return the meatballs to the skillet with the sauce. Cover and allow them to simmer on low heat for about 20-25 minutes, or until the meatballs are cooked through and the sauce has thickened.
- Serve: Remove the bay leaf and serve the Albondigas hot, garnished with additional fresh parsley if desired. Pair with crusty bread or rice for a complete meal.
Extra Tips: When forming the meatballs, wet your hands slightly with water to prevent the mixture from sticking and to help shape them smoothly. If you prefer a spicier version, add a pinch of cayenne pepper or red pepper flakes to the meat mixture.
The sauce can be adjusted to your taste—add more sugar if you prefer a sweeter sauce or more broth for a lighter consistency. Leftover Albondigas can be stored in an airtight container in the refrigerator for up to three days, and they often taste even better the next day as the flavors meld together.
Empanadas Gallegas
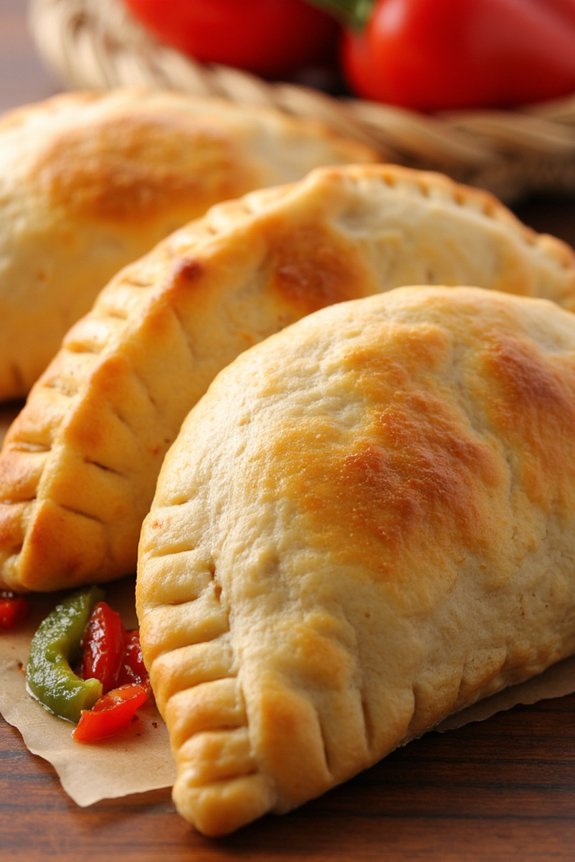
Empanadas Gallegas are a traditional dish from the Galicia region in Spain, known for their flaky crust and savory fillings. These delicious Spanish pies are perfect for a family meal or as an impressive dish for a gathering. The empanadas can be filled with a variety of ingredients, but the most traditional filling is tuna with bell peppers and onions. The pastry is made from scratch, resulting in a golden, crisp exterior that envelops the flavorful filling.
This recipe will guide you through the process of making Empanadas Gallegas for a serving size of 4-6 people. The dish is a perfect blend of textures and flavors, offering a delightful culinary experience that captures the essence of Spanish cuisine. Whether you’re a seasoned cook or trying Spanish cooking for the first time, this recipe provides detailed instructions to guarantee success.
Ingredients:
- 4 cups all-purpose flour
- 1 teaspoon salt
- 1 cup olive oil
- 1 cup warm water
- 2 tablespoons white wine
- 2 tablespoons sweet paprika
- 1 egg (beaten, for brushing)
- 2 large onions (finely chopped)
- 2 red bell peppers (chopped)
- 2 green bell peppers (chopped)
- 3 garlic cloves (minced)
- 2 cans (about 14 ounces each) of tuna in oil (drained)
- Salt and pepper to taste
Cooking Instructions:
- Prepare the Dough: In a large mixing bowl, combine the flour and salt. Make a well in the center, then add the olive oil, warm water, and white wine. Mix well until the dough starts to come together. Knead the dough on a lightly floured surface for about 10 minutes until it’s smooth and elastic. Cover the dough with a damp cloth and let it rest for about 1 hour.
- Prepare the Filling: In a large skillet, heat 2 tablespoons of olive oil over medium heat. Add the chopped onions and sauté until they’re translucent, about 5 minutes. Add the red and green bell peppers, and continue to cook for another 5 minutes until the peppers are soft. Stir in the minced garlic and cook for an additional 1 minute.
- Combine the Filling: Add the drained tuna to the skillet, breaking it up with a spoon. Mix well to combine with the vegetables. Season the mixture with salt, pepper, and paprika. Continue cooking for 2-3 minutes, allowing the flavors to meld together. Remove from heat and let the filling cool slightly.
- Roll Out the Dough: Divide the dough into two equal parts. Roll out one part on a floured surface to fit a large baking sheet. Place the rolled-out dough onto the baking sheet.
- Assemble the Empanada: Spread the tuna and vegetable filling evenly over the rolled-out dough, leaving a border around the edges. Roll out the second portion of dough to cover the filling. Place it over the filling and crimp the edges to seal the empanada. Use a fork to prick the top layer of dough to allow steam to escape.
- Bake the Empanada: Preheat the oven to 375°F (190°C). Brush the top of the empanada with the beaten egg to give it a glossy finish. Bake in the preheated oven for about 40-45 minutes, or until the crust is golden brown.
- Cool and Serve: Allow the empanada to cool slightly before slicing. Serve warm or at room temperature.
Extra Tips:
For a more flavorful dough, consider adding a teaspoon of smoked paprika alongside the sweet paprika. If you prefer a spicier filling, include a pinch of red pepper flakes when sautéing the vegetables.
The empanada can be made a day in advance and reheated before serving, which can enhance the flavors. Be sure to taste and adjust the seasoning of the filling before assembling for the best results.
Pulpo a La Gallega (Galician-Style Octopus)
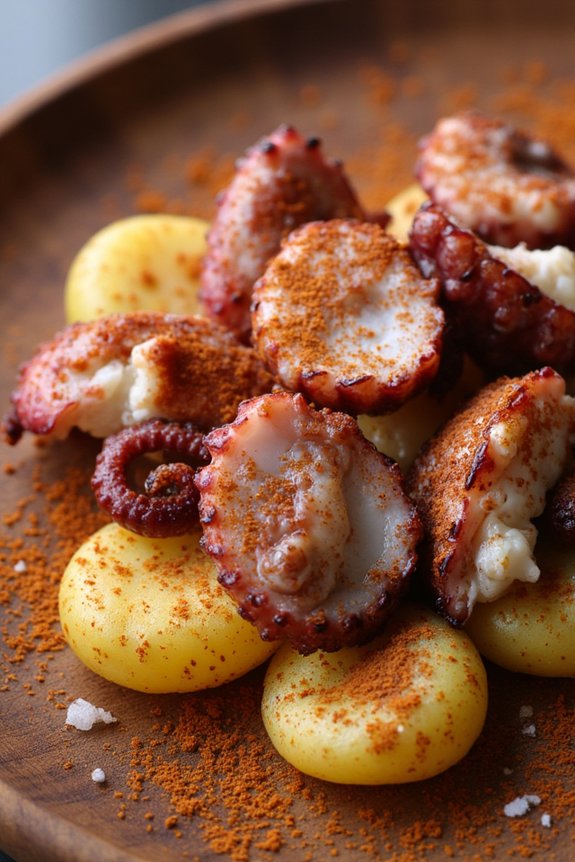
Pulpo a La Gallega, also known as Galician-Style Octopus, is a traditional dish from the region of Galicia in Spain. This dish celebrates the simplicity and purity of fresh ingredients, showcasing the tender and delicate flavors of octopus complemented by the earthiness of potatoes and the smoky warmth of paprika.
Originally a humble fisherman’s meal, Pulpo a La Gallega has become a beloved Spanish delicacy found in tapas bars and fine dining restaurants alike. It’s often served on wooden plates, which is said to enhance the flavors and textures of the dish.
The preparation of Pulpo a La Gallega requires a bit of time and patience, as cooking octopus to the perfect tenderness is key. The octopus is boiled until it reaches the desired texture and then paired with boiled potatoes. The dish is finished with a sprinkle of paprika, a drizzle of olive oil, and a pinch of sea salt, creating a harmonious blend of flavors that epitomizes the essence of Spanish cuisine.
This recipe will guide you through the steps to create an authentic Pulpo a La Gallega for a serving size of 4-6 people.
Ingredients:
- 2.5 kg (approximately 5.5 lbs) fresh octopus
- 1 kg (approximately 2.2 lbs) potatoes
- 3 bay leaves
- 2 tablespoons of coarse sea salt
- 1 tablespoon sweet paprika
- 1 tablespoon spicy paprika (optional)
- 100 ml extra virgin olive oil
- Water
Cooking Instructions:
1. Prepare the Octopus: Clean the octopus thoroughly under cold running water. Remove the beak, eyes, and any innards if not already done by the fishmonger. Rinse well.
2. Boil the Octopus: Fill a large pot with water and bring it to a boil. Add the bay leaves. When the water is boiling, “scare” the octopus by dipping it into the boiling water three times before fully submerging it. This helps to tenderize the octopus.
Once fully submerged, reduce the heat to a simmer and cook for 45-60 minutes or until the octopus is tender when pierced with a fork.
3. Cook the Potatoes: While the octopus is cooking, peel and slice the potatoes into rounds about ½ inch thick. In a separate pot, bring water to a boil and add a pinch of sea salt. Boil the potatoes until they’re tender, about 15-20 minutes. Drain and set aside.
4. Slice the Octopus: Once the octopus is cooked, remove it from the water and let it cool slightly. Using a sharp knife, slice the tentacles into bite-sized pieces, about ½ inch thick.
5. Assemble the Dish: On a serving platter or wooden plate, arrange the sliced potatoes as a base. Place the octopus slices on top of the potatoes.
6. Season and Serve: Drizzle the extra virgin olive oil over the octopus and potatoes. Sprinkle generously with the sweet paprika and, if desired, a bit of spicy paprika for heat. Finish with a sprinkle of coarse sea salt. Serve immediately.
Extra Tips:
When cooking the octopus, it’s important not to add any salt to the boiling water, as this can make the octopus tough. The salt used later in the seasoning will be sufficient.
If you have the time, consider freezing the octopus for a few days before cooking; this can break down the fibers and result in a more tender texture. Additionally, for an authentic presentation, consider serving Pulpo a La Gallega on traditional wooden plates, which can absorb excess moisture and enhance the flavors.
Enjoy this dish with a crisp Albariño wine for a true Galician experience.
Calamares a La Romana (Fried Calamari)
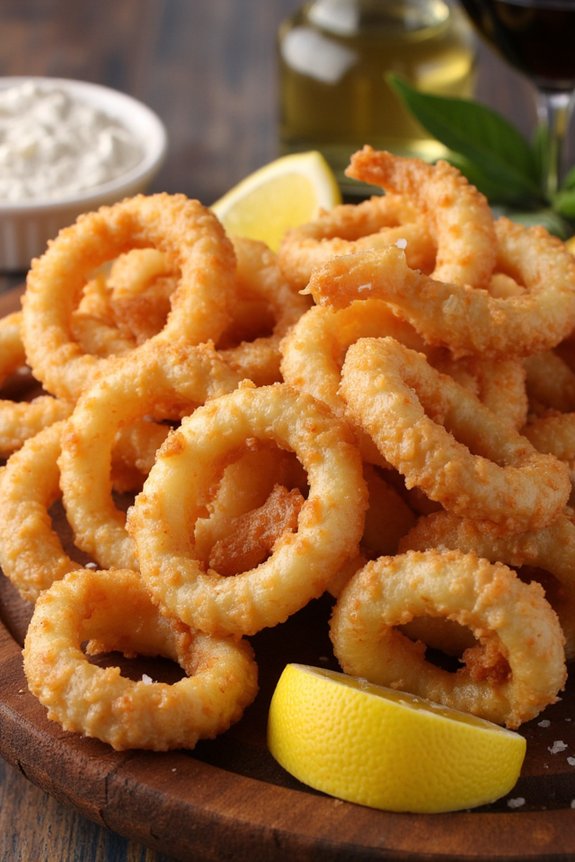
Calamares a La Romana, also known as Fried Calamari, is a classic Spanish dish that’s both simple to prepare and delightful to taste. This dish is a staple in Spanish tapas bars, where it’s often served as a delectable appetizer or snack. The combination of tender calamari rings coated in a light, crispy batter makes for an irresistible treat that will transport you to the sun-drenched coasts of Spain with every bite.
Whether you’re hosting a dinner party or just craving a taste of Spain at home, Calamares a La Romana is bound to impress. The key to perfect Calamares a La Romana lies in the freshness of the squid and the careful preparation of the batter. This dish celebrates the natural flavors of the sea, enhanced by a golden, crunchy exterior.
By following this recipe, you’ll learn how to achieve the perfect texture and flavor balance. The calamari should be succulent and tender, while the batter should provide a satisfying crunch without overpowering the delicate taste of the squid. Pair it with a slice of lemon and a sprinkle of salt for an authentic Spanish experience.
Ingredients for 4-6 servings:
- 1 kg fresh squid, cleaned and cut into rings
- 150 g all-purpose flour
- 2 large eggs
- Salt, to taste
- Black pepper, to taste
- 1 teaspoon paprika
- 1 liter vegetable oil, for frying
- 1 lemon, cut into wedges
Cooking Instructions:
- Prepare the Squid: Start by cleaning the squid thoroughly under cold running water. Remove the head, tentacles, and any innards. Cut the cleaned squid into 1/2-inch thick rings and pat them dry with paper towels to remove excess moisture.
- Season the Flour: In a shallow dish, combine the flour with salt, black pepper, and paprika. Mix well to guarantee the seasoning is evenly distributed throughout the flour.
- Beat the Eggs: In another bowl, beat the eggs until smooth. This will act as a binding agent for the flour to adhere properly to the squid rings.
- Coat the Squid Rings: Dip each squid ring first into the beaten egg, allowing any excess to drip off, and then dredge it in the seasoned flour mixture. Make sure each ring is evenly coated with flour.
- Heat the Oil: Pour the vegetable oil into a large, deep saucepan or frying pan. Heat the oil over medium-high heat until it reaches a temperature of about 180°C (350°F). You can test if the oil is ready by dropping a small piece of bread into it – it should sizzle and turn golden in about 30 seconds.
- Fry the Squid Rings: Carefully add the coated squid rings to the hot oil in batches, ensuring not to overcrowd the pan. Fry the rings for about 2-3 minutes or until they’re golden brown and crispy. Use a slotted spoon to remove the fried calamari from the oil and place them on a plate lined with paper towels to absorb any excess oil.
- Serve: Arrange the Calamares a La Romana on a serving platter, garnish with lemon wedges, and sprinkle a little salt over them just before serving. Enjoy them hot for the best taste and texture.
Extra Tips:
For the best results, verify that the oil is at the correct temperature before frying the calamari, as oil that’s too cool will result in a greasy finish. Additionally, don’t overcrowd the frying pan, as this will lower the oil temperature and affect the crispiness of the coating.
If you prefer a spicier kick, consider adding a pinch of cayenne pepper to the flour mixture. Finally, always serve the calamari immediately after frying to maintain its delightful crunchiness.
Flan De Huevo (Spanish Egg Flan)
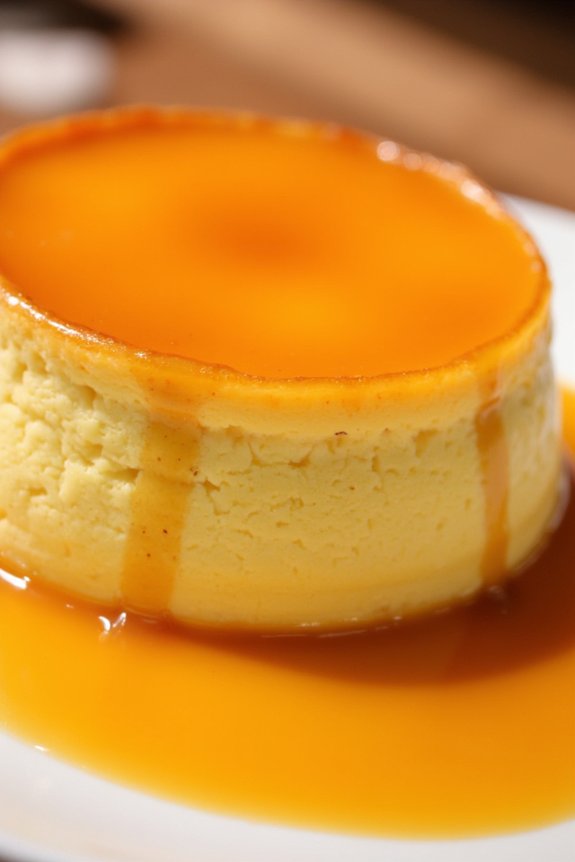
Flan De Huevo, also known as Spanish Egg Flan, is a classic dessert that hails from Spain. It’s a silky, caramel-topped custard that melts in your mouth, offering a taste of Spanish culinary tradition in every bite. The beauty of this dish lies in its simplicity, requiring only a handful of ingredients to create a dessert that’s both elegant and comforting.
The caramel layer on top adds a rich sweetness that perfectly complements the creamy custard below, making it a favorite choice for many gatherings and celebrations. Traditionally served chilled, this dessert is perfect for concluding a meal on a sweet note. Its preparation involves creating a caramel base, followed by a mixture of eggs, milk, and sugar, which is then baked to perfection.
Whether you’re hosting a dinner party or simply want to indulge in a sweet treat, Flan De Huevo is a recipe that’s bound to impress. With its smooth texture and rich flavor, this Spanish Egg Flan is a timeless dish that captures the essence of Spanish cuisine.
Ingredients (Serves 4-6):
- 1 cup granulated sugar (for caramel)
- 4 large eggs
- 1 cup granulated sugar (for custard)
- 2 cups whole milk
- 1 teaspoon vanilla extract
Cooking Instructions:
- Prepare the Caramel:
- In a medium saucepan, heat 1 cup of granulated sugar over medium heat. Stir constantly with a wooden spoon until the sugar melts and turns into a deep amber-colored liquid. Be cautious not to burn the sugar.
- Quickly pour the caramel into a 9-inch round baking dish, tilting the dish to evenly coat the bottom. Set aside to let the caramel harden.
- Make the Custard Mixture:
- Preheat your oven to 350°F (175°C).
- In a large mixing bowl, whisk together the eggs and 1 cup of granulated sugar until well combined and slightly frothy.
- Gradually add the milk and vanilla extract, continuing to whisk until the mixture is smooth and all ingredients are fully incorporated.
- Combine and Bake:
- Pour the custard mixture over the hardened caramel in the baking dish.
- Place the baking dish in a larger roasting pan. Fill the roasting pan with hot water until it reaches halfway up the sides of the baking dish, creating a bain-marie or water bath.
- Carefully transfer the pan to the preheated oven and bake for about 50-60 minutes, or until the custard is set but still slightly jiggly in the center.
- Cool and Serve:
- Once baked, remove the flan from the oven and allow it to cool to room temperature in the water bath.
- Refrigerate the flan for at least 4 hours or overnight to fully set.
- To serve, run a knife around the edges of the flan to loosen it, then invert it onto a serving plate. The caramel will flow over the custard, creating a beautiful topping.
Extra Tips:
When making the caramel, be sure to keep a close eye on the sugar as it can quickly shift from perfectly amber to burnt. It’s also important to pour the caramel into the baking dish immediately as it hardens rapidly once off the heat.
For the smoothest custard, strain the egg mixture through a fine-mesh sieve before pouring it over the caramel, removing any egg solids that could disrupt the texture. Finally, using a water bath is essential as it guarantees even baking and prevents the flan from cracking.
Enjoy your homemade Flan De Huevo with a touch of whipped cream or fresh berries for added indulgence.