

Hosting a gathering and want to delight your guests with vibrant, flavorful dishes? Spanish appetizers are the perfect choice to create a memorable spread. Think crispy Patatas Bravas and succulent Gambas Al Ajillo, offering a taste of Spain’s rich culinary culture. Ready to explore these mouthwatering bites? Bring a touch of Spain to your table with these delicious recipes.
Patatas Bravas
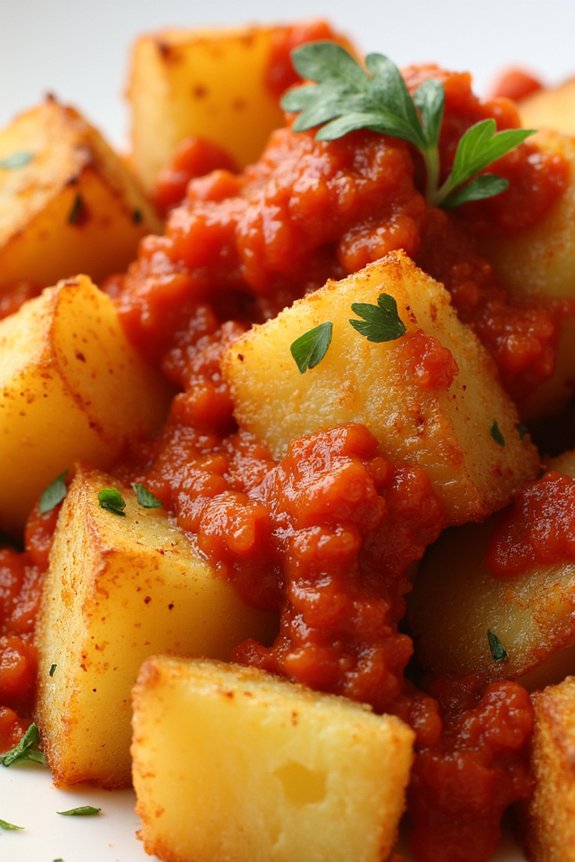
Patatas Bravas is a classic Spanish appetizer known for its crispy potatoes paired with a spicy and flavorful tomato sauce. This dish is a staple in tapas bars throughout Spain and is loved for its simple yet satisfying combination of textures and flavors. The potatoes are typically fried until golden and crunchy, while the sauce, known as “salsa brava,” is made with a blend of tomatoes, paprika, and a hint of cayenne pepper for that signature kick.
This dish can be enjoyed as a snack, side dish, or as part of a larger tapas spread.
The origins of Patatas Bravas date back to Madrid in the mid-20th century, where it quickly gained popularity as a delicious accompaniment to drinks in casual settings. The dish’s appeal lies in its versatility and the balance of spicy and savory elements.
While traditional recipes vary slightly across regions, the core ingredients and preparation methods remain largely consistent. This recipe provides a detailed guide to preparing Patatas Bravas for 4-6 people, ensuring you can recreate this beloved tapas dish in your own kitchen.
Ingredients for 4-6 servings:
- 4 large potatoes, peeled and cut into 1-inch cubes
- 1/4 cup olive oil
- Salt, to taste
- 1 small onion, finely chopped
- 2 cloves garlic, minced
- 1 teaspoon smoked paprika
- 1/2 teaspoon cayenne pepper
- 1 can (14 oz) diced tomatoes
- 1 tablespoon tomato paste
- 1 tablespoon sherry vinegar
- Fresh parsley, chopped (for garnish)
Cooking Instructions:
- Prepare the Potatoes: Begin by peeling and cutting the potatoes into 1-inch cubes. Rinse them under cold water to remove excess starch, then pat them dry with a kitchen towel.
- Cook the Potatoes: Heat the olive oil in a large skillet over medium-high heat. Add the potato cubes in a single layer, cooking them in batches if necessary. Fry until they’re golden brown and crispy on all sides, about 15-20 minutes. Remove them from the skillet and drain on paper towels, then season with salt.
- Make the Sauce: In the same skillet, reduce the heat to medium and add the chopped onion. Sauté for about 5 minutes until soft and translucent. Add the minced garlic, smoked paprika, and cayenne pepper, stirring for another minute until fragrant.
- Simmer the Sauce: Add the diced tomatoes, tomato paste, and sherry vinegar to the skillet. Stir everything together and let the sauce simmer for about 10-15 minutes, allowing it to thicken slightly. Season with salt to taste.
- Serve the Dish: Place the crispy potatoes on a serving platter and generously spoon the sauce over the top. Garnish with chopped fresh parsley for a touch of color and freshness.
Extra Tips: For the crispiest potatoes, make sure they’re completely dry before frying. If you prefer a milder sauce, adjust the amount of cayenne pepper to suit your taste.
Additionally, you can prepare the sauce a day in advance to let the flavors meld together, reheating it just before serving. This dish is best enjoyed immediately after preparation, as the potatoes can lose their crispness if left to sit for too long.
Gambas Al Ajillo

Gambas Al Ajillo, also known as Garlic Shrimp, is a classic Spanish appetizer that combines succulent shrimp with the bold flavors of garlic and chili. This simple yet flavorful dish is a staple in Spanish tapas bars and is often served sizzling hot in a clay dish.
The beauty of this dish lies in its simplicity and the freshness of its ingredients, making it a delightful treat for seafood lovers and an excellent starter for any meal.
The origins of Gambas Al Ajillo can be traced back to the coastal regions of Spain, where fresh seafood is abundant. The dish is typically enjoyed with a glass of sherry or a cold beer, and is often accompanied by crusty bread to soak up the delicious garlic-infused olive oil.
Preparing Gambas Al Ajillo requires minimal ingredients and time, making it a perfect appetizer to whip up when entertaining guests or enjoying a cozy night at home.
Ingredients for 4-6 servings:
- 1 pound (about 500 grams) large shrimp, peeled and deveined
- 6 cloves garlic, thinly sliced
- 1/2 cup extra-virgin olive oil
- 1 teaspoon red pepper flakes (adjust to taste)
- 1 teaspoon smoked paprika
- Salt, to taste
- Freshly ground black pepper, to taste
- 2 tablespoons fresh parsley, chopped
- 1 lemon, cut into wedges
- Crusty bread, for serving
Cooking Instructions:
1. Prepare the Shrimp: Start by rinsing the shrimp under cold water and patting them dry with paper towels. Confirm they’re peeled and deveined, leaving the tails on if desired for presentation.
2. Heat the Oil: In a large skillet or frying pan, heat the olive oil over medium heat. Add the sliced garlic and cook gently, stirring occasionally, until the garlic becomes fragrant and just starts to turn golden, about 2-3 minutes.
Be careful not to burn the garlic as it can turn bitter.
3. Add the Shrimp: Increase the heat to medium-high and add the shrimp to the pan in a single layer. Sprinkle the red pepper flakes and paprika over the shrimp. Season with salt and pepper.
Cook the shrimp for about 2 minutes on each side, or until they’re pink and opaque.
4. Finish with Fresh Herbs: Once the shrimp are cooked, remove the pan from heat and sprinkle the chopped parsley over the top. Toss everything gently to combine and verify the shrimp are coated in the flavored oil.
5. Serve: Transfer the Gambas Al Ajillo to a serving dish and serve immediately with lemon wedges on the side. Encourage your guests to squeeze fresh lemon juice over the shrimp to enhance the flavors.
Accompany the dish with slices of crusty bread to dip into the aromatic garlic oil.
Extra Tips:
For the best results, use fresh shrimp and high-quality olive oil, as these ingredients are the stars of the dish.
Adjust the amount of garlic and red pepper flakes to suit your taste preferences. If you prefer a milder dish, reduce the red pepper flakes.
Remember to keep an eye on the garlic while cooking, as it can quickly go from golden to burnt. For an added depth of flavor, consider adding a splash of dry white wine or sherry to the pan just before the shrimp are fully cooked.
This dish is best enjoyed fresh and hot, so serve it immediately to capture the full essence of its flavors.
Tortilla Española
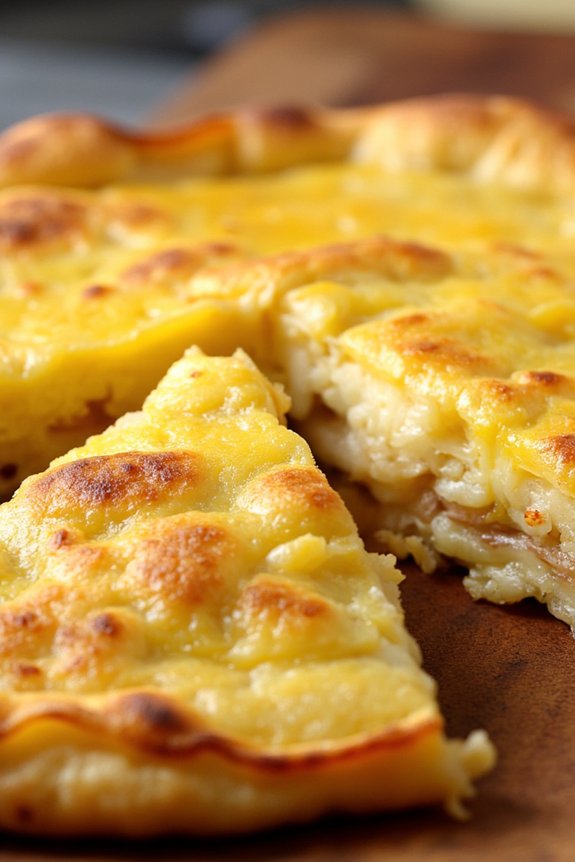
Tortilla Española, also known as Spanish omelette, is a classic Spanish appetizer that highlights the simplicity and flavor of basic ingredients. This traditional dish is cherished in Spanish cuisine for its hearty yet humble nature, often served as a tapa in bars or as a satisfying meal at home. The main ingredients are potatoes, onions, and eggs, creating a delightful combination that can be enjoyed warm or at room temperature.
Whether you’re hosting a gathering or simply enjoying a quiet meal, Tortilla Española is sure to impress with its rich taste and comforting texture.
Preparing Tortilla Española involves a few essential steps to achieve the perfect balance of flavors and textures. The potatoes should be tender yet firm, while the eggs need to envelop the ingredients smoothly, resulting in a golden, lightly crisp exterior. The onions add a touch of sweetness, complementing the savory elements of the dish.
With a little patience and attention to detail, you can create a Tortilla Española that’s both authentic and delicious, bringing a taste of Spain to your table.
Ingredients for 4-6 servings:
- 6 large eggs
- 4 medium-sized potatoes
- 1 large onion
- 1 cup olive oil
- Salt to taste
Cooking Instructions:
- Prepare the Ingredients: Peel the potatoes and slice them thinly, about 1/8 inch thick. Peel and finely slice the onion as well.
- Cook the Potatoes and Onions: In a large non-stick frying pan, heat the olive oil over medium heat. Add the potatoes and onions, ensuring they’re submerged in the oil. Cook them slowly, stirring occasionally, until the potatoes are tender but not browned. This should take about 15-20 minutes.
- Drain and Cool the Mixture: Once the potatoes and onions are cooked, use a slotted spoon to transfer them to a colander to drain excess oil. Allow them to cool for a few minutes.
- Beat the Eggs: In a large bowl, beat the eggs with a good pinch of salt until they’re well mixed. Once the potatoes and onions have cooled slightly, add them to the beaten eggs, stirring to combine.
- Cook the Tortilla: Remove any remaining oil from the frying pan, leaving just a thin film. Heat the pan over medium heat. Pour the egg mixture into the pan and reduce the heat to low. Cook for about 5 minutes, or until the edges start to set.
- Flip the Tortilla: Place a large plate over the pan and carefully flip the tortilla onto the plate. Slide the tortilla back into the pan to cook the other side for another 4-5 minutes, until it’s set and golden brown.
- Serve: Allow the Tortilla Española to cool slightly before cutting it into wedges or squares. Serve warm or at room temperature.
Extra Tips:
For the best Tortilla Española, use a good quality olive oil as it greatly affects the flavor. Be patient when cooking the potatoes and onions; they should be cooked low and slow to develop their flavors without browning.
If you’re concerned about flipping the tortilla, try using a non-stick pan, which can make the process easier. Also, letting the tortilla rest for a bit after cooking allows for easier slicing and enhances the flavors. Enjoy experimenting with variations, such as adding bell peppers or chorizo for a different twist.
Pan Con Tomate
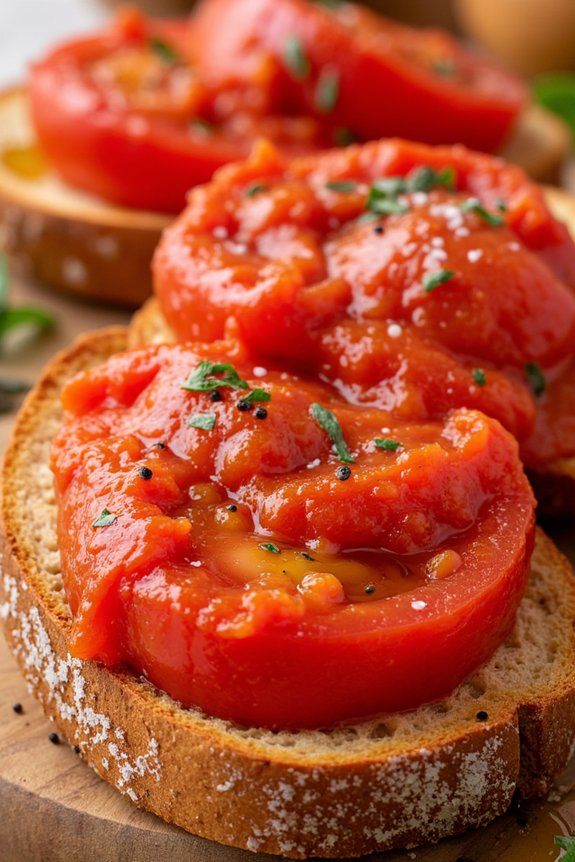
Pan Con Tomate, a traditional Spanish appetizer, is a simple yet flavorful dish that highlights the natural taste of fresh tomatoes, quality olive oil, and crusty bread. Originating from Catalonia, this dish is commonly served as a tapa, a small portion appetizer, and is loved for its simplicity and taste.
With just a few quality ingredients, you can create a delectable snack that embodies the essence of Spanish cuisine. The essence of Pan Con Tomate lies in using the freshest and highest quality ingredients available. The bread should be a rustic, country-style loaf with a firm texture that can hold the juicy tomatoes and olive oil. The tomatoes should be ripe and sweet, as they’re the star of the show.
By simply rubbing the garlic and tomatoes over the toasted bread, a rich blend of flavors is created, elevated by a drizzle of extra virgin olive oil and a sprinkle of salt.
Ingredients for 4-6 servings:
- 1 large rustic country-style bread loaf
- 4 ripe tomatoes
- 2-3 cloves of garlic
- Extra virgin olive oil
- Sea salt
- Freshly ground black pepper (optional)
Cooking Instructions:
- Prepare the Bread: Start by slicing the loaf of bread into thick slices, about 1 inch thick. Confirm that the slices are even to promote uniform toasting.
- Toast the Bread: Place the bread slices on a baking sheet and toast them in a preheated oven at 400°F (200°C) for about 5-7 minutes, or until they’re golden and crispy. Alternatively, you can grill the slices on a stovetop grill pan for a smoky flavor.
- Prepare the Tomatoes: While the bread is toasting, cut the tomatoes in half crosswise. Using a box grater, grate the cut side of the tomatoes into a bowl, discarding the skins. You should end up with a fresh tomato pulp.
- Rub the Garlic: Once the bread is toasted, take a peeled clove of garlic and rub it over the surface of each slice. Adjust the amount of garlic according to your preference.
- Assemble the Dish: Spoon the tomato pulp generously over each slice of garlic-rubbed bread. Confirm the tomato covers the entire surface for maximum flavor.
- Season and Serve: Drizzle extra virgin olive oil over each slice and sprinkle with sea salt. For added flavor, you can also add a pinch of freshly ground black pepper. Serve immediately while the bread is still warm.
Extra Tips:
For an authentic taste, use Spanish extra virgin olive oil, which has a distinct flavor and enhances the dish. If you prefer a bit of heat, consider adding a pinch of crushed red pepper flakes on top of the tomato.
Additionally, for a richer taste, you can add thin slices of jamón (Spanish ham) or anchovies as a topping. Remember, the key to a perfect Pan Con Tomate lies in the quality of the ingredients, so choose the best you can find for the most delightful experience.
Chorizo a La Sidra
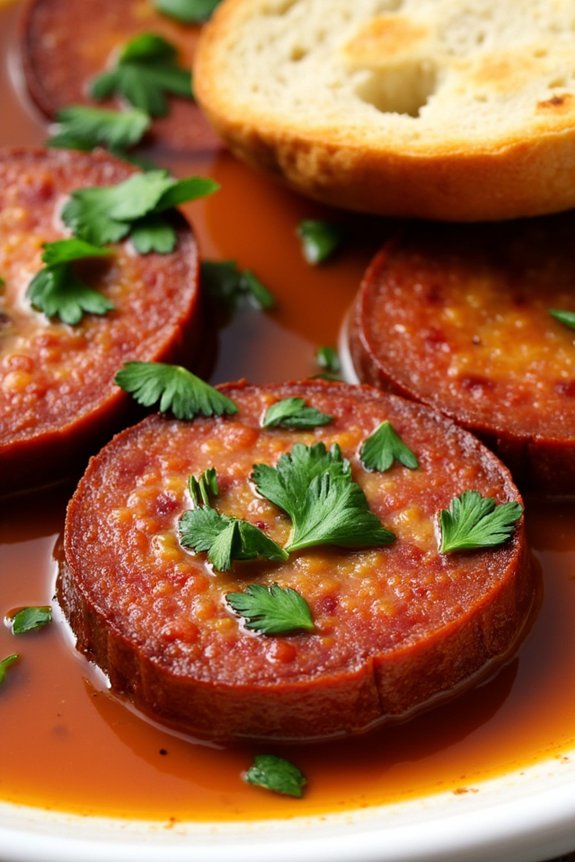
Chorizo a La Sidra is a classic Spanish appetizer that combines the rich, smoky flavor of chorizo sausage with the crisp, invigorating taste of cider. This dish is particularly popular in the Asturias region of northern Spain, where cider is a staple beverage. The cider’s acidity perfectly balances the fatty richness of the chorizo, making it an irresistible starter for any meal.
Traditionally served with crusty bread, Chorizo a La Sidra is a crowd-pleaser that brings a taste of Spain to your table.
When preparing Chorizo a La Sidra, it’s crucial to choose high-quality chorizo, as it’s the star of the dish. Opt for a semi-cured chorizo, which has a firm texture and a pronounced smoky, spicy flavor. The cider used should be a dry variety, as it will meld beautifully with the chorizo’s spices without adding excessive sweetness.
This recipe is perfect for a serving size of 4-6 people, making it an ideal choice for a small gathering or family meal.
Ingredients:
- 500g semi-cured chorizo sausage
- 500ml dry cider
- 1 tablespoon olive oil
- 1 bay leaf
- Freshly chopped parsley (for garnish)
- Crusty bread (for serving)
Instructions:
- Prepare the Chorizo: Slice the chorizo sausage into thick rounds, about 1cm thick. This thickness allows the chorizo to cook evenly and soak up the cider’s flavors without losing its texture.
- Heat the Pan: In a large skillet or frying pan, heat the olive oil over medium heat. Once hot, add the sliced chorizo. Cook for about 5 minutes, stirring occasionally, until the chorizo starts to brown and release its oils.
- Add Cider and Bay Leaf: Pour the dry cider over the chorizo in the pan. Add the bay leaf for an extra layer of flavor. Bring the mixture to a gentle simmer.
- Simmer: Reduce the heat to low and let the chorizo simmer in the cider for about 15-20 minutes. This process allows the chorizo to absorb the cider while the alcohol evaporates, leaving behind a flavorful broth.
- Remove Bay Leaf and Serve: Once the chorizo is tender and the sauce has slightly thickened, remove the bay leaf. Transfer the chorizo and sauce to a serving dish.
- Garnish and Serve: Sprinkle freshly chopped parsley over the chorizo for a touch of color and freshness. Serve hot, accompanied by slices of crusty bread to soak up the delicious sauce.
Extra Tips:
When selecting chorizo, consider the level of spice you prefer, as it can range from mild to very spicy. If you can’t find semi-cured chorizo, you can use fully cured chorizo, but adjust the cooking time as it will need less time to cook.
Croquetas De Jamón

Croquetas De Jamón are a classic Spanish appetizer, known for their creamy interior and crispy exterior. These delightful ham croquettes are perfect for serving at gatherings or as a delicious snack. Originating from Spain, Croquetas De Jamón have become a favorite tapas dish worldwide, cherished for their savory flavor and satisfying texture.
They’re typically made with a béchamel sauce mixed with finely chopped ham, then coated in breadcrumbs and fried to golden perfection. Preparing Croquetas De Jamón involves creating a thick béchamel sauce, which is infused with the rich flavor of jamón (Spanish cured ham).
Once the mixture has chilled and set, it’s shaped into small, cylindrical croquettes, coated in egg and breadcrumbs, and fried until crisp. While the process requires some time and patience, the result is a delectable appetizer that’s sure to captivate your guests. This recipe serves 4-6 people, making it perfect for a small gathering or family meal.
Ingredients:
- 1 cup (150g) finely chopped jamón (Spanish cured ham)
- 1/2 cup (110g) unsalted butter
- 3/4 cup (100g) all-purpose flour
- 2 cups (500ml) whole milk
- Salt and freshly ground black pepper to taste
- A pinch of nutmeg
- 2 large eggs
- 2 cups (200g) breadcrumbs
- Olive oil for frying
Instructions:
1. Prepare the Béchamel Sauce: In a medium saucepan, melt the butter over medium heat. Once melted, add the flour and stir continuously for about 2-3 minutes until you achieve a smooth paste (roux). Gradually add the milk while whisking continuously to prevent lumps from forming.
Cook until the mixture thickens and begins to pull away from the sides of the pan.
2. Incorporate the Jamón: Add the finely chopped jamón to the béchamel sauce. Season with salt, pepper, and a pinch of nutmeg. Stir well to combine. Cook for an additional 2-3 minutes, then remove from heat.
3. Chill the Mixture: Transfer the mixture to a shallow dish and cover with plastic wrap, pressing it against the surface to prevent a skin from forming. Refrigerate for at least 2 hours, or until the mixture is firm and set.
4. Shape the Croquettes: Once chilled, take small portions of the mixture and shape them into cylindrical croquettes, about 2 inches long. Repeat until all the mixture is used.
5. Coat the Croquettes: Beat the eggs in a shallow dish. Place the breadcrumbs in another shallow dish. Dip each croquette into the beaten egg, then roll it in the breadcrumbs, making sure it’s fully coated. Repeat the process for all croquettes.
6. Fry the Croquettes: In a deep frying pan, heat enough olive oil to cover the croquettes over medium-high heat. Once hot, carefully add the croquettes in batches, frying them until golden brown on all sides, about 3-4 minutes per batch. Remove and drain on paper towels.
7. Serve and Enjoy: Serve the croquetas de jamón hot, as is, or with your favorite dipping sauce.
Extra Tips:
When making the béchamel sauce, guarantee you stir continuously to avoid lumps and achieve a smooth consistency. If the mixture seems too thick, you can add a little more milk.
For a crunchier exterior, you can double-coat the croquettes by repeating the egg and breadcrumb process. If you’re short on time, prepare the croquettes ahead and freeze them. Then, fry them directly from frozen when you’re ready to serve.
Make sure not to overcrowd the frying pan to maintain the oil temperature and achieve perfectly crisp croquettes.
Empanadillas De Atún

The beauty of Empanadillas De Atún lies in their simplicity and versatility. The filling can be prepared ahead of time, allowing you to assemble and bake them just before serving.
Whether you choose to make the dough from scratch or opt for pre-made pastry, these empanadillas are a delicious nod to traditional Spanish cuisine, offering a burst of flavor in every bite.
Ingredients for 4-6 servings:
- 2 cups all-purpose flour
- 1/2 cup cold water
- 1/4 cup olive oil
- 1/2 teaspoon salt
- 1 egg (beaten, for egg wash)
- 2 tablespoons olive oil (for filling)
- 1 small onion, finely chopped
- 1 red bell pepper, finely chopped
- 2 cloves garlic, minced
- 1 large tomato, chopped
- 2 cans (about 6 oz each) tuna in olive oil, drained
- 1/4 cup green olives, sliced
- 1 teaspoon paprika
- Salt and pepper to taste
Cooking Instructions:
- Prepare the Dough: In a large bowl, combine the flour and salt. Gradually add the cold water and olive oil, mixing until a dough forms. Knead the dough on a lightly floured surface for about 5 minutes until smooth. Wrap in plastic wrap and refrigerate for at least 30 minutes.
- Make the Filling: Heat the olive oil in a skillet over medium heat. Add the onion and red bell pepper, cooking until softened, about 5 minutes. Add the garlic and cook for another minute until fragrant. Stir in the tomato, cooking until it starts to break down.
- Add Tuna and Seasoning: Flake the drained tuna into the skillet, mixing well with the vegetables. Stir in the sliced olives, paprika, salt, and pepper. Cook for 2-3 minutes until the mixture is well combined and heated through. Remove from heat and allow to cool slightly.
- Roll Out the Dough: Preheat your oven to 375°F (190°C). Roll out the dough on a floured surface to a thickness of about 1/8 inch. Cut out circles using a large cookie cutter or the rim of a glass, about 4 inches in diameter.
- Assemble the Empanadillas: Place a tablespoon of the tuna filling in the center of each dough circle. Fold the dough over to form a half-moon shape. Press the edges together firmly, then crimp with a fork to seal.
- Bake the Empanadillas: Transfer the empanadillas to a baking sheet lined with parchment paper. Brush the tops with the beaten egg to guarantee a golden finish. Bake in the preheated oven for 20-25 minutes, or until the pastries are golden brown.
- Serve and Enjoy: Allow the empanadillas to cool slightly before serving. They can be enjoyed warm or at room temperature.
Extra Tips:
To enhance the flavor of your empanadillas, consider adding a pinch of cayenne pepper for a bit of heat, or some chopped fresh parsley for a burst of freshness.
If you’re short on time, pre-made puff pastry can be used as a substitute for homemade dough. When sealing the edges, make sure they’re well-crimped to prevent the filling from leaking during baking.
Finally, these empanadillas can also be frozen before baking, making them a convenient option for last-minute entertaining.
Albóndigas En Salsa

Albóndigas En Salsa, or Spanish meatballs in sauce, is a flavorful and comforting dish that makes for a perfect appetizer. These tender meatballs are simmered in a rich tomato sauce, infused with Spanish spices and aromas, making them an irresistible dish for gatherings or family dinners.
This recipe combines ground beef and pork with breadcrumbs, garlic, and herbs for the meatballs, which are then cooked in a luscious tomato sauce enhanced with onions, garlic, and paprika. The resulting dish is a harmonious blend of flavors and textures that’s quintessentially Spanish.
This recipe serves 4-6 people and is ideal as an appetizer or a main course when paired with crusty bread or a side of rice. The key to perfect Albóndigas En Salsa lies in the balance of spices and the slow cooking of the meatballs in the sauce to allow them to soak up all the flavors.
Whether you’re looking to impress guests or simply want to enjoy a taste of Spain at home, this dish is sure to become a favorite.
Ingredients:
- 500g ground beef
- 500g ground pork
- 1 cup breadcrumbs
- 2 large eggs
- 4 cloves garlic, minced
- 1 onion, finely chopped
- 1 tablespoon fresh parsley, chopped
- 1 teaspoon smoked paprika
- 1 teaspoon cumin
- Salt and pepper to taste
- 2 tablespoons olive oil
- 400g canned chopped tomatoes
- 1 cup beef or chicken stock
- 1 bay leaf
Instructions:
1. Prepare the Meatball Mixture:
In a large bowl, combine the ground beef, ground pork, breadcrumbs, eggs, half of the minced garlic, fresh parsley, smoked paprika, cumin, salt, and pepper. Mix thoroughly until all ingredients are well incorporated.
2. Shape the Meatballs:
Using your hands, shape the mixture into 1-inch meatballs. Place them on a tray or plate and set aside.
3. Brown the Meatballs:
Heat olive oil in a large skillet over medium heat. Add the meatballs in batches, being careful not to overcrowd the pan. Brown the meatballs on all sides, then remove them from the skillet and set them aside on a plate.
4. Prepare the Sauce:
In the same skillet, add the chopped onion and the remaining minced garlic. Sauté for 3-4 minutes until the onion is translucent and fragrant.
5. Simmer the Sauce:
Add the canned chopped tomatoes, beef or chicken stock, and bay leaf to the skillet. Stir well and bring the mixture to a simmer.
6. Cook the Meatballs in Sauce:
Return the browned meatballs to the skillet, nestling them into the sauce. Cover and let them simmer over low heat for 25-30 minutes, occasionally stirring, until the meatballs are cooked through and have absorbed the flavors of the sauce.
7. Serve:
Remove the bay leaf before serving. Transfer the Albóndigas En Salsa to a serving dish and garnish with additional chopped parsley if desired.
Extra Tips:
For the best flavor, allow the meatball mixture to rest in the refrigerator for at least 30 minutes before shaping and cooking. This resting time allows the flavors to meld together.
If your sauce becomes too thick while simmering, you can add a little more stock or water to reach your desired consistency. When rolling the meatballs, wet your hands slightly to prevent the mixture from sticking.
Serve these delicious meatballs with a side of crusty bread to soak up the sauce, or over a bed of rice for a heartier meal.
Pimientos De Padrón

Pimientos De Padrón are a quintessential Spanish tapas dish that offer a delightful surprise with every bite. These small green peppers are typically mild, but every so often, you’ll encounter one with a spicy kick, adding an element of fun to your dining experience.
Originating from the region of Galicia in northwest Spain, Pimientos De Padrón have become a popular appetizer across the country, known for their simple preparation and delicious flavor.
The secret to cooking Pimientos De Padrón lies in their quick sautéing process, which enhances their natural sweetness and gives them a slight char. This creates a perfect harmony of flavors, especially when seasoned generously with flaky sea salt. Served warm, they make for a perfect start to any meal, especially when shared among friends and family.
Here’s how you can make Pimientos De Padrón for 4-6 people.
Ingredients:
- 1 pound (about 450 grams) of Padrón peppers
- 3 tablespoons of olive oil
- Flaky sea salt
Instructions:
- Prepare the Peppers: Begin by washing the Padrón peppers thoroughly under cold water and drying them with a clean kitchen towel. Confirming the peppers are dry will help them blister nicely when cooked.
- Heat the Oil: In a large skillet or frying pan, heat the olive oil over medium-high heat. It’s important to wait until the oil is hot enough before adding the peppers, as this will guarantee they cook quickly and evenly.
- Cook the Peppers: Once the oil is hot, add the Padrón peppers to the pan in a single layer. Be careful not to overcrowd the pan as this will steam the peppers instead of frying them. Sauté the peppers for about 5-7 minutes, turning occasionally, until they’re blistered and slightly charred on all sides.
- Season and Serve: Remove the peppers from the pan using a slotted spoon and transfer them to a serving plate. Immediately sprinkle with flaky sea salt to taste. Serve the peppers warm as a tapas dish or appetizer.
Extra Tips:
When cooking Pimientos De Padrón, freshness is key, so try to use fresh peppers for the best flavor.
If you prefer a little more kick, you can experiment by adding a pinch of smoked paprika to the peppers after cooking.
Also, be mindful of the oil temperature; if it’s too hot, the peppers might burn rather than blister.
Boquerones En Vinagre

Boquerones en Vinagre is a classic Spanish appetizer that showcases the delicate flavors of fresh anchovies marinated in vinegar. This dish is a staple in tapas bars across Spain and is prized for its simplicity and freshness. The anchovies are cleaned and filleted before being submerged in vinegar, allowing them to “cook” without heat. The result is a tangy, tender fish that pairs beautifully with bread or crisp vegetables.
This dish is perfect for gatherings, as it can be made ahead of time and served cold, making it an ideal candidate for tapas-style dining. The key to success lies in using the freshest anchovies possible and balancing the vinegar‘s acidity with a hint of olive oil and garlic. Once prepared, Boquerones en Vinagre can be a delightful addition to any spread of Spanish appetizers, bringing a touch of the Mediterranean to your table.
Ingredients for 4-6 servings:
- 500g fresh anchovies
- 200ml white wine vinegar
- 200ml water
- 3 cloves garlic, thinly sliced
- 1 teaspoon salt
- 100ml extra virgin olive oil
- Fresh parsley, chopped
- Lemon wedges for serving
Cooking Instructions:
- Prepare the Anchovies: Begin by cleaning the anchovies. Remove the heads and guts, then carefully fillet the fish by slicing along the belly and removing the backbone. Rinse the fillets under cold water and pat dry with paper towels.
- Marinate the Fish: In a shallow glass or ceramic dish, arrange the anchovy fillets in a single layer. In a separate bowl, mix the white wine vinegar, water, and salt until the salt dissolves. Pour the vinegar mixture over the anchovies, making certain they’re completely submerged. Cover the dish with plastic wrap and refrigerate for 4-6 hours, or until the flesh turns white and firm.
- Add Flavor: Once the anchovies have marinated, drain the liquid. Arrange the fillets on a serving plate. Drizzle with extra virgin olive oil and scatter the sliced garlic over the top. Sprinkle with chopped parsley for freshness.
- Serve: Serve the boquerones chilled, accompanied by lemon wedges for squeezing over the top. They can be enjoyed on their own or with crusty bread or crackers.
Extra Tips:
When selecting anchovies, verify they’re as fresh as possible by looking for clear eyes and firm flesh. If you can’t find fresh anchovies, fresh sardines can be a substitute.
When marinating, make sure the fish are fully submerged in the vinegar mixture to allow even curing. If the vinegar flavor is too strong for your taste, you can adjust the vinegar-to-water ratio.
This dish can be made a day ahead and stored in the refrigerator, allowing the flavors to meld beautifully.
Ensaladilla Rusa
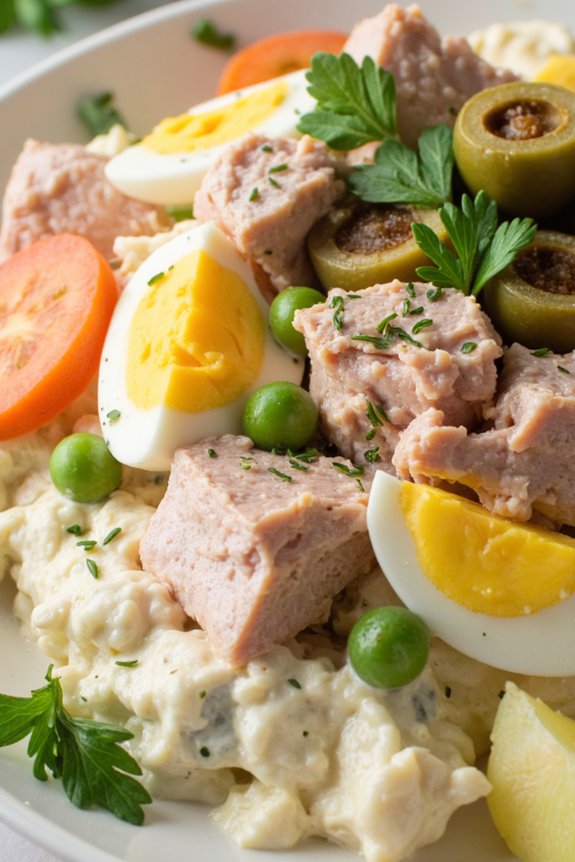
The beauty of Ensaladilla Rusa lies in its simplicity and the ability to customize the ingredients based on personal preferences or what’s available in the pantry. It’s a cold dish, making it perfect for hot summer days or as a revitalizing appetizer.
The key to a successful Ensaladilla Rusa is to guarantee the vegetables are cooked to the right tenderness and the mayonnaise is mixed in to create a creamy yet not overly heavy dish. Whether you’re hosting a dinner party or preparing a casual family meal, Ensaladilla Rusa is sure to be a crowd-pleaser.
Ingredients for 4-6 servings:
- 4 medium-sized potatoes
- 3 medium-sized carrots
- 1 cup of frozen peas
- 2 large eggs
- 1 can (about 5 oz) of tuna in olive oil, drained
- 1/2 cup of mayonnaise
- 1 tablespoon of olive oil
- Salt to taste
- Black pepper to taste
- A handful of green olives, pitted and sliced
- Fresh parsley for garnish (optional)
Cooking Instructions:
- Prepare the Vegetables: Start by peeling and dicing the potatoes and carrots into small, uniform cubes. This will guarantee even cooking. In a large pot, bring water to a boil and add a pinch of salt. Add the diced potatoes and carrots to the boiling water and cook for about 10-15 minutes or until they’re tender but not mushy.
- Cook the Peas and Eggs: While the potatoes and carrots are cooking, in a separate pot, bring water to a boil and add the frozen peas. Boil for 3-5 minutes until the peas are tender. In the same pot or another, boil the eggs for about 10 minutes until hard-boiled. Once cooked, remove the peas and eggs from the heat and let them cool. Peel and chop the eggs into small pieces.
- Mix the Ingredients: In a large mixing bowl, combine the cooked potatoes, carrots, peas, and chopped eggs. Add the drained tuna, breaking it into smaller pieces with a fork. Gently mix all the ingredients together.
- Add the Mayonnaise: Add the mayonnaise to the vegetable and tuna mixture. Drizzle with olive oil, and season with salt and black pepper to taste. Mix everything thoroughly until all ingredients are well-coated with mayonnaise.
- Chill and Serve: Transfer the mixture to a serving dish. Garnish with sliced green olives and a sprinkle of fresh parsley if desired. Cover the dish with plastic wrap and refrigerate for at least one hour to allow the flavors to meld. Serve chilled.
Extra Tips:
For a healthier version, consider using a light mayonnaise or Greek yogurt as a substitute for traditional mayonnaise. If you prefer a bit of tanginess, a splash of lemon juice can be added to the mixture.
Additionally, you can customize your Ensaladilla Rusa by adding other ingredients such as roasted red peppers or capers for extra flavor. It’s important to guarantee that the vegetables aren’t overcooked to maintain a good texture in the final dish.
Queso Manchego Con Membrillo
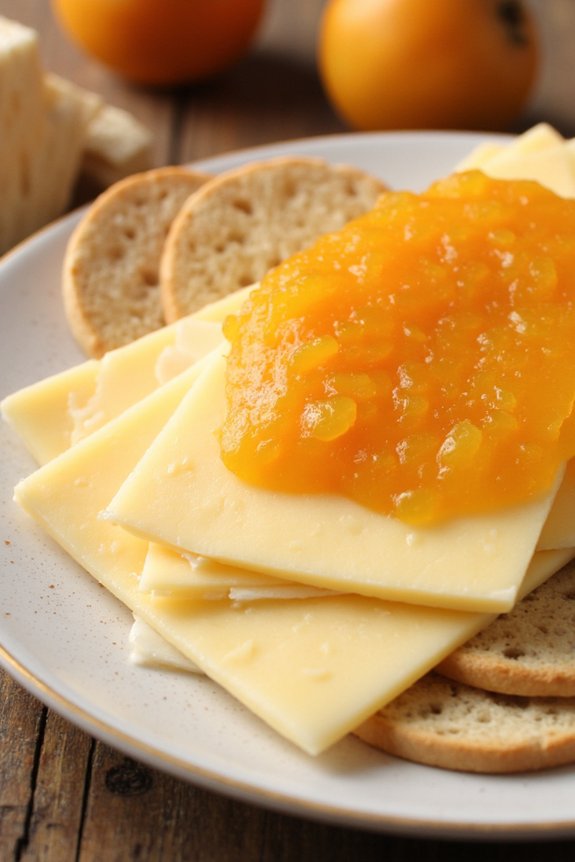
Queso Manchego con Membrillo is a classic Spanish appetizer that perfectly marries the rich, nutty flavors of Manchego cheese with the sweet, floral notes of quince paste, known as membrillo. This delightful pairing hails from the La Mancha region in Spain, where Manchego cheese is traditionally produced.
The simplicity of this dish allows the quality of the ingredients to shine through, making it a favorite among cheese lovers and those who appreciate the balance of savory and sweet.
When preparing Queso Manchego con Membrillo, it’s important to choose a well-aged Manchego cheese, which will have a more developed flavor profile. The membrillo should be firm but pliable, allowing it to hold its shape while being easy to cut into.
This dish isn’t only easy to prepare but also visually striking, with the pale yellow cheese contrasting beautifully with the deep amber hue of the quince paste. Perfect for serving at gatherings, this appetizer will surely impress your guests with its elegant simplicity and delightful taste.
Ingredients for 4-6 servings:
- 200 grams of Manchego cheese (aged for at least 6 months)
- 150 grams of quince paste (membrillo)
- Fresh crusty bread or crackers (optional)
Cooking Instructions:
- Prepare the Ingredients: Begin by taking the Manchego cheese out of the refrigerator about 30 minutes before serving to allow it to come to room temperature. This helps enhance the flavor and texture of the cheese.
- Slice the Cheese: Using a sharp knife, cut the Manchego cheese into thin slices, approximately 1/4 inch thick. Arrange the slices neatly on a serving platter.
- Slice the Membrillo: Cut the quince paste into slices that are roughly the same size and thickness as the cheese slices. This guarantees a harmonious bite when paired together.
- Assemble the Appetizer: Place a slice of membrillo on top of each piece of Manchego cheese. You can create a layered effect by stacking them or arrange them side by side for a more casual presentation.
- Serve: Optionally, serve the Queso Manchego con Membrillo with slices of fresh crusty bread or crackers to add a crunchy element to the dish. This also makes it easier for guests to pick up and enjoy.
Extra Tips:
When selecting Manchego cheese, look for a reputable brand that offers a cheese aged for at least 6 months for a fuller flavor. If you prefer a milder taste, opt for a younger Manchego.
For an added touch, garnish the platter with a few fresh mint leaves or some sliced almonds, which complement the flavors beautifully. Finally, verify that the membrillo is firm enough to slice but not too hard; if it’s too firm, you can slightly warm it up in the microwave for a few seconds to soften it.
Enjoy this Spanish delicacy with a glass of sherry or a crisp white wine to enhance the experience.