

Traveling through Spain left me with a treasure trove of flavors and memories that I just can’t shake. The aroma of saffron and the comforting sizzle of garlic instantly take me back to those lively kitchens filled with warmth and joy. Spanish cuisine is all about heart, soul, and bringing people together around the table. From the vibrant Paella Valenciana to the sweet delight of Churros with Chocolate, each recipe in this list captures the comforting essence of Spain. Get ready to explore these homestyle Spanish comfort food recipes that everyone craves.
Classic Paella Valenciana
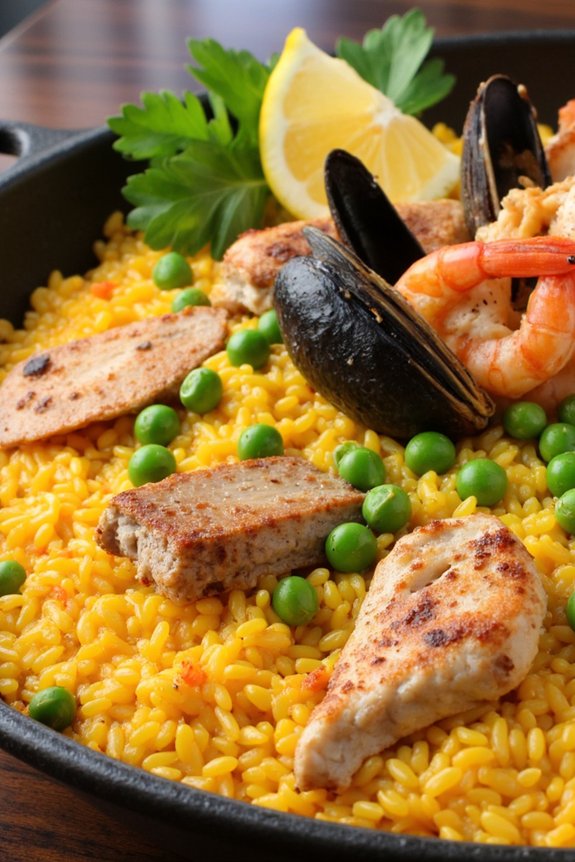
Classic Paella Valenciana is a traditional Spanish dish that hails from the region of Valencia. Known for its vibrant colors and robust flavors, this iconic dish combines a variety of meats, seafood, and vegetables to create a harmonious and satisfying meal. At the heart of Paella Valenciana is the unique blend of saffron-spiked rice that absorbs the rich flavors of the other ingredients as it cooks.
The dish is traditionally prepared in a wide, shallow pan over an open flame, which helps to develop the signature crispy rice layer, known as “socarrat,” at the bottom. Cooking Paella Valenciana isn’t just about following a recipe; it’s about embracing the spirit of Spanish cooking — gathering family and friends, enjoying the process, and savoring every bite.
This recipe will guide you through making a Paella Valenciana that serves 4-6 people, guaranteeing you achieve the perfect balance of textures and flavors. Whether you’re hosting a dinner party or simply want to bring a taste of Spain to your kitchen, this recipe is sure to impress.
Ingredients (Serves 4-6)
- 1/4 cup olive oil
- 1 onion, finely chopped
- 4 cloves garlic, minced
- 1 red bell pepper, chopped
- 1 green bell pepper, chopped
- 2 tomatoes, peeled and chopped
- 1 teaspoon paprika
- 1/2 teaspoon saffron threads
- Salt and pepper to taste
- 2 cups Bomba or Arborio rice
- 4 cups chicken broth
- 1/2 cup dry white wine
- 1/2 pound chicken thighs, cut into chunks
- 1/2 pound rabbit, cut into chunks
- 1/2 pound shrimp, deveined and peeled
- 1/2 pound mussels, cleaned
- 1/2 cup peas
- 1 lemon, cut into wedges
- Fresh parsley, chopped for garnish
Cooking Instructions
- Prepare the Pan: Heat the olive oil in a large paella pan over medium heat. Add the chopped onion and garlic, sautéing until they become translucent.
- Cook the Vegetables: Add the red and green bell peppers to the pan and cook for 5 minutes until they begin to soften. Stir in the chopped tomatoes, paprika, saffron threads, salt, and pepper. Cook for an additional 5 minutes until the tomatoes break down into a sauce.
- Add the Meats: Increase the heat to medium-high and add the chicken thighs and rabbit pieces to the pan. Cook until the meats are browned on all sides.
- Incorporate the Rice: Stir in the rice, making sure it’s well-coated with the tomato mixture. Pour in the chicken broth and white wine, stirring to combine all ingredients. Bring to a boil, then reduce the heat to a gentle simmer.
- Simmer the Paella: Allow the paella to cook uncovered for about 15 minutes, stirring occasionally to make sure the rice cooks evenly and absorbs the liquid.
- Add Seafood and Peas: Arrange the shrimp and mussels on top of the rice, along with the peas. Cover the pan with a lid or foil and cook for another 10 minutes or until the seafood is cooked through and the mussels have opened.
- Develop the Socarrat: Increase the heat to high for the last 2-3 minutes to create the crispy socarrat layer at the bottom of the pan. Be sure not to stir during this process.
- Garnish and Serve: Remove the paella from the heat and let it rest for a few minutes. Garnish with lemon wedges and chopped parsley before serving.
Extra Tips
For the best results, use a paella pan if possible, as its wide, flat surface is ideal for evenly cooking the rice and achieving the sought-after socarrat. If you don’t have a paella pan, a large, shallow frying pan can be used as a substitute.
Hearty Spanish Cocido
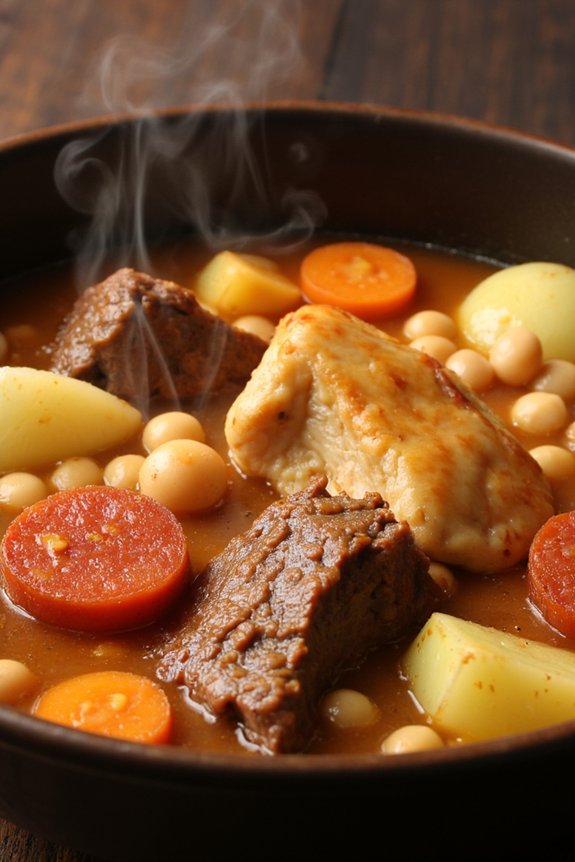
Cocido is a traditional Spanish stew that’s the epitome of comfort food, perfect for gathering family and friends around the dining table. This hearty dish is a staple in Spanish households, especially during the cooler months, and is known for its rich flavors and nourishing qualities. Cocido typically combines a variety of meats, chickpeas, and vegetables, simmered to perfection to create a meal that’s both satisfying and delicious.
Each region in Spain has its own variation of cocido, but the essence remains the same—a warm, comforting stew that speaks to the heart and soul of Spanish cuisine.
This recipe for hearty Spanish cocido is designed to serve 4-6 people, making it an ideal choice for a cozy family dinner or a small gathering. The process involves slowly cooking the ingredients to allow the flavors to meld together beautifully, resulting in a dish that’s as aromatic as it’s tasty. This cocido recipe includes a selection of meats such as beef, chicken, and chorizo, along with an assortment of vegetables and spices that create a robust and savory flavor profile.
Ingredients:
- 1 lb (450g) beef shank or stewing beef
- 1 lb (450g) chicken thighs or drumsticks
- 8 oz (225g) Spanish chorizo, sliced
- 1 cup (200g) dried chickpeas, soaked overnight
- 4 medium potatoes, peeled and quartered
- 3 carrots, peeled and sliced
- 1 large onion, quartered
- 1 leek, cleaned and sliced
- 1 small cabbage, cut into wedges
- 4 cloves garlic, minced
- 2 bay leaves
- 1 teaspoon sweet paprika
- Salt and pepper to taste
- 8 cups (2 liters) water or chicken broth
- Olive oil for sautéing
Cooking Instructions:
- Prepare the Ingredients: Begin by soaking the chickpeas overnight in cold water. Drain and set aside. Peel and chop the vegetables as directed, and set them aside along with the sliced chorizo.
- Sear the Meats: In a large pot, heat a drizzle of olive oil over medium-high heat. Add the beef shank and chicken pieces, searing them on all sides until browned. Remove the meats from the pot and set aside.
- Cook the Aromatics: In the same pot, add the onion, leek, and garlic. Sauté for a few minutes until the onion becomes translucent and fragrant.
- Build the Stew: Return the beef and chicken to the pot, along with the sliced chorizo. Add the drained chickpeas, carrots, potatoes, cabbage, and bay leaves. Season with paprika, salt, and pepper.
- Add Liquid: Pour in the water or chicken broth, ensuring all ingredients are submerged. Bring the mixture to a boil over high heat.
- Simmer: Once boiling, reduce the heat to low and cover the pot. Allow the stew to simmer gently for about 2 to 3 hours, or until the meats are tender and the chickpeas are fully cooked.
- Adjust Seasoning: Taste the cocido and adjust seasoning with additional salt and pepper if necessary. If the stew is too thick, you can add more water or broth to reach your desired consistency.
- Serve: Ladle the cocido into bowls, ensuring each serving has a generous portion of meat, vegetables, and broth. Serve hot, accompanied by crusty bread for soaking up the flavorful broth.
Extra Tips:
When preparing cocido, patience is key. The slow cooking process is essential for developing the deep flavors that define this dish.
If time permits, consider making cocido a day in advance, as it often tastes even better the next day after the flavors have had a chance to meld further. Additionally, feel free to customize the recipe by adding other vegetables or meats based on personal preferences or regional variations. Cocido is a versatile dish that can adapt to whatever ingredients you have on hand, making it a perfect showcase for the essence of home-cooked Spanish cuisine.
Sizzling Gambas Al Ajillo
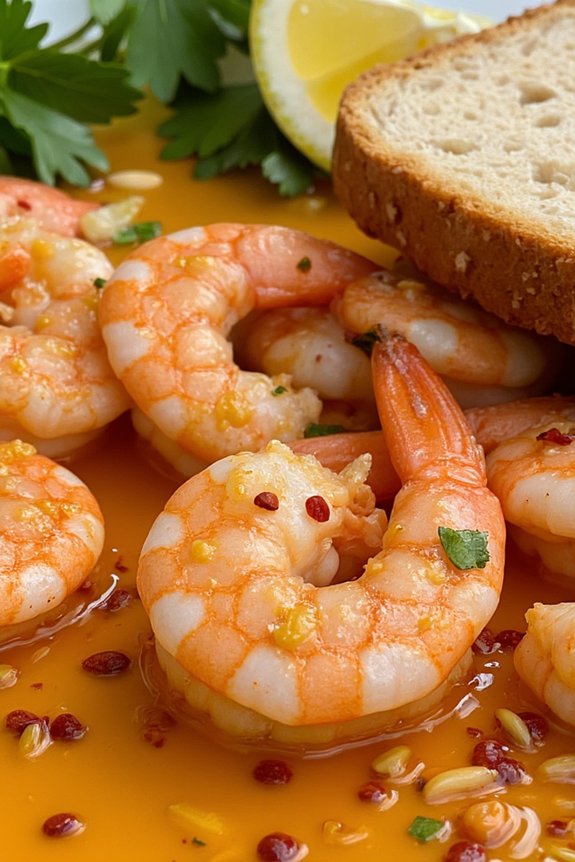
Sizzling Gambas Al Ajillo is a classic Spanish tapas dish that brings the vibrant flavors of Spain right to your kitchen. This dish, known for its succulent shrimp and aromatic garlic, is the perfect comfort food for any occasion.
Originating from the coastal regions of Spain, Gambas Al Ajillo combines the freshness of seafood with the warmth of garlic-infused olive oil, creating a delightful and aromatic experience. Whether you’re preparing it for a family dinner or a gathering with friends, this dish is sure to impress with its simplicity and flavor.
The beauty of Gambas Al Ajillo lies in its minimal ingredients and quick preparation time, making it an ideal choice for those who love to cook but are short on time. The key to this dish is using fresh shrimp and good quality olive oil, which together create a rich and savory sauce that perfectly complements the tender shrimp.
Served typically with crusty bread, this dish allows you to soak up every final drop of the flavorful sauce. With a few simple steps, you can bring the taste of Spain to your table and enjoy a meal that’s both comforting and satisfying.
Ingredients (Serves 4-6):
- 1 pound large shrimp, peeled and deveined
- 6 cloves garlic, thinly sliced
- 1/2 cup extra virgin olive oil
- 1 teaspoon red pepper flakes
- 1/4 cup dry white wine
- Salt to taste
- Freshly ground black pepper to taste
- 2 tablespoons chopped fresh parsley
- 1 lemon, cut into wedges
- Crusty bread, for serving
Cooking Instructions:
- Prepare the Shrimp: Rinse the shrimp under cold water and pat them dry with paper towels. Make certain they’re completely dry to prevent splattering during cooking.
- Heat the Oil: In a large skillet, heat the olive oil over medium heat. Add the sliced garlic and sauté until it becomes fragrant and just starts to turn golden brown. Be careful not to burn the garlic.
- Add the Shrimp: Increase the heat to medium-high and add the shrimp to the skillet. Sprinkle the red pepper flakes over the shrimp and season with salt and pepper. Stir the shrimp occasionally to guarantee even cooking.
- Incorporate the Wine: Once the shrimp begin to turn pink, pour in the white wine. Allow it to simmer for about 2-3 minutes, letting the alcohol evaporate and the flavors meld together.
- Finish the Dish: Once the shrimp are fully cooked and opaque, remove the skillet from the heat. Sprinkle the chopped parsley over the top and give everything a final stir to combine.
- Serve: Transfer the shrimp and sauce to a serving dish. Serve immediately with lemon wedges on the side and crusty bread for dipping.
Extra Tips:
When cooking Sizzling Gambas Al Ajillo, it’s important to keep an eye on the garlic to prevent it from burning, as it can quickly turn bitter.
If you prefer a milder garlic flavor, you can remove the garlic slices from the oil once they’re golden and set them aside, then add them back in at the end. For a spicier kick, consider adding more red pepper flakes according to your taste.
Ultimately, choosing a high-quality extra virgin olive oil will enhance the overall flavor of this dish, making it even more authentic and delicious.
Rustic Tortilla Española
The Tortilla Española, also known as Spanish omelette, is a traditional dish that captures the essence of homestyle Spanish comfort food. This rustic version of the classic dish is simple yet flavorful, made with the quintessential ingredients of potatoes and eggs. The dish is perfect for any meal, whether it’s breakfast, lunch, or dinner, and it pairs wonderfully with a fresh salad or a side of crusty bread.
In this recipe, we’re aiming for a golden-brown crust on the outside and a soft, tender interior. Traditionally, a Tortilla Española is cooked using a pan on the stovetop, but with this recipe, you’ll learn how to achieve the perfect texture and flavor. The key to a great Tortilla Española is patience and attention to detail when cooking the potatoes and onions. The potatoes should be cooked until tender yet not too crispy, allowing them to meld beautifully with the beaten eggs.
This recipe serves 4-6 people, making it an ideal dish for family gatherings or a cozy dinner with friends.
Ingredients for 4-6 servings:
- 6 large eggs
- 4 medium potatoes
- 1 large onion
- 1 cup olive oil
- Salt, to taste
- Freshly ground black pepper, to taste
Cooking Instructions:
- Prepare the Ingredients: Peel the potatoes and cut them into thin, even slices. Peel and thinly slice the onion. Crack the eggs into a large bowl, season with salt and pepper, and beat them until well combined.
- Cook the Potatoes and Onions: In a large non-stick frying pan, heat the olive oil over medium heat. Add the sliced potatoes and onions to the pan, making sure they’re fully submerged in the oil. Cook slowly, stirring occasionally, until the potatoes are tender and the onions are soft, about 15-20 minutes. Use a slotted spoon to remove them from the oil and drain on paper towels.
- Combine with Eggs: Allow the potatoes and onions to cool slightly, then add them to the bowl of beaten eggs. Stir gently to make sure everything is well-coated with the egg mixture.
- Cook the Tortilla: Heat a tablespoon of olive oil in a clean frying pan over medium heat. Pour the egg, potato, and onion mixture into the pan, spreading it out evenly. Reduce the heat to medium-low and cook for about 8-10 minutes, or until the edges are set and the bottom is golden brown.
- Flip the Tortilla: Place a large plate over the frying pan, carefully invert the pan to flip the tortilla onto the plate. Slide the tortilla back into the pan, uncooked side down. Cook for another 5 minutes until the tortilla is set and golden on both sides.
- Serve: Remove the tortilla from the pan and let it cool slightly before slicing. Serve warm or at room temperature.
Extra Tips:
For the best results, use a good quality non-stick frying pan to prevent the tortilla from sticking and breaking apart. It’s essential to cook the potatoes and onions slowly to guarantee they absorb the flavors of the oil and become tender.
If you’re feeling adventurous, you can add additional ingredients such as red peppers or chorizo for extra flavor. Remember to be careful when flipping the tortilla to avoid spilling the contents. Enjoy your Rustic Tortilla Española with a drizzle of olive oil or a sprinkle of chopped parsley for a touch of freshness.
Flavorful Patatas Bravas
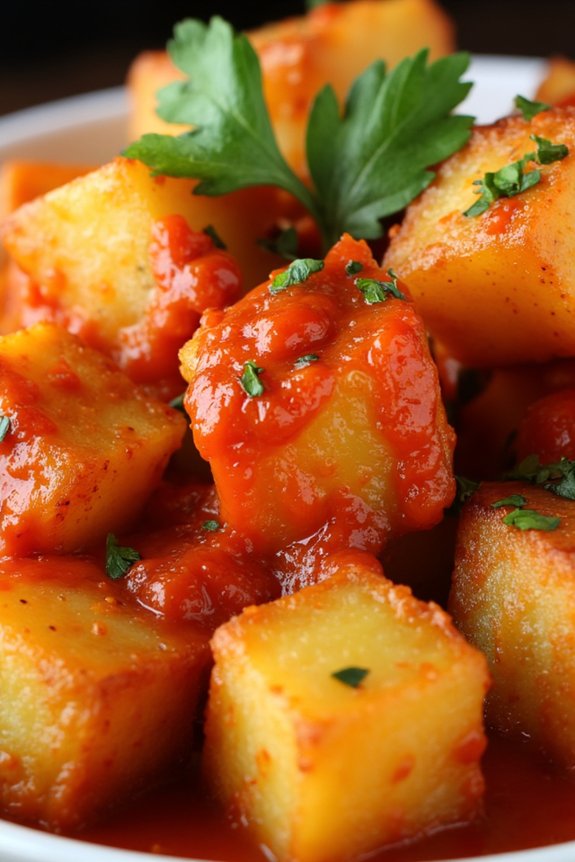
Patatas Bravas is a quintessential Spanish comfort food that brings warmth and satisfaction to any table. This dish consists of crispy, fried potatoes paired with a spicy, tangy tomato sauce that’s simply irresistible. Originating from Madrid, Patatas Bravas is a staple in tapas bars across Spain and is beloved for its simplicity and bold flavors. The combination of the crunchy potatoes and the rich, spicy sauce makes it a perfect appetizer or side dish to complement a variety of meals.
Preparing Patatas Bravas at home isn’t only rewarding but also allows you to enjoy an authentic taste of Spain without leaving your kitchen. The key to this dish lies in the perfect balance between the crispy texture of the potatoes and the robust character of the bravas sauce. While the ingredients are straightforward, attention to detail and a few cooking techniques will guarantee your dish is as delightful as the ones served in Spanish tapas bars. This recipe serves 4-6 people, making it ideal for sharing with friends and family.
Ingredients:
- 4 large potatoes
- 1/4 cup olive oil
- Salt to taste
- 1 teaspoon smoked paprika
- 1/2 teaspoon cayenne pepper
- 1 can (14 oz) crushed tomatoes
- 1 small onion, finely chopped
- 2 cloves garlic, minced
- 1 tablespoon red wine vinegar
- 1 tablespoon sugar
- Fresh parsley, chopped (for garnish)
Instructions:
- Prepare the Potatoes:
- Peel the potatoes and cut them into 1-inch cubes. Rinse the cubes under cold water to remove excess starch, and then pat them dry with a kitchen towel.
- Fry the Potatoes:
- In a large skillet, heat the olive oil over medium-high heat. Once the oil is hot, add the potato cubes in a single layer. Fry them for about 10-15 minutes, turning occasionally, until they’re golden brown and crispy on all sides. Remove the potatoes from the skillet and drain them on a paper towel-lined plate. Season with salt and set aside.
- Prepare the Bravas Sauce:
- In the same skillet, reduce the heat to medium and add the finely chopped onion. Sauté for about 3-4 minutes until the onion is soft and translucent. Add the minced garlic and cook for another minute until fragrant.
- Stir in the smoked paprika and cayenne pepper, and cook for 30 seconds to release their flavors. Add the crushed tomatoes, red wine vinegar, and sugar. Stir everything together and let the sauce simmer for about 10 minutes, allowing it to thicken slightly.
- Combine and Serve:
- Once the sauce has thickened, taste it and adjust the seasoning if necessary. Transfer the fried potatoes to a serving dish and generously spoon the bravas sauce over the top. Garnish with freshly chopped parsley.
Extra Tips:
For the crispiest potatoes, make sure they’re thoroughly dried before frying, as moisture can prevent them from achieving a perfect golden crust. If you prefer a milder sauce, adjust the amount of cayenne pepper to suit your taste. Additionally, using a high-quality olive oil will enhance the overall flavor of the dish.
For an added twist, you can serve Patatas Bravas with a side of aioli or a dollop of sour cream to balance the spice. Enjoy your homemade Patatas Bravas with friends as a delightful starter or a satisfying side dish!
Savory Albondigas in Tomato Sauce
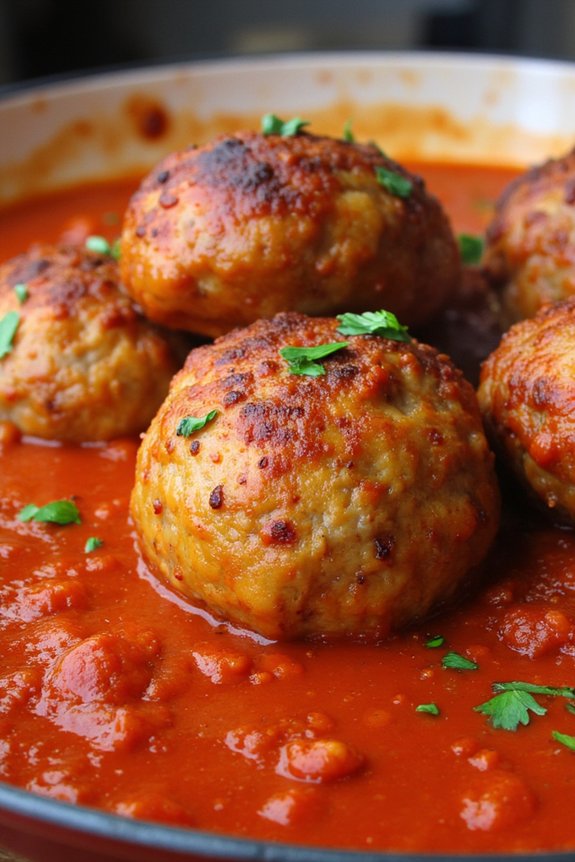
Albondigas, or Spanish meatballs, are a quintessential comfort food hailing from Spain. These tender meatballs, infused with a blend of spices and herbs, are simmered in a rich tomato sauce that brings warmth and coziness to any table. The dish is perfect for a family gathering or a simple weeknight dinner, offering a delightful balance of flavors that are both satisfying and comforting.
The combination of juicy meatballs and a savory sauce creates a harmony that’s both hearty and delicious, making it a favorite in Spanish cuisine. The key to perfect Albondigas lies in the careful seasoning of the meatballs and the slow simmering of the sauce. Using a mixture of beef and pork provides a depth of flavor and a tender, juicy texture to the meatballs.
The tomato sauce, spiced with garlic and paprika, complements the savory meat, creating a dish that’s rich in taste and aroma. This recipe serves 4-6 people, making it an ideal choice for sharing with friends and family. Let’s explore the ingredients and steps needed to bring this Spanish classic to your table.
Ingredients (Serves 4-6):
- 500g ground beef
- 500g ground pork
- 1 cup bread crumbs
- 2 large eggs
- 1/4 cup milk
- 4 cloves garlic, minced
- 1 small onion, finely chopped
- 1 teaspoon dried oregano
- 1 teaspoon smoked paprika
- Salt and pepper to taste
- 3 tablespoons olive oil
- 1 can (400g) crushed tomatoes
- 1/2 cup beef broth
- 1 bay leaf
- Fresh parsley, chopped (for garnish)
Cooking Instructions:
- Prepare the Meatball Mixture: In a large mixing bowl, combine ground beef, ground pork, bread crumbs, eggs, milk, half of the minced garlic, onion, oregano, smoked paprika, salt, and pepper. Mix everything together with your hands or a spatula until all ingredients are well incorporated.
- Form the Meatballs: Roll the mixture into small balls, about 1 inch in diameter. Place the meatballs on a baking sheet or plate as you go, ensuring they’re evenly sized for consistent cooking.
- Brown the Meatballs: In a large skillet or Dutch oven, heat the olive oil over medium heat. Add the meatballs in batches and cook until browned on all sides, about 5-7 minutes. Remove the meatballs from the skillet and set them aside.
- Prepare the Tomato Sauce: In the same skillet, add the remaining minced garlic and sauté for about 1 minute until fragrant. Pour in the crushed tomatoes and beef broth, stirring to combine. Add the bay leaf, salt, and pepper. Bring the sauce to a gentle simmer.
- Simmer the Meatballs: Return the browned meatballs to the skillet with the tomato sauce. Cover and let them simmer on a low heat for about 30 minutes, allowing the flavors to meld together and the meatballs to cook through.
- Serve: Once the meatballs are cooked, remove the bay leaf. Garnish with fresh parsley before serving. Serve the Albondigas hot, with crusty bread or over a bed of rice.
Extra Tips:
For the best flavor, allow the meatball mixture to sit in the refrigerator for about 30 minutes before forming the meatballs. This helps the flavors to meld and makes the mixture easier to handle.
If you prefer a spicier sauce, feel free to add a pinch of red pepper flakes to the tomato sauce. Additionally, the meatballs can be prepared ahead of time and stored in the refrigerator for up to a day before cooking, making this dish a great option for meal prep.
Creamy Seafood Risotto
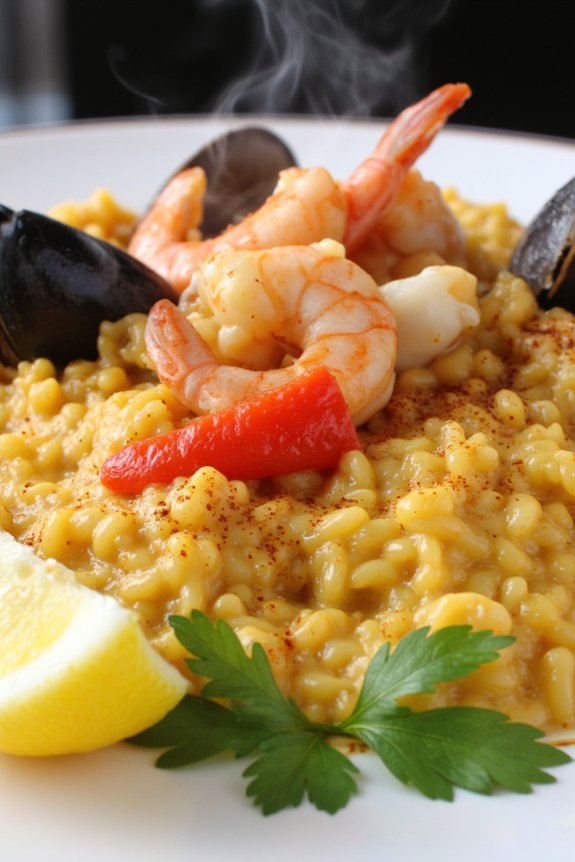
If you’re seeking a comforting and luxurious dish that embodies the rich flavors of Spanish cuisine, search no longer than Creamy Seafood Risotto. This dish melds the delicate flavors of the sea with the creamy, indulgent texture of risotto, creating a meal that’s both sophisticated and soul-warming. The combination of fresh seafood, aromatic vegetables, and creamy rice makes this a delightful choice for a special dinner or an everyday treat that will transport you to the coasts of Spain with every bite.
Ideal for serving 4-6 people, this recipe is perfect for gatherings or a family meal. Whether you’re a seasoned cook or a novice in the kitchen, this step-by-step recipe guarantees a delicious outcome that your guests will savor. The key to a perfect risotto lies in the gradual incorporation of liquid and constant stirring, which releases the starches for that creamy consistency.
Let’s plunge into the ingredients and steps to create this delectable dish.
Ingredients:
- 1 pound mixed seafood (shrimp, mussels, clams, and squid)
- 2 cups Arborio rice
- 6 cups seafood stock
- 1 cup dry white wine
- 1 onion, finely chopped
- 2 cloves garlic, minced
- 1 red bell pepper, diced
- 1 teaspoon smoked paprika
- 1/4 teaspoon saffron threads
- 1/4 cup grated Parmesan cheese
- 3 tablespoons olive oil
- Salt and pepper to taste
- Fresh parsley, chopped, for garnish
- Lemon wedges for serving
Cooking Instructions:
- Prepare the Seafood: Rinse the seafood under cold water. If using shrimp, peel and devein them. Clean the mussels and clams, discarding any that remain open after tapping them. Cut the squid into rings. Pat all the seafood dry with a paper towel.
- Sauté the Aromatics: In a large pan, heat 2 tablespoons of olive oil over medium heat. Add the onion and cook until translucent, about 3-4 minutes. Add the garlic and red bell pepper, cooking for another 2 minutes until fragrant.
- Toast the Rice: Add the Arborio rice to the pan, stirring constantly for about 2 minutes until the rice is lightly toasted. This step is essential for developing the flavor and texture of the risotto.
- Deglaze with Wine: Pour in the white wine and stir until it’s mostly absorbed, scraping up any bits from the bottom of the pan to enhance the flavor.
- Add Broth Gradually: Warm the seafood stock in a separate saucepan. Add a ladleful of stock to the rice, stirring constantly until absorbed. Continue adding stock, one ladle at a time, allowing each to be absorbed before adding the next. This process should take about 18-20 minutes, and the rice should be almost cooked through.
- Season and Add Saffron: Stir in the smoked paprika, saffron threads, and a pinch of salt and pepper. This will impart the vibrant color and distinct flavor characteristic of Spanish cuisine.
- Cook the Seafood: In a separate pan, heat the remaining tablespoon of olive oil over medium-high heat. Add the seafood and cook for 3-4 minutes until just cooked through. The shrimp should be pink, and the mussels and clams should open.
- Combine and Finish: Add the cooked seafood to the risotto, gently folding it in. Stir in the Parmesan cheese, which will add creaminess and depth of flavor. Adjust seasoning with salt and pepper to taste.
- Serve: Garnish with fresh parsley and serve with lemon wedges on the side. The acidity of the lemon will balance the rich flavors of the dish.
Extra Tips:
For the best results, use high-quality seafood that’s as fresh as possible. If you can’t find fresh seafood, frozen seafood can be a good alternative—just confirm it’s properly thawed before cooking.
Remember that the key to a creamy risotto is patience and gradual incorporation of liquid, which might require some practice but is worth the effort. Additionally, feel free to experiment by adding other vegetables or herbs to customize the dish to your liking.
Traditional Gazpacho Andaluz
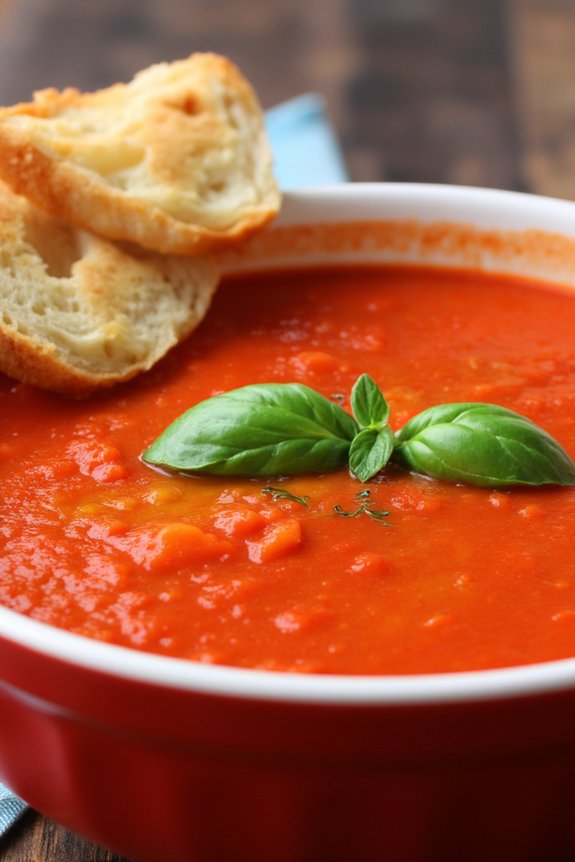
Gazpacho Andaluz is a revitalizing and vibrant cold soup that hails from Andalusia, a region in southern Spain. This traditional dish is an ideal way to cool down during the hot summer months while enjoying the rich flavors of ripe tomatoes, crisp cucumbers, and fresh bell peppers.
The key to a truly authentic Gazpacho Andaluz lies in using the freshest produce available, allowing the natural flavors to shine through. This recipe is simple, yet it captures the essence of Spanish cuisine, combining a few humble ingredients to create a dish that’s both satisfying and nourishing.
The beauty of Gazpacho Andaluz is its versatility. It can be served as a starter, a light lunch, or even as an invigorating beverage. The soup is traditionally served chilled, often accompanied by garnishes such as croutons, diced vegetables, or a drizzle of olive oil.
It’s best prepared a few hours in advance to allow the flavors to meld together, resulting in a harmonious blend of taste and texture. This recipe serves 4-6 people, making it perfect for a family meal or a small gathering with friends.
Ingredients:
- 6 ripe tomatoes, peeled and chopped
- 1 cucumber, peeled and chopped
- 1 green bell pepper, chopped
- 1 small red onion, chopped
- 2 cloves garlic
- 3 tablespoons olive oil
- 2 tablespoons red wine vinegar
- 2 cups cold water
- Salt, to taste
- Freshly ground black pepper, to taste
- Bread, for serving (optional)
- Olive oil, for drizzling (optional)
- Fresh herbs, for garnish (optional)
Instructions:
- Prepare the Vegetables: Begin by peeling and chopping the tomatoes, cucumber, and green bell pepper. Place them in a large mixing bowl. Add the chopped red onion and the peeled garlic cloves to the bowl as well.
- Blend the Ingredients: Transfer the prepared vegetables to a blender or food processor. Add the olive oil, red wine vinegar, and cold water. Blend the mixture until smooth and creamy. Depending on your preference, you can adjust the thickness by adding more water if necessary.
- Season the Soup: Taste the gazpacho and season it with salt and freshly ground black pepper according to your preference. Blend again for a few seconds to confirm the seasoning is evenly distributed throughout the soup.
- Chill the Soup: Pour the gazpacho into a large bowl or pitcher and refrigerate for at least 2 hours, allowing the flavors to develop and the soup to chill thoroughly.
- Serve the Gazpacho: When ready to serve, stir the gazpacho well and pour it into individual bowls or glasses. For added texture and flavor, consider garnishing with a drizzle of olive oil, fresh herbs, or croutons. Serve with slices of crusty bread on the side, if desired.
Extra Tips:
For the best results, use ripe, high-quality tomatoes as they’re the cornerstone of this dish. If you have time, prepare the gazpacho a day in advance to allow the flavors to deepen and meld together.
If you prefer a smoother texture, strain the soup through a fine mesh sieve after blending to remove any remaining pulp or seeds. Adjust the vinegar and garlic to suit your taste, as these ingredients can greatly impact the soup’s flavor profile.
Ultimately, consider experimenting with different garnishes to personalize the dish to your liking.
Mouthwatering Pollo Al Ajillo
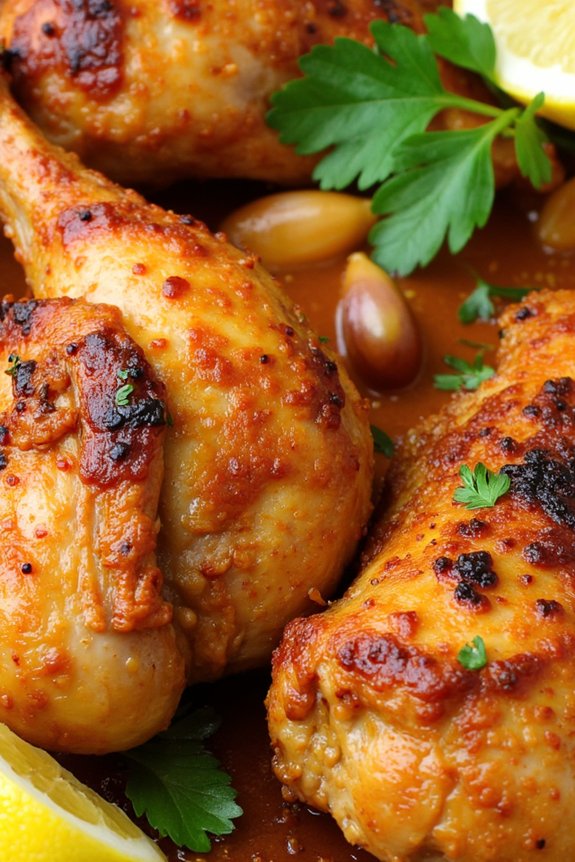
Pollo Al Ajillo is a classic Spanish dish that brings comfort and warmth to any meal. With its roots in traditional Spanish cuisine, this dish highlights the simplicity and richness of garlic-infused chicken. The key to Pollo Al Ajillo lies in its aromatic garlic sauce, which envelops tender pieces of chicken, creating a delightful harmony of flavors.
Perfect for a family meal or a cozy night in, this dish is sure to become a favorite in your culinary repertoire. This recipe serves 4-6 people and is ideal for those seeking a taste of Spain without leaving their kitchen. The preparation is straightforward, and the ingredients are likely to be found in your pantry or easily sourced from your local grocery store.
The result is a dish that’s both satisfying and deeply flavorful, capturing the essence of traditional Spanish home cooking. Whether you’re a novice or an experienced cook, Pollo Al Ajillo is a rewarding dish to prepare.
Ingredients:
- 1 whole chicken, cut into pieces (or 4-6 chicken thighs)
- Salt and freshly ground black pepper
- 6 tablespoons olive oil
- 10 cloves garlic, peeled and smashed
- 1 cup dry white wine
- 1/4 cup chicken broth
- 2 tablespoons fresh lemon juice
- 2 tablespoons chopped fresh parsley
- Lemon wedges for serving
Cooking Instructions:
- Prepare the Chicken: Season the chicken pieces generously with salt and freshly ground black pepper on all sides. Set aside while you prepare the other ingredients.
- Heat the Oil: In a large skillet or frying pan, heat the olive oil over medium-high heat. Once the oil is hot, add the smashed garlic cloves and sauté until they’re golden brown and fragrant, about 2 minutes. Be careful not to burn the garlic.
- Brown the Chicken: Add the seasoned chicken pieces to the skillet, skin-side down. Cook for about 5-7 minutes on each side, or until the chicken is browned and crispy. You might need to do this in batches to avoid overcrowding the pan.
- Deglaze the Pan: Once the chicken is browned, remove it from the skillet and set aside. Pour off any excess oil from the pan, leaving behind about 1 tablespoon. Add the white wine, scraping up any browned bits from the bottom of the pan. Let the wine simmer for about 2 minutes.
- Simmer the Chicken: Return the chicken to the skillet, skin-side up. Add the chicken broth and lemon juice, and bring the mixture to a simmer. Cover the skillet and cook for about 20-25 minutes, or until the chicken is cooked through and tender.
- Finish with Parsley: Remove the cover and increase the heat to medium-high. Cook for an additional 5 minutes to allow the sauce to thicken slightly. Sprinkle the chopped parsley over the chicken and stir to combine.
- Serve: Transfer the chicken to a serving platter, spooning the garlic sauce over the top. Garnish with lemon wedges and additional parsley if desired.
Extra Tips:
For an even deeper flavor, marinate the chicken pieces in the salt, pepper, and a little olive oil for an hour before cooking. This allows the seasoning to penetrate the meat, enhancing the overall taste.
If you prefer a thicker sauce, add a teaspoon of cornstarch mixed with a tablespoon of water to the sauce during the final simmering stage. Finally, serve Pollo Al Ajillo with crusty bread or roasted potatoes to soak up the delicious garlic sauce.
Authentic Churros With Chocolate

Authentic Churros With Chocolate offer a taste of traditional Spanish street food that can be made right in your own kitchen. These delightful fried dough pastries are perfectly crisp on the outside and soft on the inside, making them an irresistible treat for both kids and adults alike.
Pair them with a rich and velvety chocolate sauce for dipping, and you’ve got a comforting, sweet indulgence that’s perfect for a cozy night in or a festive gathering.
Making churros at home is surprisingly simple and requires only a few basic ingredients. The key to achieving the perfect churro is in the dough’s consistency and the temperature of the oil. Once you’ve mastered these, you’ll be able to whip up a batch of these delicious treats anytime.
The accompanying chocolate sauce is made from high-quality dark chocolate, guaranteeing a decadent and satisfying contrast to the light and airy churros. This recipe serves 4-6 people, ideal for sharing with friends or family.
Ingredients for Churros:
- 1 cup water
- 2 1/2 tablespoons sugar
- 1/2 teaspoon salt
- 2 tablespoons vegetable oil
- 1 cup all-purpose flour
- Vegetable oil, for frying
- 1/2 cup sugar, for dusting
- 1 teaspoon ground cinnamon
Ingredients for Chocolate Sauce:
- 200g dark chocolate, chopped
- 1/2 cup heavy cream
- 1 tablespoon sugar
- 1/2 teaspoon vanilla extract
Instructions:
- Prepare the Churro Dough:
- In a medium saucepan, combine water, 2 1/2 tablespoons sugar, 1/2 teaspoon salt, and 2 tablespoons vegetable oil. Bring the mixture to a boil over medium heat, stirring until the sugar is dissolved.
- Remove the pan from the heat and stir in 1 cup of all-purpose flour until the mixture forms a smooth ball.
- Heat the Oil:
- Pour vegetable oil into a deep frying pan or pot to a depth of about 2 inches. Heat over medium-high heat until the oil reaches 375°F (190°C).
- Pipe and Fry the Churros:
- Transfer the dough to a piping bag fitted with a large star tip. Pipe strips of dough directly into the hot oil, cutting them with scissors to your preferred length.
- Fry the churros in batches, turning them occasionally, until golden brown and cooked through, about 2-3 minutes per side.
- Dust with Cinnamon Sugar:
- Remove the churros from the oil using a slotted spoon and drain on paper towels. In a separate bowl, mix 1/2 cup sugar with 1 teaspoon ground cinnamon. Roll the churros in the cinnamon sugar mixture to coat.
- Prepare the Chocolate Sauce:
- In a small saucepan, heat 1/2 cup heavy cream over low heat until it begins to simmer. Remove from heat and add the chopped dark chocolate, 1 tablespoon sugar, and 1/2 teaspoon vanilla extract. Stir until the chocolate is completely melted and the sauce is smooth.
- Serve:
- Serve the warm churros immediately with the chocolate sauce on the side for dipping.
Extra Tips:
To guarantee your churros are light and airy, don’t overmix the dough once the flour is added.
Also, maintaining the right oil temperature is vital to prevent the churros from absorbing too much oil and becoming greasy. Use a thermometer to keep the oil at a steady 375°F (190°C).
If the oil is too hot, the churros will brown too quickly on the outside while remaining raw inside. For a flavor twist, try adding a pinch of nutmeg or a few drops of almond extract to the dough.
Rich and Velvety Flan

Flan is a quintessential Spanish dessert that’s known for its rich, creamy texture and delightful caramel flavor. The smooth custard paired with a glossy caramel layer makes it a favorite comfort food that ends any meal on a sweet note. This recipe is perfect for those looking to create a traditional Spanish dessert at home, bringing a touch of culinary elegance with relatively simple ingredients.
Whether served at a family gathering or a dinner party, this flan is sure to impress with its luscious texture and delectable taste. The key to achieving the perfect flan lies in the careful preparation of the caramel and the gentle baking of the custard. By following this recipe, you’ll learn how to make a flan that isn’t only visually appealing but also melts in your mouth with each bite.
This recipe serves 4-6 people, making it an ideal dessert for sharing with friends and family. Gather your ingredients and get ready to begin a culinary journey to create a flan that’s as authentic as it’s delicious.
Ingredients:
- 1 cup granulated sugar
- 6 large eggs
- 1 can (14 ounces) sweetened condensed milk
- 1 can (12 ounces) evaporated milk
- 1 tablespoon pure vanilla extract
- 1/4 teaspoon salt
- Hot water (for the water bath)
Cooking Instructions:
- Prepare the Caramel: In a medium saucepan over medium heat, add the granulated sugar. Stir constantly until the sugar melts and turns a deep amber color. Be careful not to burn it. Quickly pour the caramel into a 9-inch round baking dish, tilting the dish to coat the bottom evenly. Set aside to let the caramel harden.
- Mix the Custard: In a large mixing bowl, whisk together the eggs, sweetened condensed milk, evaporated milk, vanilla extract, and salt until smooth and well combined. Confirm there are no lumps for a smooth custard texture.
- Combine and Pour: Pour the custard mixture over the hardened caramel in the baking dish. Use a fine-mesh sieve if needed to remove any remaining lumps for a silky finish.
- Prepare the Water Bath: Place the flan dish in a larger baking pan. Pour hot water into the larger pan until it reaches halfway up the sides of the flan dish. This water bath, or “bain-marie,” helps cook the flan evenly and prevent it from cracking.
- Bake the Flan: Preheat your oven to 350°F (175°C). Carefully place the baking dish setup in the oven. Bake for about 50-60 minutes, or until the flan is set around the edges but still slightly jiggly in the center.
- Cool and Chill: Remove the flan from the oven and let it cool to room temperature. Once cooled, cover it with plastic wrap and refrigerate for at least 4 hours, or overnight, to allow it to fully set.
- Serve: To serve, run a knife around the edge of the flan to loosen it. Place a serving plate over the baking dish and carefully invert it to release the flan. The caramel will flow over the top, creating a beautiful sauce.
Extra Tips:
When making caramel, it’s important to keep an eye on the sugar as it can go from perfectly amber to burnt very quickly. Use a stainless-steel saucepan to better judge the color of the caramel.
Additionally, make sure all your ingredients are at room temperature before mixing them to guarantee a smooth custard. If you notice bubbles forming on the custard’s surface during baking, gently tap the baking dish to release them.
Finally, patience is key; letting the flan chill thoroughly will make unmolding it easier and result in a firmer texture.
Comforting Fabada Asturiana
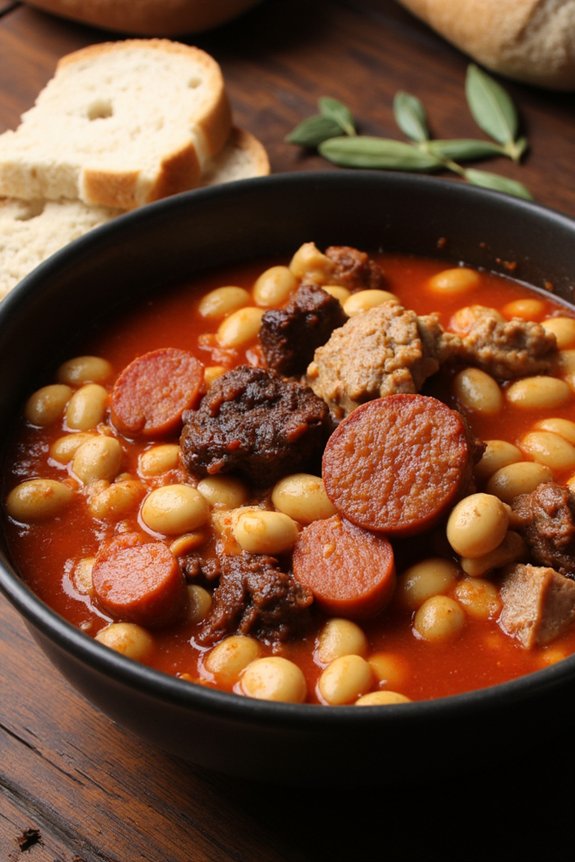
Fabada Asturiana is a rich and hearty bean stew from the Asturias region in Northern Spain. This classic Spanish dish is renowned for its delicious combination of white beans, smoky chorizo, morcilla (Spanish blood sausage), and succulent pork. The slow-cooked stew is perfect for cold days, offering a comforting warmth and a burst of flavor with every bite.
Traditionally, Fabada is enjoyed during the chilly months, making it a staple in Spanish comfort food cuisine. The dish is known for its simplicity, yet it delivers a complex array of flavors. The key to a good Fabada is using high-quality ingredients and giving the stew plenty of time to simmer, allowing the flavors to meld together beautifully.
This recipe serves 4-6 people, making it ideal for a family dinner or a gathering with friends. Whether you’re new to Spanish cuisine or a seasoned cook, Fabada Asturiana is sure to become a favorite.
Ingredients (Serves 4-6):
- 500g dried white beans (such as Asturian fabes or cannellini beans)
- 1 large onion, chopped
- 4 cloves garlic, minced
- 2 tablespoons olive oil
- 1 teaspoon paprika
- 1 bay leaf
- 200g chorizo sausage, sliced
- 200g morcilla (Spanish blood sausage), sliced
- 300g pork shoulder, cubed
- 1 ham bone or pork hock (optional for extra flavor)
- Salt and black pepper to taste
- Water or chicken stock (enough to cover the ingredients in the pot)
Instructions:
- Soak the Beans: The night before cooking, place the dried white beans in a large bowl and cover with cold water. Allow them to soak overnight. This will help soften the beans and reduce cooking time.
- Prepare the Ingredients: On the day of cooking, drain and rinse the soaked beans. Chop the onion and mince the garlic, then set them aside. Slice the chorizo and morcilla into thick pieces, and cube the pork shoulder.
- Sauté the Aromatics: In a large pot or Dutch oven, heat the olive oil over medium heat. Add the chopped onion and minced garlic, sautéing until the onion becomes translucent.
- Add the Meat and Spices: Stir in the paprika and bay leaf, then add the sliced chorizo, morcilla, and cubed pork shoulder. Cook for about 5 minutes, allowing the meats to brown slightly and release their flavors.
- Combine with Beans: Add the drained beans to the pot, stirring to combine with the other ingredients. If using a ham bone or pork hock, add it to the pot now.
- Simmer the Stew: Pour enough water or chicken stock into the pot to cover all the ingredients. Bring to a gentle boil, then reduce the heat to low. Cover the pot and let the stew simmer for about 2 to 2.5 hours, or until the beans are tender and the flavors are well developed. Stir occasionally and add more liquid if needed to keep the ingredients submerged.
- Season and Serve: Once the beans are tender, season the Fabada with salt and black pepper to taste. Remove the bay leaf and ham bone (if used) before serving. Enjoy the Fabada hot, accompanied by crusty bread.
Extra Tips:
For an authentic taste, try to source Asturian fabes, which are traditionally used in this dish and provide a creamy texture. If you can’t find morcilla, you can substitute with another type of blood sausage, though the flavor may differ slightly.
It’s important to let the Fabada rest for a few minutes after cooking to allow the flavors to meld even further. Reheating the stew the next day often enhances the flavors, making it a great make-ahead meal.