

I’m thrilled to introduce you to a journey through Spanish culture with these 15 festive recipes. Each dish is a delicious nod to tradition, from the iconic Paella Valenciana to the comforting Fabada Asturiana. Picture yourself enjoying small plates like Gambas Al Ajillo or indulging in sweet treats like Churros Con Chocolate. Curious about the stories behind these culinary delights? Let’s explore these flavorful dishes together!
Paella Valenciana
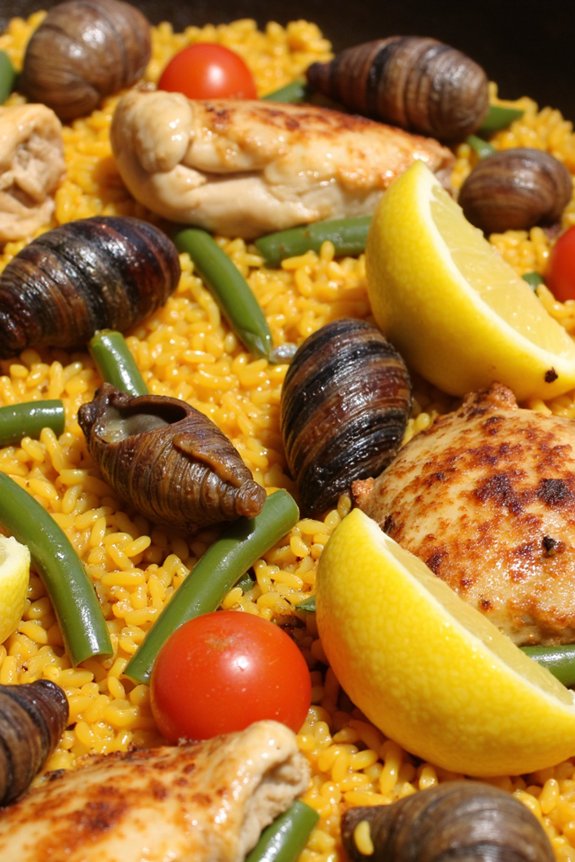
Paella Valenciana is a quintessential Spanish dish, renowned for its vibrant flavors and communal nature, making it perfect for festive gatherings. Originating from the Valencia region, this dish traditionally combines a variety of meats and vegetables with saffron-infused rice cooked in a wide, shallow pan. As a cultural staple, Paella Valenciana is often enjoyed as a celebratory meal, bringing people together around the table to share in the rich and diverse tastes of Spain.
To create an authentic Paella Valenciana, it’s essential to use the right ingredients and cooking techniques to capture its unique essence. The dish typically includes a mixture of rabbit, chicken, and sometimes snails, combined with fresh vegetables like green beans and tomatoes. The key to a successful paella is achieving the perfect socarrat, a crispy layer of caramelized rice at the bottom of the pan that adds a delightful texture and depth of flavor. Below is a detailed recipe for making Paella Valenciana, designed to serve 4-6 people.
Ingredients:
- 1/4 cup olive oil
- 1 pound chicken, cut into pieces
- 1 pound rabbit, cut into pieces
- 1/2 pound snails (optional)
- 1 cup green beans, trimmed
- 1 cup white beans, cooked
- 1 large ripe tomato, grated
- 1 teaspoon sweet paprika
- A pinch of saffron threads
- 4 cups chicken broth
- 2 cups Bomba rice or short-grain rice
- Salt and pepper to taste
- Lemon wedges for serving
Instructions:
- Prepare the Pan and Heat the Oil: Heat the olive oil in a large paella pan over medium-high heat. The pan should be wide and shallow to allow even cooking of the rice.
- Brown the Meat: Add the chicken and rabbit pieces to the pan. Season them with salt and pepper, and cook until they’re browned all over. This should take about 10 minutes. If using snails, add them to the pan once the meat is browned.
- Cook the Vegetables: Add the green beans to the pan and sauté for about 5 minutes. Then, add the grated tomato and cook until it reduces and thickens slightly.
- Incorporate Spices: Stir in the sweet paprika and saffron threads, guaranteeing they evenly coat the meat and vegetables. This will enhance the dish’s color and flavor.
- Add the Rice: Evenly distribute the rice in the pan, stirring it briefly to coat it with the oil and spices. This step is essential for even cooking.
- Pour in the Broth: Add the chicken broth to the pan. Bring the mixture to a gentle boil, then reduce the heat to a simmer. Don’t stir the rice after this point to allow the socarrat to form.
- Cook the Paella: Let the paella cook for about 20 minutes, or until the rice is tender and the broth is absorbed. If needed, adjust the heat to make sure the bottom doesn’t burn but develops a crisp layer.
- Rest and Serve: Remove the pan from the heat and cover it with a clean kitchen towel. Allow it to rest for 5-10 minutes before serving. Garnish with lemon wedges for an added zest.
Extra Tips:
Choosing the right type of rice is essential to achieving the authentic texture of Paella Valenciana. Bomba rice is preferred due to its ability to absorb liquid while maintaining its structure. If it’s unavailable, any short-grain rice will suffice.
Additionally, controlling the heat is key to forming the socarrat without burning the rice. Keep a close eye on the pan, especially in the last few minutes of cooking. Finally, resist the urge to stir the paella once the broth is added; this guarantees that the rice cooks evenly and the flavors meld beautifully.
Gambas Al Ajillo
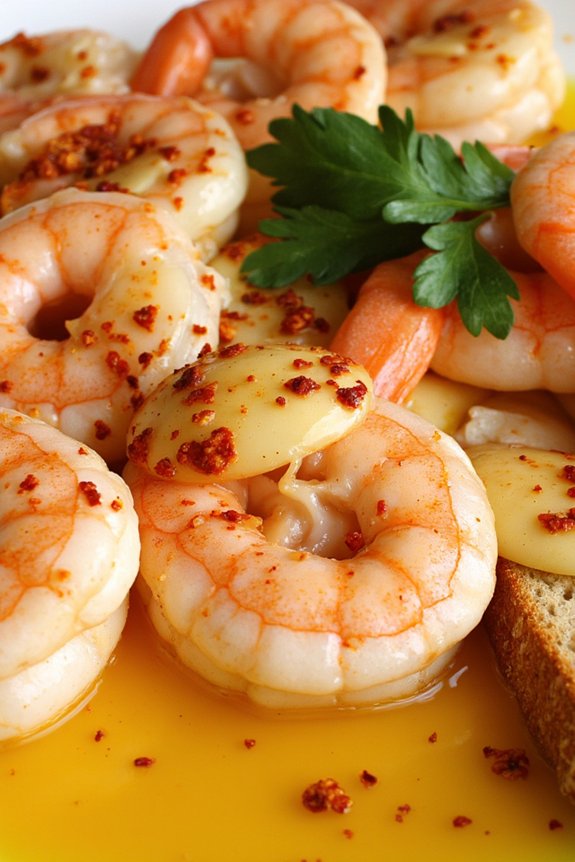
The beauty of Gambas Al Ajillo lies in its quick preparation and straightforward cooking process, making it an ideal choice for both novice and experienced cooks. The dish showcases the natural sweetness of shrimp, enhanced by the bold flavors of garlic and a hint of heat from red pepper flakes.
Served hot, often with crusty bread to soak up the flavorful oil, Gambas Al Ajillo is an irresistible appetizer or a light main course. Preparing this dish for 4-6 people requires only a handful of ingredients and minimal effort, yet it delivers a powerful punch of taste that captures the essence of Spanish cuisine.
Ingredients for 4-6 servings:
- 1 pound large shrimp, peeled and deveined
- 6 cloves garlic, thinly sliced
- 1/2 cup olive oil
- 1 teaspoon red pepper flakes
- 1 tablespoon lemon juice
- Salt, to taste
- 2 tablespoons fresh parsley, chopped
- Crusty bread, for serving
Cooking Instructions:
- Prepare the Ingredients: Begin by ensuring your shrimp are peeled, deveined, and patted dry. Slice the garlic cloves thinly and set aside. Chop the fresh parsley and prepare the lemon juice.
- Heat the Olive Oil: In a large skillet or frying pan, heat the olive oil over medium heat. Once the oil is shimmering, add the sliced garlic.
- Infuse the Oil: Allow the garlic to cook gently in the oil for about 1-2 minutes, or until it turns golden and fragrant. Be careful not to burn the garlic as it can become bitter.
- Cook the Shrimp: Add the shrimp to the skillet, making sure they’re in a single layer. Sprinkle the red pepper flakes over the shrimp and season with a pinch of salt. Cook the shrimp for about 2-3 minutes on one side.
- Flip the Shrimp: Turn the shrimp over and cook for another 2-3 minutes, or until they’re pink and opaque.
- Finish with Lemon Juice and Parsley: Once the shrimp are cooked through, remove the skillet from heat. Drizzle the lemon juice over the shrimp and sprinkle with chopped parsley.
- Serve Immediately: Transfer the shrimp and garlic oil to a serving dish and serve hot with slices of crusty bread.
Extra Tips: To enhance the flavors, consider adding a splash of white wine to the pan after cooking the garlic but before adding the shrimp. This will create a slightly more complex sauce.
Additionally, if you prefer a milder heat level, adjust the amount of red pepper flakes according to your taste. Always use fresh shrimp for the best texture and flavor, and don’t forget to serve this dish immediately to enjoy the shrimp at its peak tenderness.
Tortilla Española

Tortilla Española, also known as Spanish omelet, is a traditional dish from Spain, renowned for its simplicity and delightful flavor. It’s a versatile dish that can be served hot or cold, making it an excellent choice for parties, family gatherings, or even a simple meal at home.
The beauty of Tortilla Española lies in its basic ingredients, primarily eggs and potatoes, which come together to create a rich and satisfying dish. This classic Spanish recipe is often enjoyed as a tapa, but it can also serve as a hearty main course.
The preparation of Tortilla Española involves slow-cooking the potatoes and onions, which allows their flavors to meld beautifully. The eggs are then added, creating an omelet that’s both creamy and slightly crisp on the outside. This recipe serves 4-6 people, making it perfect for sharing.
While the traditional version only includes potatoes and onions, you can personalize it with additional ingredients like chorizo or peppers to suit your taste.
Ingredients (serving size: 4-6 people):
- 6 large eggs
- 5 medium potatoes
- 1 large onion
- 1 cup olive oil
- Salt, to taste
Cooking Instructions:
- Prepare the Ingredients:
- Peel the potatoes and slice them thinly, about 1/8 inch thick. Slice the onion thinly as well.
- Cook the Potatoes and Onions:
- In a large, non-stick frying pan, heat the olive oil over medium heat. Add the potatoes and onions, and gently stir to coat them in oil. Cook on low heat, stirring occasionally, for 25-30 minutes until the potatoes are tender but not browned. Season with salt to taste.
- Drain the Oil:
- Once the potatoes and onions are cooked, use a slotted spoon to transfer them to a bowl. Leave the oil in the pan, as it will be used for frying the tortilla.
- Beat the Eggs:
- In a large mixing bowl, beat the eggs thoroughly and season with a bit more salt. Add the cooked potatoes and onions to the eggs and mix well, guaranteeing the potatoes are well-coated with the egg mixture.
- Cook the Tortilla:
- Reheat the oil in the pan over medium heat. Pour the egg, potato, and onion mixture back into the pan. Cook for about 6-8 minutes until the bottom is set and the edges begin to firm up.
- Flip the Tortilla:
- Carefully place a large plate over the pan and flip the tortilla onto it. Slide the tortilla back into the pan, uncooked side down. Cook for another 4-6 minutes until the tortilla is fully set and lightly golden.
- Serve:
- Once cooked, slide the tortilla onto a serving plate. Allow it to cool for a few minutes before slicing into wedges. Serve warm or at room temperature.
Extra Tips:
For the best results, use a non-stick pan to guarantee easy flipping and prevent sticking. If you’re new to flipping, you may want to practice with a smaller amount first.
Allowing the tortilla to rest for a few minutes before slicing helps it to set further, making it easier to cut cleanly. Feel free to experiment with additional ingredients such as bell peppers, ham, or cheese to customize your tortilla.
Gazpacho Andaluz
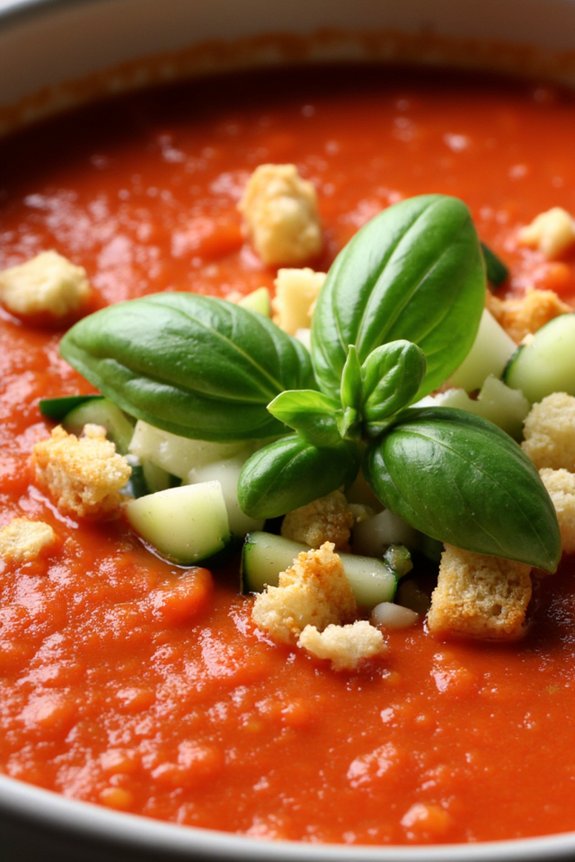
Gazpacho Andaluz is a classic cold soup originating from the southern region of Spain, known as Andalusia. This invigorating dish is particularly popular in the summer months, as it offers a cool respite from the heat.
Traditionally, Gazpacho Andaluz is made with ripe tomatoes, cucumbers, bell peppers, onions, garlic, and stale bread, all blended together with olive oil, vinegar, and seasoning. The result is a smooth, vibrant soup that embodies the flavors of fresh produce and the rich history of Spanish cuisine.
Perfect for festive gatherings or a light meal, this dish is both nutritious and easy to prepare. With a serving size suited for 4-6 people, Gazpacho Andaluz can be made ahead of time, allowing the flavors to meld together beautifully.
It’s often served with a variety of garnishes, such as diced vegetables or croutons, adding a delightful textural contrast. Whether enjoyed as a starter or a main course, this Spanish classic is sure to impress with its simplicity and robust flavor profile.
Ingredients for Gazpacho Andaluz (Serving Size: 4-6)
- 1 kg ripe tomatoes
- 1 cucumber, peeled and chopped
- 1 green bell pepper, seeded and chopped
- 1 small red onion, chopped
- 2 cloves of garlic
- 2 slices of stale bread, crusts removed
- 3 tablespoons extra virgin olive oil
- 2 tablespoons red wine vinegar
- 1 teaspoon salt
- 1/4 teaspoon ground black pepper
- 1 cup cold water
- Optional garnishes: diced cucumber, diced bell peppers, croutons, fresh basil leaves
Cooking Instructions
- Prepare the Vegetables: Start by washing the tomatoes, cucumber, and bell pepper thoroughly. Chop them into large chunks and place them in a blender or food processor. Add the chopped onion and garlic cloves.
- Soak the Bread: Tear the stale bread into smaller pieces and soak them in a little cold water for a few minutes until soft. Squeeze out the excess water and add the bread to the blender with the vegetables.
- Blend the Ingredients: Add the olive oil, red wine vinegar, salt, and black pepper to the blender. Blend all the ingredients on high speed until the mixture becomes smooth and well combined. If the mixture seems too thick, add cold water gradually until the desired consistency is achieved.
- Chill the Soup: Pour the blended mixture into a large bowl or pitcher. Cover and refrigerate for at least 2 hours or until thoroughly chilled. This chilling time allows the flavors to develop and intensify.
- Serve and Garnish: Before serving, taste the gazpacho and adjust seasoning if necessary. Pour into bowls and garnish with your choice of diced cucumber, bell peppers, croutons, or fresh basil leaves for added texture and flavor.
Extra Tips
For the best flavor, use the ripest tomatoes you can find, as they’re the star ingredient of this dish. If you prefer a smoother texture, you can strain the gazpacho through a fine sieve after blending to remove any remaining solids.
Additionally, Gazpacho Andaluz can be made a day in advance, allowing the flavors to meld even more. Just give it a good stir before serving. If you like a bit of heat, consider adding a pinch of cayenne pepper or a splash of hot sauce to the mix.
Enjoy this delightful dish as an invigorating appetizer or a light meal on a warm day.
Jamón Ibérico With Pan Con Tomate
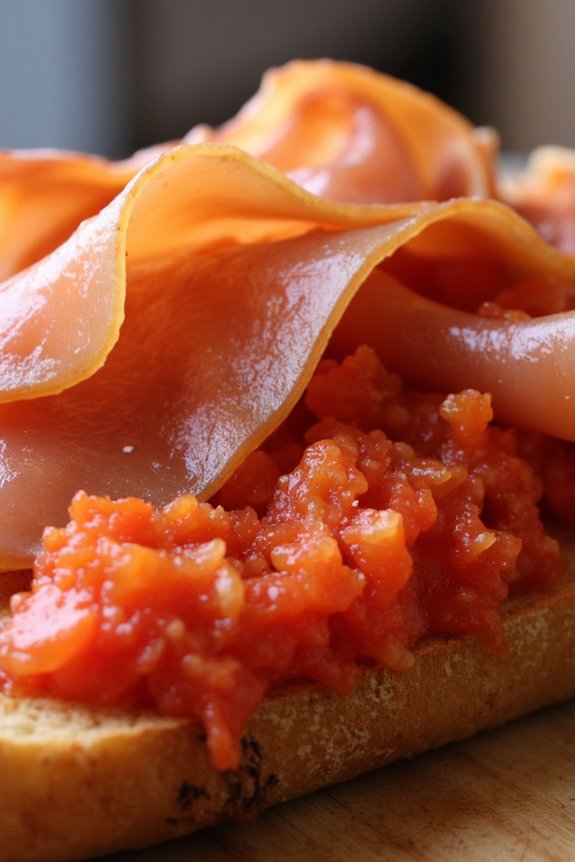
Jamón Ibérico With Pan Con Tomate is a classic Spanish appetizer that beautifully marries the rich, nutty flavors of Jamón Ibérico with the fresh, tangy taste of tomato-rubbed grilled bread. This dish exemplifies simplicity and sophistication, making it an ideal choice for festive celebrations or intimate gatherings.
The succulent slices of Jamón Ibérico are the star of the show, providing a melt-in-your-mouth experience that’s perfectly complemented by the rustic crunch and slight acidity of the pan con tomate. Not only is this dish a feast for the taste buds, but it also offers a stunning visual appeal with its vibrant colors and artful presentation.
Originating from the region of Catalonia, Pan Con Tomate is a demonstration of the ingenuity of Spanish cuisine, where minimal ingredients are transformed into a culinary delight. The key to this dish lies in the quality of its components; ripe tomatoes, excellent extra virgin olive oil, and authentic Jamón Ibérico are non-negotiable.
When served together, these components create a harmonious blend of flavors and textures that are both satisfying and unforgettable. Perfect for serving 4-6 people, this recipe will help you bring a taste of Spain to your festive table.
Ingredients (Serves 4-6):
- 12 slices of high-quality Jamón Ibérico
- 1 large baguette or rustic bread loaf
- 3 ripe tomatoes
- 2 cloves of garlic
- Extra virgin olive oil
- Salt to taste
- Freshly ground black pepper (optional)
Cooking Instructions:
- Prepare the Bread: Start by slicing the baguette or rustic bread into 12 slices, about 1/2 inch thick. You can adjust the thickness according to your preference, but thinner slices will crisp up nicely.
- Grill the Bread: Preheat a grill pan over medium heat. Grill the bread slices for about 2-3 minutes on each side until they’re golden and slightly charred. This will give the bread a delightful crunch and enhance the overall texture of the dish.
- Prepare the Tomato Mixture: Cut the tomatoes in half and grate them using a box grater. Discard the skins. Place the grated tomato in a bowl and add a generous drizzle of extra virgin olive oil and a pinch of salt. Mix well to combine.
- Prepare the Garlic: Peel the garlic cloves and slice them in half. Rub the cut side of the garlic on each slice of grilled bread. This imparts a subtle garlic flavor without overpowering the dish.
- Assemble the Pan Con Tomate: Spoon the tomato mixture generously onto each slice of garlic-rubbed bread. Make sure each piece is well-covered, but not soggy.
- Add the Jamón Ibérico: Carefully place a slice of Jamón Ibérico on top of the tomato-covered bread. The heat from the bread will slightly melt the fat in the ham, enhancing its flavor.
- Final Touches: Drizzle a little more extra virgin olive oil over the assembled pan con tomate with jamón. Optionally, add a sprinkle of freshly ground black pepper for additional flavor.
Extra Tips:
For the best results, use the highest quality ingredients you can find. The flavor of Jamón Ibérico varies depending on the region and aging process, so choose a reputable source.
When selecting tomatoes, opt for ripe, juicy ones as they’ll produce a richer, more flavorful tomato mixture. If you prefer a smokier flavor, consider lightly toasting the bread over a charcoal grill.
Finally, serve this dish immediately after assembling to enjoy the perfect balance of textures and flavors.
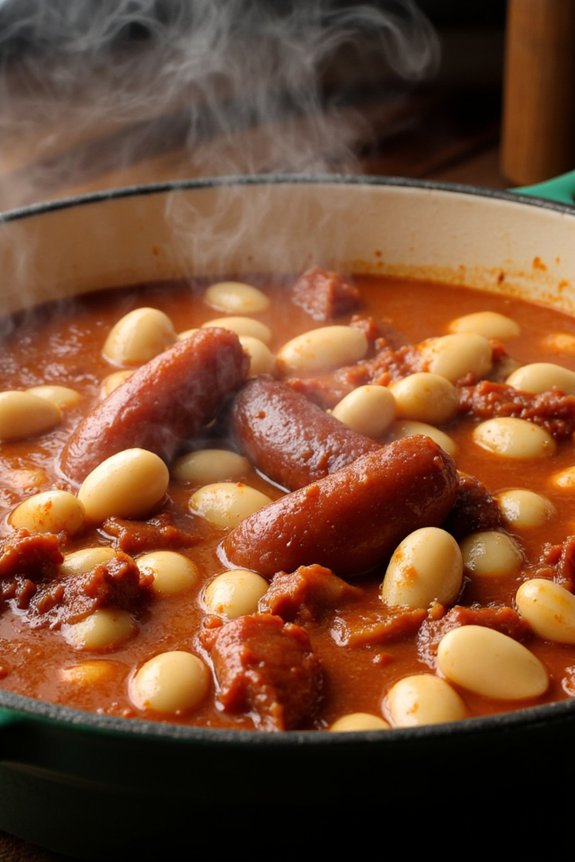
Chorizo a La Sidra

Chorizo a La Sidra is a classic Spanish dish that combines the rich, spicy flavors of chorizo sausage with the crisp, tart notes of apple cider. This dish is a staple at many Spanish celebrations and is known for its simplicity and bold taste. It’s the perfect appetizer to share with friends and family during festive gatherings. The cider not only adds a unique depth of flavor but also helps to tenderize the chorizo, making it even more succulent and flavorful.
Traditionally served warm, Chorizo a La Sidra is best enjoyed with crusty bread to soak up the delicious sauce. The preparation is straightforward, allowing the quality of the ingredients to shine through. This dish is a great way to introduce your guests to the authentic flavors of Spain, and with just a few steps, you can bring this festive Spanish celebration recipe to your own table.
Ingredients for 4-6 servings:
- 500 grams of Spanish chorizo sausage
- 500 ml of natural apple cider
- 2 tablespoons of olive oil
- 1 bay leaf
- Fresh parsley for garnish (optional)
Cooking Instructions:
- Prepare the Chorizo: Begin by slicing the chorizo into thick rounds, approximately 1/2 inch thick. This size guarantees the chorizo cooks evenly and allows the cider to penetrate each piece, enhancing the flavor.
- Heat the Oil: In a large skillet or frying pan, heat the olive oil over medium heat. The oil will help to sear the chorizo, giving it a slightly crispy exterior while keeping the inside juicy.
- Cook the Chorizo: Add the sliced chorizo to the pan in a single layer. Cook for about 3-4 minutes on each side, or until the chorizo pieces are browned and have released some of their oils.
- Add the Cider: Pour the apple cider into the pan with the chorizo. Add the bay leaf for additional aroma and a subtle layer of flavor. Increase the heat to bring the mixture to a gentle simmer.
- Simmer the Dish: Allow the chorizo to simmer in the cider for about 15-20 minutes. This will reduce the cider, intensifying its flavor and allowing it to infuse into the chorizo. Stir occasionally to confirm even cooking.
- Serve: Once the cider has reduced to a thick, syrupy consistency and the chorizo is fully cooked, remove the bay leaf and transfer the dish to a serving platter. Garnish with freshly chopped parsley if desired.
Extra Tips:
For the best results, use high-quality Spanish chorizo, as its flavor and texture are key to the success of this dish. If you prefer a milder taste, you can opt for sweet chorizo instead of the spicy variety.
When selecting the cider, choose a natural apple cider with no added sugars to maintain the traditional taste. Remember, the key to this dish is allowing the cider to reduce sufficiently, so don’t rush this process; patience will reward you with a richly flavored sauce that perfectly complements the chorizo.
Serve it immediately for the best taste and texture.
Albondigas En Salsa
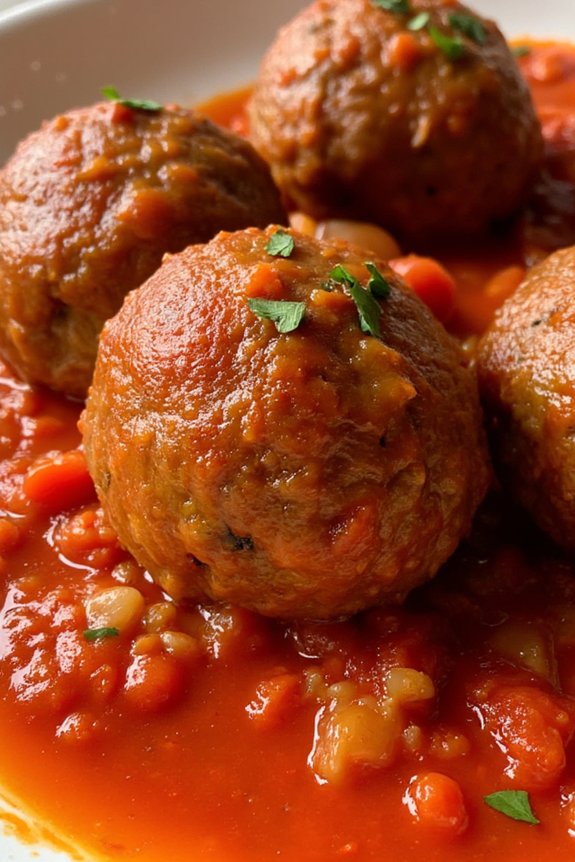
Albondigas En Salsa, a classic Spanish dish, is a delightful combination of succulent meatballs simmered in a rich, flavorful tomato sauce. This dish is a staple in many festive Spanish celebrations, offering a comforting and hearty meal that brings people together.
The meatballs, or “albondigas,” are typically made from a mixture of ground meat, breadcrumbs, and spices, creating a tender and moist texture. The sauce, infused with garlic, onions, and a hint of paprika, adds depth and warmth to the dish.
Preparing Albondigas En Salsa is a perfect way to introduce a taste of Spain to your festive celebrations. The dish is both satisfying and crowd-pleasing, making it an ideal choice for gatherings with family and friends.
With this recipe, you can easily serve a group of 4-6 people, guaranteeing everyone gets to enjoy this Spanish culinary delight. Follow the instructions below to recreate this traditional recipe in your own kitchen and bring a festive Spanish flavor to your table.
Ingredients for 4-6 Servings:
- 500g ground beef or pork (or a mix of both)
- 1/2 cup breadcrumbs
- 1/4 cup milk
- 1 egg
- 2 cloves garlic, minced
- 1 teaspoon salt
- 1/2 teaspoon black pepper
- 1 teaspoon dried oregano
- 1/2 teaspoon smoked paprika
- 1/4 cup chopped fresh parsley
- 2 tablespoons olive oil
- 1 onion, finely chopped
- 1 can (400g) crushed tomatoes
- 1/2 cup beef or chicken broth
- 1 bay leaf
- 1/2 teaspoon sugar
Cooking Instructions:
1. Prepare the Meatball Mixture: In a large mixing bowl, combine the ground meat, breadcrumbs, milk, egg, minced garlic, salt, black pepper, oregano, smoked paprika, and chopped parsley. Mix well until all ingredients are thoroughly combined.
Form the mixture into small, evenly-sized meatballs, about 1 inch in diameter.
2. Brown the Meatballs: Heat the olive oil in a large skillet over medium heat. Add the meatballs in batches, taking care not to overcrowd the pan. Brown the meatballs on all sides for about 5-7 minutes, then remove them from the skillet and set aside. They don’t need to be fully cooked at this stage.
3. Cook the Sauce: In the same skillet, add the finely chopped onion and sauté until it becomes translucent, about 5 minutes. Add the crushed tomatoes, beef or chicken broth, bay leaf, and sugar. Stir to combine the ingredients.
4. Simmer the Meatballs: Return the browned meatballs to the skillet, nestling them into the sauce. Cover the skillet and let the meatballs simmer over low heat for 25-30 minutes, or until they’re cooked through and the sauce has thickened.
5. Serve: Remove the bay leaf and transfer the Albondigas En Salsa to a serving dish. Garnish with additional fresh parsley if desired. Serve warm with crusty bread or over a bed of rice, if preferred.
Extra Tips:
When making Albondigas En Salsa, it’s vital to ascertain that the meatball mixture is well-combined but not overworked, as this can lead to dense meatballs.
For an extra layer of flavor, consider adding a pinch of cayenne pepper for a subtle kick. If you have time, allowing the meatball mixture to rest in the refrigerator for about 30 minutes before forming the balls can help the flavors meld together beautifully.
Additionally, if the sauce seems too thick, you can adjust the consistency by adding a bit more broth. Enjoy bringing a touch of Spanish festivity to your table with this delicious dish!
Pimientos De Padrón
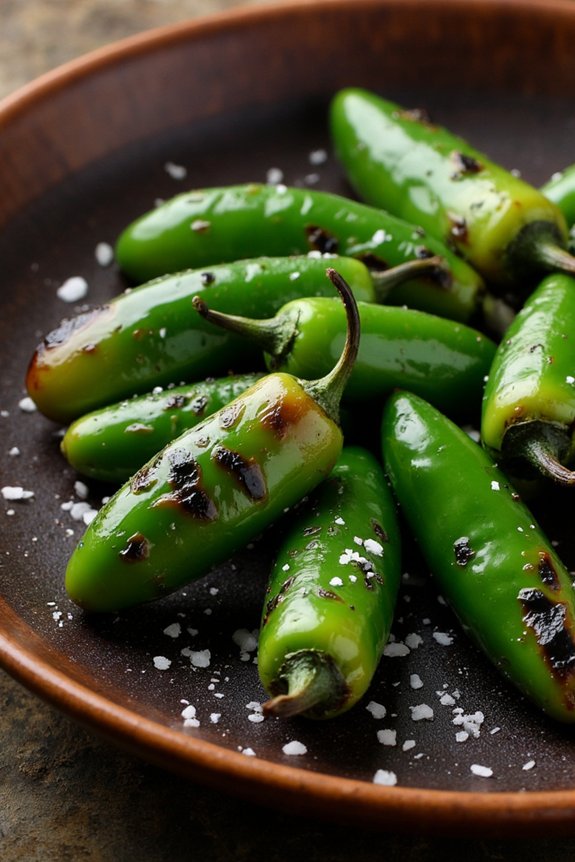
Pimientos de Padrón are a traditional Spanish tapas dish that brings a burst of flavor and excitement to any festive celebration. These small, green peppers are a staple in Spanish cuisine, offering a delightful combination of smokiness and mild heat. Originating from the Galicia region, Pimientos de Padrón are known for their unique characteristic where most peppers are mild, but occasionally you get one with a surprising kick of heat. This makes the dish not only delicious but also a fun culinary adventure.
Perfect as an appetizer or a side dish, Pimientos de Padrón are incredibly easy to prepare and require minimal ingredients. The key to this dish is the quality of the peppers and the simplicity of the cooking process, which allows the natural flavors to shine. Served warm with a sprinkle of flaky sea salt, these peppers are perfect for sharing among friends and family, creating a communal and festive atmosphere.
Ingredients (Serves 4-6):
- 500 grams of Pimientos de Padrón
- 2 tablespoons of extra virgin olive oil
- Flaky sea salt to taste
Cooking Instructions:
- Preparation: Start by rinsing the Pimientos de Padrón under cold water to remove any dirt. Pat them dry thoroughly using a clean kitchen towel or paper towels. Making sure the peppers are dry will help them blister nicely when cooking.
- Heating the Pan: Place a large skillet or frying pan over medium-high heat. Allow the pan to heat for a few minutes until it’s hot. This step is essential as it helps the peppers to blister quickly, locking in their flavors.
- Cooking the Peppers: Add the olive oil to the heated pan. Once the oil is shimmering, add the Pimientos de Padrón in a single layer. It’s important not to overcrowd the pan, so if necessary, cook the peppers in batches.
- Blistering: Cook the peppers for about 5-7 minutes, stirring occasionally. You want the skins to blister and char slightly, but be careful not to burn them. The peppers should become tender and soften as they cook.
- Seasoning: Once the peppers are evenly blistered, transfer them to a serving plate. Immediately sprinkle with flaky sea salt to taste. The salt enhances the natural flavors of the peppers and adds a delightful crunch.
- Serving: Serve the Pimientos de Padrón warm, as they’re best enjoyed immediately after cooking to appreciate their full flavor and texture.
Extra Tips:
When purchasing Pimientos de Padrón, look for firm, vibrant green peppers without any blemishes. If you can, buy them fresh from a local market to guarantee the best quality.
While the peppers are generally mild, one in every ten can be spicy, so be prepared for a surprise now and then. If you prefer a less intense heat, you can remove the seeds before cooking, though traditionally, the peppers are cooked whole.
Finally, feel free to experiment by adding a squeeze of lemon juice or a dash of smoked paprika for an extra layer of flavor. Enjoy this simple yet delicious dish as part of your festive Spanish celebration!
Fabada Asturiana
The key to an authentic Fabada Asturiana lies in the quality of its ingredients. Opt for the best Spanish sausages and the freshest beans you can find to capture the genuine taste of this iconic stew.
While the preparation requires a bit of time, the end result is a flavorful and satisfying meal that’s worth every minute spent in the kitchen. Perfect for serving 4-6 people, this dish is best enjoyed with crusty bread and a glass of red wine.
Ingredients:
- 500g dried large white beans (fabes)
- 2 chorizo sausages
- 2 morcilla (Spanish blood sausages)
- 200g pancetta or unsmoked bacon
- 1 medium onion, peeled and halved
- 2 bay leaves
- 4 cloves of garlic, peeled
- 1 teaspoon sweet paprika
- Salt to taste
- Black pepper to taste
- Water or chicken broth
Cooking Instructions:
1. Preparation of Beans: Begin by soaking the dried beans in a large bowl of cold water overnight, or for at least 8 hours. This will help the beans to soften and reduce cooking time.
Drain and rinse the beans before proceeding with the recipe.
2. Initial Cooking: Place the soaked beans in a large pot. Add enough water or chicken broth to cover the beans by about 2 inches. Add the onion halves, bay leaves, and garlic cloves to the pot.
Bring to a boil over medium-high heat.
3. Add Meats: Once the beans begin to boil, reduce the heat to low and add the chorizo, morcilla, and pancetta to the pot. If the water level drops too low, add more water or broth as needed to keep the ingredients submerged.
4. Seasoning: Add the sweet paprika to the pot. Season with salt and black pepper to taste. Stir gently to combine, taking care not to break the beans.
5. Simmer: Cover the pot and allow the stew to simmer gently for about 2-3 hours, or until the beans are tender and the flavors have melded together.
Stir occasionally and check the liquid level, adding more water or broth if necessary.
6. Final Touches: Once the beans are fully cooked and the meat is tender, remove the onion, bay leaves, and garlic cloves from the pot. Adjust seasoning if necessary.
7. Serve: Transfer the Fabada Asturiana to a serving dish and serve hot, accompanied by crusty bread for dipping.
Extra Tips: For an even richer flavor, consider preparing the Fabada Asturiana a day in advance. Allowing the stew to rest overnight enhances the flavors, making it even more delectable.
When reheating, do so gently over low heat to maintain the texture of the beans. Additionally, if you prefer a less fatty version, you can skim off any excess fat that rises to the surface during cooking.
Enjoy this traditional Spanish dish with a group of friends or family for a truly festive experience.
Pulpo a La Gallega

Pulpo a La Gallega, also known as Galician-style octopus, is a traditional Spanish dish that hails from the region of Galicia. This simple yet flavorful dish highlights the natural taste of octopus, which is boiled to tender perfection and then seasoned with paprika, olive oil, and salt.
Typically served on wooden platters, Pulpo a La Gallega is a favorite at Spanish festivals and gatherings, where it’s often enjoyed with a side of crusty bread and a glass of Albariño wine.
The key to mastering Pulpo a La Gallega lies in the preparation of the octopus. It’s essential to achieve the perfect texture, ensuring the octopus is neither too chewy nor too soft. This dish is a celebration of simplicity, using minimal ingredients to enhance the natural flavors of the octopus.
When prepared correctly, it offers a delightful combination of tender octopus with a smoky, slightly spicy finish from the paprika.
Ingredients for 4-6 servings:
- 2 kg (4.4 lbs) octopus, cleaned
- 2 bay leaves
- 1 large onion, peeled and halved
- 4 medium potatoes, peeled and sliced into ½-inch rounds
- 4 tablespoons extra virgin olive oil
- 2 teaspoons sweet Spanish paprika (pimentón dulce)
- 1 teaspoon hot Spanish paprika (pimentón picante)
- Coarse sea salt to taste
Cooking Instructions:
- Prepare the Octopus: Clean the octopus thoroughly under cold running water. Remove the beak and the eyes, if not done already by the fishmonger.
- Tenderize the Octopus: Bring a large pot of water to a rolling boil. Add the bay leaves and onion. Holding the octopus by the head, dip it into the boiling water three times, allowing the tentacles to curl each time. This helps tenderize the octopus.
- Cook the Octopus: Submerge the octopus completely in the water, reduce the heat to a simmer, and cover. Cook gently for about 40-45 minutes, or until the octopus is tender when pierced with a fork.
- Cook the Potatoes: In a separate pot, boil the sliced potatoes until they’re fork-tender, about 15-20 minutes. Drain and set aside.
- Slice the Octopus: Once cooked, remove the octopus from the water and let it cool slightly. Slice the tentacles into ½-inch thick rounds.
- Assemble the Dish: Arrange the potato slices on a wooden platter or large serving dish. Place the octopus slices on top of the potatoes.
- Seasoning: Drizzle the octopus and potatoes with extra virgin olive oil. Sprinkle generously with sweet and hot paprika, and finish with a touch of coarse sea salt.
- Serve: Serve immediately while warm, accompanied by crusty bread and a glass of white wine.
Extra Tips:
To enhance the flavor of Pulpo a La Gallega, consider using a mixture of sweet and smoked paprika for an added depth of flavor.
If you prefer a spicier dish, adjust the amount of hot paprika to your taste. When boiling the octopus, avoid adding salt to the water as it can toughen the meat. Instead, season the dish at the end to bring out the natural flavors.
It’s also recommended to let the octopus rest for a few minutes after cooking to allow the flavors to meld. Enjoy this traditional Spanish dish as part of a festive meal or a special occasion.
Empanadas Gallegas
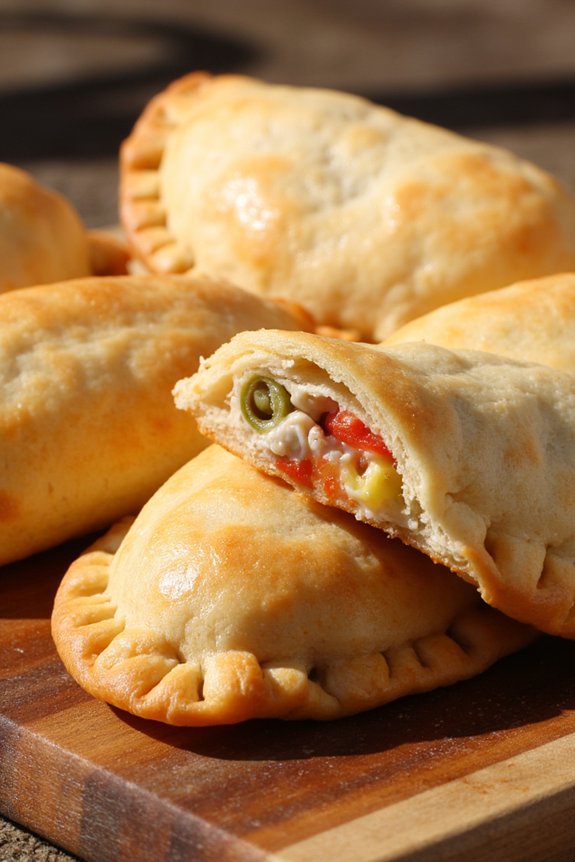
Empanadas Gallegas are a traditional dish from Galicia, a region in the northwest of Spain. These savory pastries are known for their deliciously flaky crust and flavorful fillings, which can vary depending on personal preferences. The most common fillings include a mix of meats, fish, and vegetables, all seasoned with a blend of spices that bring out the bold Spanish flavors.
Empanadas Gallegas are perfect for festive celebrations, as they can be made in large batches and served as a delightful appetizer or main course. This recipe will guide you through making Empanadas Gallegas for a serving size of 4-6 people. The process involves preparing both the pastry dough and the filling, which can be customized to your tastes.
Whether you’re celebrating a Spanish holiday or simply want to bring a taste of Galicia to your table, these empanadas are bound to impress your family and friends with their rich and satisfying flavors.
Ingredients:
- 4 cups all-purpose flour
- 1/2 cup olive oil
- 1/2 cup warm water
- 1 teaspoon salt
- 1 egg, beaten (for egg wash)
- 1 pound chicken breast, diced
- 1 large onion, finely chopped
- 1 red bell pepper, chopped
- 3 cloves garlic, minced
- 1 teaspoon smoked paprika
- 1/2 teaspoon saffron threads
- 1/2 cup tomato puree
- Salt and pepper to taste
- 2 tablespoons olive oil (for filling)
- 1/2 cup green olives, sliced
Instructions:
- Prepare the Dough:
- In a large mixing bowl, combine the all-purpose flour and salt. Gradually add the olive oil and warm water to the dry ingredients, mixing until a smooth dough forms. Knead the dough for about 5 minutes on a floured surface until elastic and smooth.
- Cover with a damp cloth and let it rest for 30 minutes.
- Cook the Filling:
- Heat 2 tablespoons of olive oil in a large skillet over medium heat. Add the diced chicken breast and cook until browned and cooked through, approximately 5-7 minutes. Remove the chicken from the skillet and set aside.
- In the same skillet, add the onion, red bell pepper, and garlic. Sauté until the vegetables are soft and translucent. Stir in the smoked paprika, saffron, and tomato puree, cooking for another 2 minutes.
- Return the chicken to the skillet, add the sliced green olives, and season with salt and pepper to taste. Simmer for another 5 minutes, allowing the flavors to meld together. Remove from heat and let the filling cool slightly.
- Assemble the Empanadas:
- Preheat your oven to 375°F (190°C). Divide the rested dough into equal portions, rolling each into a ball. On a floured surface, roll out each dough ball into a circle, approximately 6 inches in diameter.
- Place a generous spoonful of the chicken filling onto one half of each dough circle. Fold the other half over the filling, pressing the edges together to seal. Use a fork to crimp the edges and guarantee they’re tightly sealed.
- Bake the Empanadas:
- Place the empanadas on a baking sheet lined with parchment paper. Brush the tops with the beaten egg for a golden finish. Bake in the preheated oven for 25-30 minutes, or until the pastry is golden brown and crispy. Allow to cool slightly before serving.
Extra Tips:
When making Empanadas Gallegas, you can experiment with different fillings such as tuna, chorizo, or even a vegetarian option with mushrooms and spinach.
If you prefer a spicier kick, consider adding a pinch of cayenne pepper or some chopped chili peppers to the filling. Additionally, ascertain that the filling isn’t too wet, as excess moisture can make the dough soggy.
For a more rustic look, try folding the edges of the empanadas in a pleated fashion instead of crimping with a fork. Enjoy these delicious pastries warm or at room temperature, as they make a delightful addition to any festive table!
Flan De Huevo
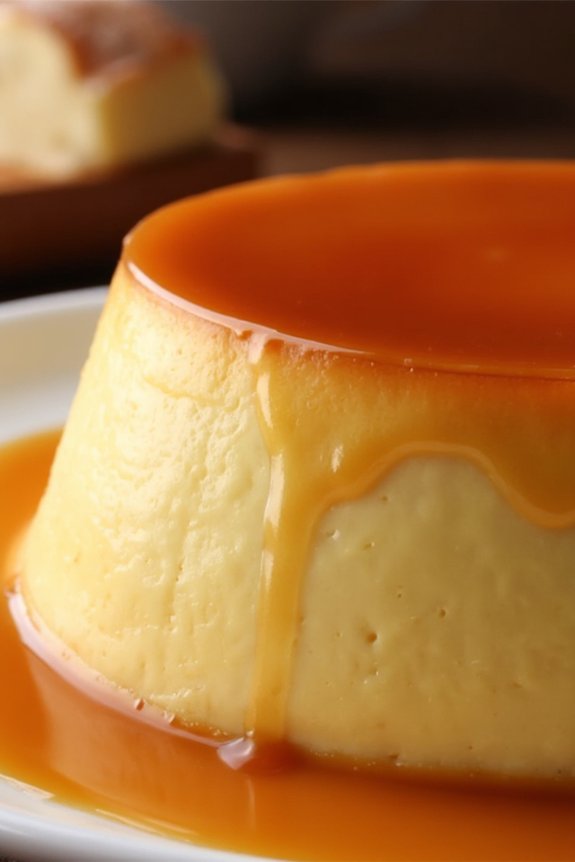
The origins of Flan De Huevo can be traced back to Roman times, but it became a beloved dessert in Spain, where each region has its own twist on the recipe.
Despite its elegant appearance, it’s incredibly easy to make at home with just a few basic ingredients. The key to a perfect flan is patience and precise timing to achieve that signature jiggle. For a serving size of 4-6 people, follow the instructions below to create this delectable dessert that will surely impress your guests.
Ingredients:
- 1 cup granulated sugar
- 6 large eggs
- 1 can (14 ounces) sweetened condensed milk
- 2 cups whole milk
- 1 tablespoon vanilla extract
Cooking Instructions:
1. Prepare the Caramel**: In a medium saucepan over medium heat, add the granulated sugar**. Stir constantly until the sugar melts completely and turns into a golden-brown caramel. Be careful not to burn it.
Once done, quickly pour the caramel into a round baking dish or individual ramekins, tilting them to evenly coat the bottom. Set aside to cool and harden.
2. Preheat the Oven: Preheat your oven to 350°F (175°C). Prepare a large baking dish with hot water for the bain-marie, which will help cook the flan evenly and prevent it from cracking.
3. Mix the Custard**: In a large bowl, whisk together the eggs until fully blended. Gradually add the sweetened condensed milk, whole milk, and vanilla extract**, continuing to whisk until all ingredients are well combined and the mixture is smooth.
4. Strain the Custard: For an extra smooth flan, strain the custard mixture through a fine-mesh sieve into a large measuring cup or bowl. This will remove any egg solids or bubbles, guaranteeing a silky texture.
5. Pour the Custard: Carefully pour the strained custard mixture over the hardened caramel in the baking dish or ramekins.
6. Bake the Flan: Place the filled baking dish or ramekins into the prepared bain-marie. The hot water should reach about halfway up the sides of the dish or ramekins.
Bake in the preheated oven for about 50-60 minutes, or until the flan is set but still slightly jiggly in the center.
7. Cool and Refrigerate: Remove the flan from the oven and bain-marie. Allow it to cool to room temperature, then cover and refrigerate for at least 4 hours, or overnight, to fully set and develop flavors.
8. Serve: To Serve, run a knife around the edges of the flan to loosen it. Carefully invert the baking dish or ramekins onto a serving plate, allowing the caramel sauce to flow over the top.
Extra Tips:
When preparing Flan De Huevo, the key is to keep a close eye on the caramel as it can go from golden to burnt quickly.
It’s also important to strain the custard mixture to guarantee a smooth texture without any egg lumps. If you’re using individual ramekins, check them a bit earlier as they may set faster than a single large dish.
Finally, always allow the flan to cool completely and chill thoroughly before serving for the best flavor and texture.
Tarta De Santiago
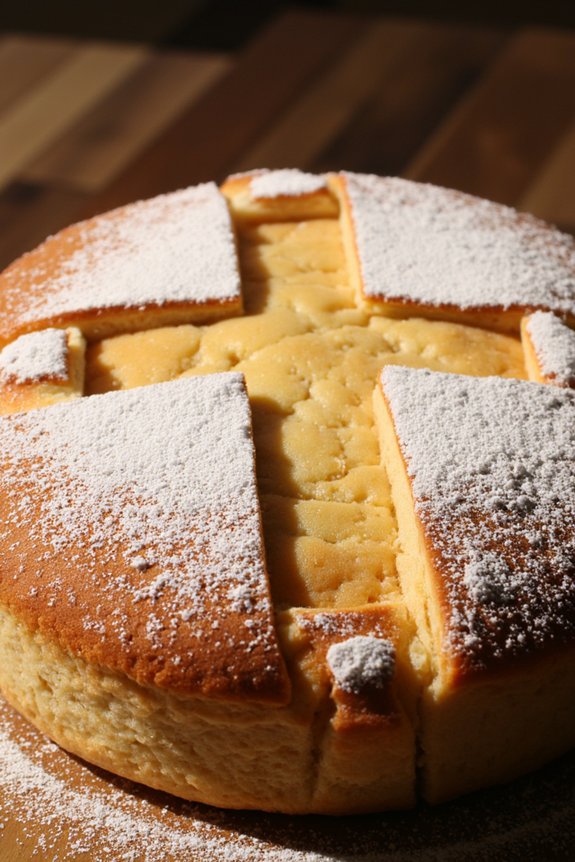
Tarta De Santiago is a traditional Spanish almond cake that originates from the region of Galicia. This delightful dessert, named after Saint James (Santiago), is renowned for its simple yet rich flavors. Typically served as a celebratory dish during the feast of Saint James, it holds a special place in Spanish culinary traditions.
The cake is characterized by its moist texture and the delicate almond flavor that’s perfectly complemented by a dusting of powdered sugar. It’s not only a treat for the taste buds but also a visual delight, often adorned with the Cross of Saint James stenciled on top.
This recipe for Tarta De Santiago serves 4-6 people, making it perfect for small gatherings or family celebrations. The cake is gluten-free, as it relies on ground almonds instead of flour, making it a great option for those with dietary restrictions. With minimal ingredients and straightforward preparation, this cake is both accessible to novice bakers and appealing to seasoned chefs looking for an authentic taste of Spain.
Ingredients:
- 250g almond meal (finely ground almonds)
- 250g granulated sugar
- 5 large eggs
- Zest of 1 lemon
- 1/2 teaspoon ground cinnamon
- Powdered sugar, for dusting
Instructions:
- Preheat and Prepare: Start by preheating your oven to 175°C (350°F). Grease a 9-inch (23 cm) springform pan with butter, then line the bottom with parchment paper for easy removal later.
- Combine Dry Ingredients: In a large mixing bowl, combine the almond meal, granulated sugar, lemon zest, and ground cinnamon. Mix well to ascertain the zest and cinnamon are evenly distributed throughout the almond meal.
- Beat the Eggs: In a separate bowl, beat the eggs using an electric mixer on medium speed until they become pale and slightly fluffy, which should take about 3-4 minutes.
- Incorporate Wet and Dry Mixtures: Gently fold the beaten eggs into the almond mixture. Use a spatula to combine them, being careful not to overmix, which could deflate the eggs.
- Pour and Bake: Pour the batter into the prepared pan, smoothing the top with a spatula. Bake in the preheated oven for about 35-40 minutes, or until the top is golden brown and a toothpick inserted into the center comes out clean.
- Cool and Decorate: Allow the cake to cool in the pan on a wire rack for 10 minutes. Then, remove the sides of the springform pan and let it cool completely. Once cooled, place a stencil of the Cross of Saint James on top and dust generously with powdered sugar. Carefully remove the stencil to reveal the cross pattern.
Extra Tips:
For the best results, use fresh, high-quality almonds and verify they’re finely ground to achieve the cake’s signature texture. If you can’t find almond meal, you can make your own by processing blanched almonds in a food processor until fine.
Be careful not to over-process, or you’ll end up with almond butter. Additionally, allow the cake to cool completely before applying the powdered sugar decoration to prevent it from melting into the cake. Enjoy your Tarta De Santiago with a dollop of whipped cream or a scoop of vanilla ice cream for an extra indulgent treat.
Churros Con Chocolate

Churros Con Chocolate is a quintessential Spanish treat, often enjoyed during festive celebrations or as a delightful snack. Originating from Spain, this dessert combines the crispy, golden churros with a rich, velvety chocolate dipping sauce. The churros, made with a simple dough, are deep-fried to perfection and then dusted with sugar and cinnamon, creating a sweet and crunchy exterior. The accompanying chocolate sauce is typically thick and luscious, making it the perfect companion to the churros, offering a satisfying contrast of textures and flavors.
This recipe for Churros Con Chocolate serves 4-6 people, making it an ideal choice for family gatherings or small parties. It’s a dish that’s not only delicious but also fun to make, as the process of piping and frying the churros can be a delightful activity to share with others. The key to mastering this dish is to guarantee the churros are crispy yet tender, and the chocolate sauce is smooth and rich. With the right balance of ingredients and techniques, you’ll be able to recreate this Spanish classic in your own kitchen.
Ingredients:
*For the Churros:*
- 1 cup water
- 2 tablespoons sugar
- 1/2 teaspoon salt
- 2 tablespoons vegetable oil
- 1 cup all-purpose flour
- Vegetable oil, for frying
- 1/2 cup sugar
- 1 teaspoon ground cinnamon
For the Chocolate Sauce:
- 1 1/2 cups whole milk
- 1 tablespoon cornstarch
- 4 ounces dark chocolate, chopped
- 1 tablespoon sugar
- A pinch of salt
Cooking Instructions:
1. Prepare the Churro Dough:
In a medium saucepan, combine the water, 2 tablespoons of sugar, salt, and 2 tablespoons of vegetable oil. Bring the mixture to a boil, then remove it from the heat. Stir in the flour until the mixture forms a ball.
2. Heat the Oil:
Heat the vegetable oil in a deep frying pan or pot to 375°F (190°C). The oil should be deep enough to submerge the churros completely.
3. Pipe the Churros:
Transfer the churro dough to a pastry bag fitted with a large star tip. Pipe strips of dough (about 4 inches long) directly into the hot oil, using a pair of scissors to cut the dough from the piping bag.
4. Fry the Churros:
Fry the churros until golden brown, about 2-3 minutes per side. Remove them from the oil using a slotted spoon and drain on paper towels.
5. Coat the Churros:
In a shallow dish, mix 1/2 cup of sugar with 1 teaspoon of cinnamon. Roll the warm churros in the cinnamon-sugar mixture until fully coated.
6. Make the Chocolate Sauce:
In a small saucepan, whisk together the milk and cornstarch until smooth. Add the chopped chocolate, sugar, and salt, and heat over medium heat, stirring constantly until the chocolate is melted and the sauce has thickened.
7. Serve:
Serve the churros warm with the chocolate sauce on the side for dipping.
Extra Tips:
When making churros, it’s important to monitor the oil temperature closely. If the oil is too hot, the churros will brown too quickly on the outside while remaining doughy inside. Conversely, if the oil isn’t hot enough, the churros can become greasy.
Additionally, for a smoother chocolate sauce, be sure to stir the mixture continuously while melting the chocolate to prevent it from burning or clumping. Enjoy this delicious treat fresh, as churros are best when enjoyed immediately after frying.
Crema Catalana
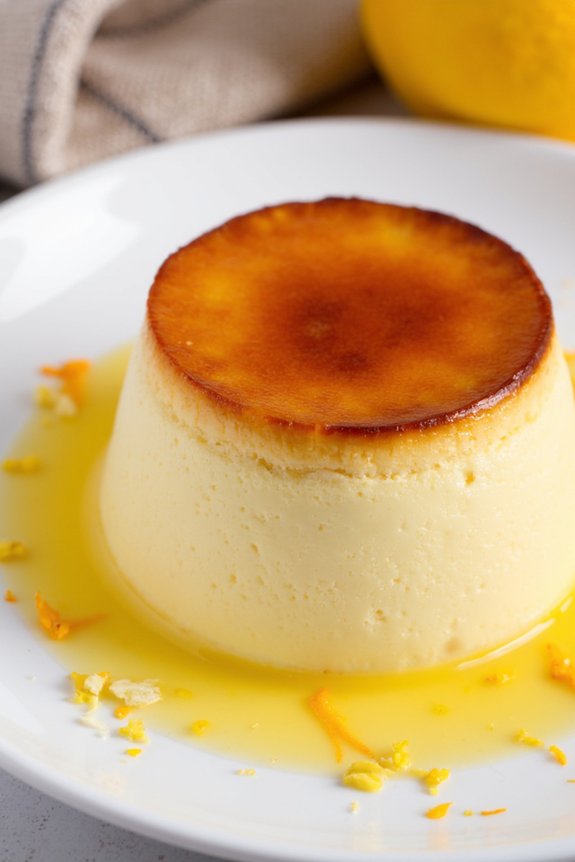
This dessert is perfect for those who enjoy a creamy texture with a hint of zest and spice. It’s a simple yet elegant dish that can be prepared ahead of time, making it an excellent choice for entertaining guests.
The key to mastering Crema Catalana is to guarantee the custard is smooth and not overcooked, and the sugar is caramelized to a perfect golden brown. Serve this delightful dessert to a group of 4-6 people and watch as it becomes a highlight of your festive celebration.
Ingredients (Serves 4-6):
- 1 liter whole milk
- 1 cinnamon stick
- Zest of 1 lemon
- Zest of 1 orange
- 8 egg yolks
- 200 grams granulated sugar (plus extra for caramelizing)
- 40 grams cornstarch
Cooking Instructions:
- Infuse the Milk: In a medium saucepan, combine the whole milk, cinnamon stick, lemon zest, and orange zest. Heat the mixture over medium heat until it’s just about to simmer. Remove from heat and let it sit for about 10 minutes to allow the flavors to infuse.
- Prepare the Egg Mixture: In a large mixing bowl, whisk together the egg yolks and 200 grams of granulated sugar until the mixture is pale and creamy. Add the cornstarch and whisk until fully incorporated.
- Combine and Cook: Slowly strain the infused milk into the egg mixture, stirring continuously to prevent the eggs from cooking. Once combined, pour the mixture back into the saucepan and cook over low heat. Stir consistently with a wooden spoon until the mixture thickens enough to coat the back of the spoon (do not let it boil).
- Chill the Custard: Remove from heat and discard the cinnamon stick and zest. Pour the custard into individual ramekins. Allow it to cool to room temperature, then cover with plastic wrap and refrigerate for at least 4 hours or until set.
- Caramelize the Sugar: Just before serving, sprinkle a thin, even layer of granulated sugar over each custard. Using a kitchen torch, carefully caramelize the sugar until it’s golden and crisp. Allow the sugar to harden for a minute before serving.
Extra Tips:
For an even smoother custard, strain the egg mixture through a fine-mesh sieve before cooking it on the stove.
When caramelizing the sugar, keep the torch moving to avoid burning and creating a bitter taste. If you don’t have a kitchen torch, you can caramelize the sugar under a hot broiler, but keep an eye on it to prevent burning.
Enjoy your Crema Catalana as a delightful end to your festive meal!